Introduction to this section:
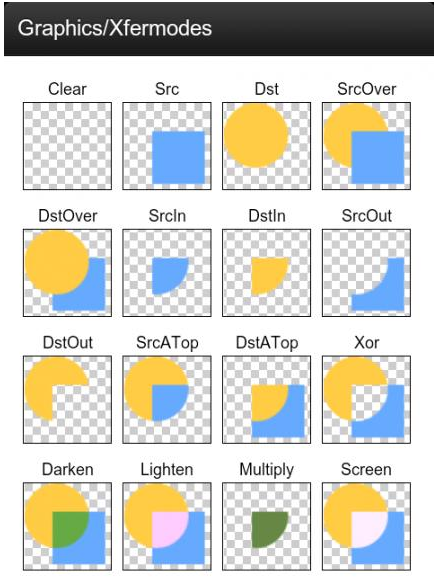
Alright, in the previous section, we wrote another example of Xfermode image blending — a demo of erasing a beautiful woman's clothes. Along with the earlier use of Xfermode to implement rounded or circular ImageViews, I believe everyone is no longer as unfamiliar with Xfermode as before, or rather, somewhat familiar with it. Okay, in this section we will write the last example of Xfermode, using Xfermode's PorterDuff.SRC_INmode to implement a text loading effect! We still need to paste PorterDuff's mode diagram:
This section's example is referenced from:Android Paint's setXfermode PorterDuffXfermode explanationOkay, without further ado, let's begin the content of this section~
1. Target effect image and implementation process analysis:
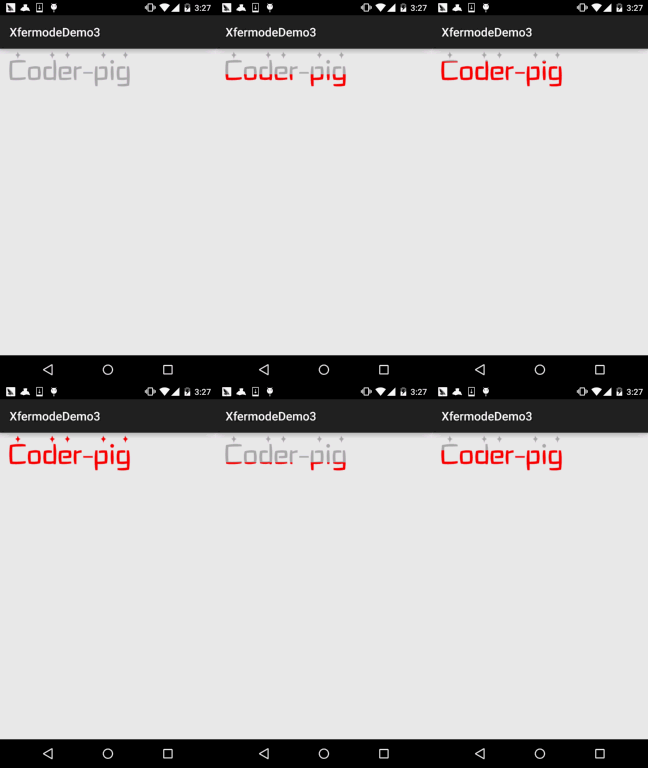
Target effect image:
Implementation process analysis:
Step 1.First, a text image (transparent background)
Step 2.Initialize the Paint, background image (DST), and rectangle Rect (SRC)
Step 3.First save the layer, then draw the background image, set the blending mode, then draw the Rect, clear the blending mode, then restore the saved layer, finally modify the height of the Rect area, and call invalidate() to make the View redraw!
If the process analysis is a bit confusing, just look at the code, it's super simple~
2. Code implementation:
First, the screen utility class, ScreenUtil.java, won't be posted here; it was posted in previous sections! Then our custom View class:LoadTextView.java:
/**
 * Created by Jay on 2015/10/26 0026.
 */
public class LoadTextView extends View {

    private PorterDuffXfermode mXfermode = new PorterDuffXfermode(PorterDuff.Mode.SRC_IN);
    private Bitmap backBitmap;
    private Paint mPaint;
    private int mBitW, mBitH;
    private int mCurW, mCurH, mCurTop;
    private Rect mDynamicRect;

    public LoadTextView(Context context) {
        this(context, null);
    }
    public LoadTextView(Context context, AttributeSet attrs) {
        super(context, attrs);
        mCurW = ScreenUtil.getScreenW(context);
        mCurH = ScreenUtil.getScreenH(context);
        init();
    }
    public LoadTextView(Context context, AttributeSet attrs, int defStyleAttr) {
        super(context, attrs, defStyleAttr);
    }


    private void init() {
        //画笔初始化:
        mPaint = new Paint(Paint.ANTI_ALIAS_FLAG);
        mPaint.setFilterBitmap(true);
        mPaint.setDither(true);
        mPaint.setColor(Color.RED);
        //背部图片的初始化
        backBitmap = BitmapFactory.decodeResource(getResources(), R.mipmap.img_string);
        mBitH = backBitmap.getHeight();
        mBitW = backBitmap.getWidth();
        //设置当前的高度
        mCurTop = mBitH;
        mDynamicRect = new Rect(0, mBitH, mBitW, mBitH);  //初始化原图
    }


    @Override
    protected void onDraw(Canvas canvas) {
        super.onDraw(canvas);
        int saveLayerCount = canvas.saveLayer(0, 0, mCurW, mCurH, mPaint, Canvas.ALL_SAVE_FLAG);
        canvas.drawBitmap(backBitmap, 0, 0, mPaint);// 绘制目标图
        mPaint.setXfermode(mXfermode);    //设置混排模式
        canvas.drawRect(mDynamicRect, mPaint);   //绘制源图
        mPaint.setXfermode(null);         //清除混排模式
        canvas.restoreToCount(saveLayerCount);    //恢复保存的图层
        // 改变Rect区域,假如
        mCurTop -= 2;
        if (mCurTop <= 0) {
            mCurTop = mBitH;
        }
        mDynamicRect.top = mCurTop;
        invalidate();    //重绘
    }

}
Okay, that's all, just the small bit of code above achieves the effect shown in the figure. Isn't it simple?
Do you want the image of the coder-pig font? Here it is~

3. Code example download for this section:
XfermodeDemo3.zip
Summary of this section:
Alright, in this section we again used PorterDuff'sSRC_INmode to create a text loading effect, along with the previous:DST_INmode to implement circular and rounded-corner ImageView, andDST_OUTmode to implement erasing the beautiful woman's clothes. I believe everyone now has a clue about using Xfermode. Of course, these examples are not very meaningful; in actual development, they would never be used, but they are very helpful for understanding~ It's like practicing martial arts: the master leads you to the door, but cultivation depends on yourself! The basic tutorial is just a guide. To truly master it and apply what you learn, you need to rely on yourselves, read more excellent code written by others, and practice more! Alright, that's all I have to say, thanks~