Section Introduction:
I believe everyone is familiar with apps where you click a list and then go to the details, which is most common in shopping and news apps. Next, let's briefly explain the process logic!
1. Logic Flow Explanation:
It just so happens that the company's female tester had the Chuchu Street "9.9" app installed on her test device. Haha, let's just use this to study:
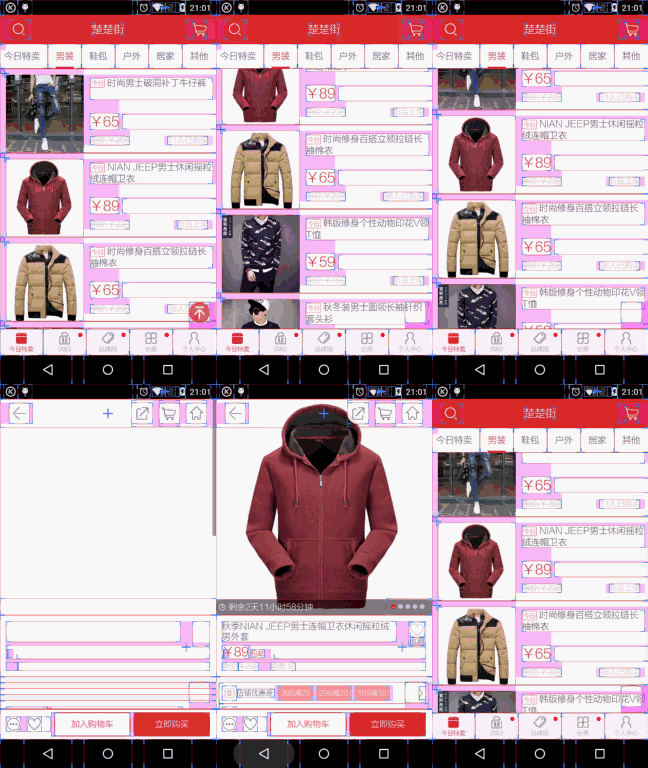
Hehe, many apps on the market are like this, and this can be implemented with the Fragment we learned. Maybe the GIF animation isn't clear, so the author will draw a rough sketch using a UI prototype tool:
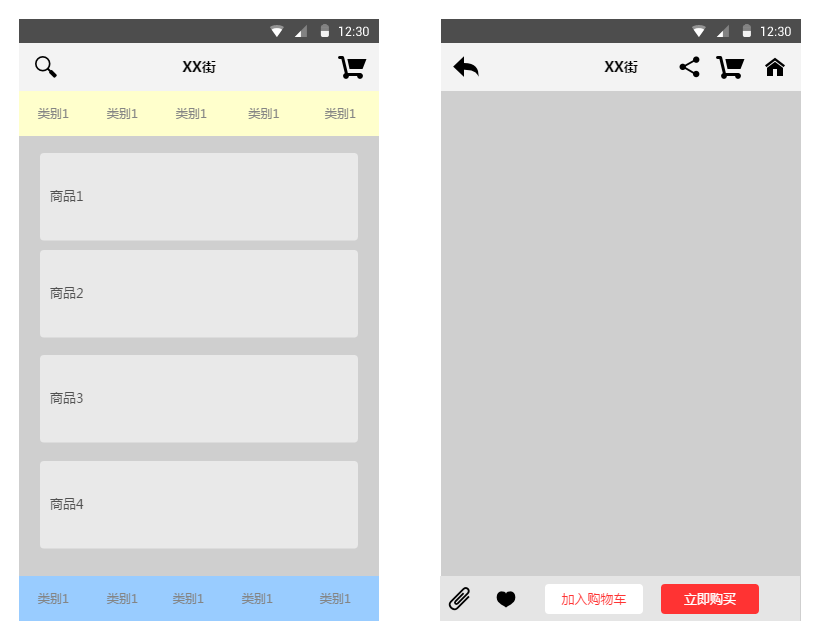
Roughly like this: the middle area is a layout container, usually a FrameLayout, and then we replace a Fragment into this container, or add it as well. This Fragment contains a ListView. When we click an item in this ListView, the Fragment in the middle container will be replaced by the Fragment with the corresponding detailed information. If we just replace it, the state of the first Fragment won't be preserved, and the user will have to browse from the beginning again, which is definitely inconvenient. Here we can solve this problem through the Fragment stack's addToBackStack and popBackStack! When replacing, we add the replaced Fragment to the stack. When the user presses the back button, popBackStack is called to pop it from the stack. See the code example below for the specific implementation!
2. Code Example: Simple implementation of a news app list and content switching
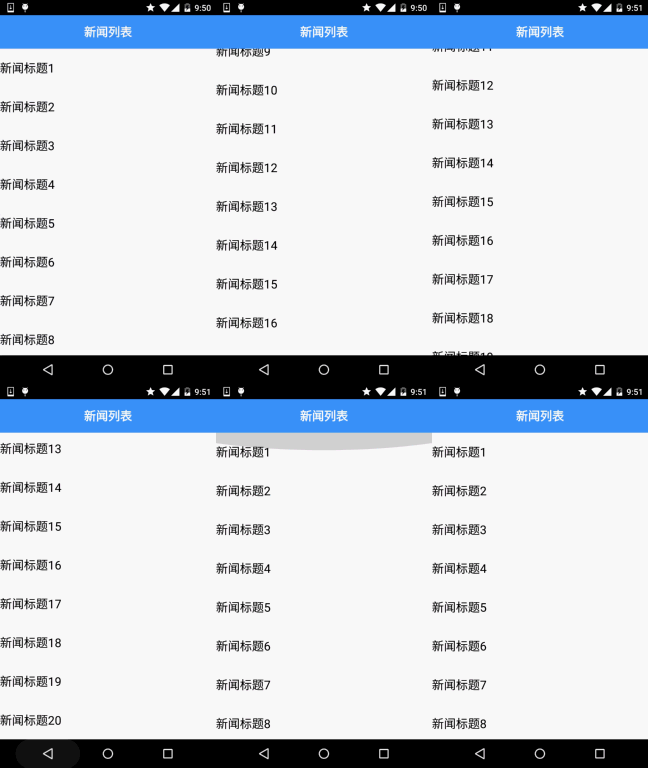
Running effect screenshot:
Implementation code:
Step 1: First implement the layouts of the two Fragments and the Activity
fg_newlist.xml:
<?xml version="1.0" encoding="utf-8"?>
<LinearLayout xmlns:android="http://schemas.android.com/apk/res/android"
    android:layout_width="match_parent"
    android:layout_height="match_parent"
    android:background="@color/white"
    android:orientation="horizontal">

    <ListView
        android:id="@+id/list_news"
        android:layout_width="match_parent"
        android:layout_height="match_parent" />

</LinearLayout>
fg_context.xml:
<?xml version="1.0" encoding="utf-8"?>
<LinearLayout xmlns:android="http://schemas.android.com/apk/res/android"
    android:layout_width="match_parent"
    android:layout_height="match_parent"
    android:orientation="vertical">

    <TextView
        android:id="@+id/txt_content"
        android:layout_width="match_parent"
        android:layout_height="match_parent"
        android:gravity="center"
        android:textColor="@color/blue"
        android:textSize="20sp" />

</LinearLayout>
activity_main.xml:
<RelativeLayout xmlns:android="http://schemas.android.com/apk/res/android"
    xmlns:tools="http://schemas.android.com/tools"
    android:layout_width="match_parent"
    android:layout_height="match_parent"
    tools:context=".MainActivity">

    <TextView
        android:id="@+id/txt_title"
        android:layout_width="match_parent"
        android:layout_height="56dp"
        android:background="@color/blue"
        android:textColor="@color/white"
        android:text="新闻列表"
        android:textSize="20sp"
        android:textStyle="bold"
        android:gravity="center"/>

    <FrameLayout
        android:id="@+id/fl_content"
        android:layout_width="match_parent"
        android:layout_height="match_parent"
        android:layout_below="@id/txt_title"/>

</RelativeLayout>
Step 2: Implement our business Bean class and custom BaseAdapter class:
Data.java:
/**
 * Created by Jay on 2015/9/6 0006.
 */
public class Data {

    private String new_title;
    private String new_content;

    public Data(){}

    public Data(String new_title, String new_content) {
        this.new_title = new_title;
        this.new_content = new_content;
    }

    public String getNew_title() {
        return new_title;
    }

    public String getNew_content() {
        return new_content;
    }

    public void setNew_title(String new_title) {
        this.new_title = new_title;
    }

    public void setNew_content(String new_content) {
        this.new_content = new_content;
    }
}
MyAdapter.java:
/**
 * Created by Jay on 2015/9/6 0006.
 */
public class MyAdapter extends BaseAdapter{

    private List<Data> mData;
    private Context mContext;

    public MyAdapter(List<Data> mData, Context mContext) {
        this.mData = mData;
        this.mContext = mContext;
    }

    @Override
    public int getCount() {
        return mData.size();
    }

    @Override
    public Object getItem(int position) {
        return null;
    }

    @Override
    public long getItemId(int position) {
        return position;
    }

    @Override
    public View getView(int position, View convertView, ViewGroup parent) {
        ViewHolder viewHolder;
        if(convertView == null){
            convertView = LayoutInflater.from(mContext).inflate(R.layout.list_item,parent,false);
            viewHolder = new ViewHolder();
            viewHolder.txt_item_title = (TextView) convertView.findViewById(R.id.txt_item_title);
            convertView.setTag(viewHolder);
        }else{
            viewHolder = (ViewHolder) convertView.getTag();
        }
        viewHolder.txt_item_title.setText(mData.get(position).getNew_title());
        return convertView;
    }

    private class ViewHolder{
        TextView txt_item_title;
    }

}
Step 3: MainActivity implementation
MainActivity.java:
public class MainActivity extends AppCompatActivity {

    private TextView txt_title;
    private FrameLayout fl_content;
    private Context mContext;
    private ArrayList<Data> datas = null;
    private FragmentManager fManager = null;
    private long exitTime = 0;


    @Override
    protected void onCreate(Bundle savedInstanceState) {
        super.onCreate(savedInstanceState);
        setContentView(R.layout.activity_main);
        mContext = MainActivity.this;
        fManager = getFragmentManager();
        bindViews();

        datas = new ArrayList<Data>();
        for (int i = 1; i <= 20; i++) {
            Data data = new Data("新闻标题" + i, i + "~新闻内容~~~~~~~~");
            datas.add(data);
        }
        NewListFragment nlFragment = new NewListFragment(fManager, datas);
        FragmentTransaction ft = fManager.beginTransaction();
        ft.replace(R.id.fl_content, nlFragment);
        ft.commit();
    }


    private void bindViews() {
        txt_title = (TextView) findViewById(R.id.txt_title);
        fl_content = (FrameLayout) findViewById(R.id.fl_content);
    }


    //点击回退键的处理:判断Fragment栈中是否有Fragment
    //没,双击退出程序,否则像是Toast提示
    //有,popbackstack弹出栈
    @Override
    public void onBackPressed() {
        if (fManager.getBackStackEntryCount() == 0) {
            if ((System.currentTimeMillis() - exitTime) > 2000) {
                Toast.makeText(getApplicationContext(), "再按一次退出程序",
                        Toast.LENGTH_SHORT).show();
                exitTime = System.currentTimeMillis();
            } else {
                super.onBackPressed();
            }
        } else {
            fManager.popBackStack();
            txt_title.setText("新闻列表");
        }
    }
}
Step 4: Implementation of list Fragment:
NewListFragment.java:
package com.jay.fragmentdemo4;

import android.app.Fragment;
import android.app.FragmentManager;
import android.app.FragmentTransaction;
import android.os.Bundle;
import android.view.LayoutInflater;
import android.view.View;
import android.view.ViewGroup;
import android.widget.AdapterView;
import android.widget.ListView;
import android.widget.TextView;

import java.util.ArrayList;

/**
 * Created by Jay on 2015/9/6 0006.
 */
public class NewListFragment extends Fragment implements AdapterView.OnItemClickListener {
    private FragmentManager fManager;
    private ArrayList<Data> datas;
    private ListView list_news;

    public NewListFragment(FragmentManager fManager, ArrayList<Data> datas) {
        this.fManager = fManager;
        this.datas = datas;
    }

    @Override
    public View onCreateView(LayoutInflater inflater, ViewGroup container, Bundle savedInstanceState) {
        View view = inflater.inflate(R.layout.fg_newlist, container, false);
        list_news = (ListView) view.findViewById(R.id.list_news);
        MyAdapter myAdapter = new MyAdapter(datas, getActivity());
        list_news.setAdapter(myAdapter);
        list_news.setOnItemClickListener(this);
        return view;
    }


    @Override
    public void onItemClick(AdapterView<?> parent, View view, int position, long id) {
        FragmentTransaction fTransaction = fManager.beginTransaction();
        NewContentFragment ncFragment = new NewContentFragment();
        Bundle bd = new Bundle();
        bd.putString("content", datas.get(position).getNew_content());
        ncFragment.setArguments(bd);
        //获取Activity的控件
        TextView txt_title = (TextView) getActivity().findViewById(R.id.txt_title);
        txt_title.setText(datas.get(position).getNew_content());
        //加上Fragment替换动画
        fTransaction.setCustomAnimations(R.anim.fragment_slide_left_enter, R.anim.fragment_slide_left_exit);
        fTransaction.replace(R.id.fl_content, ncFragment);
        //调用addToBackStack将Fragment添加到栈中
        fTransaction.addToBackStack(null);
        fTransaction.commit();
    }
}
Step 5: Implementation of content Fragment:
NewContentFragment.java:
/**
 * Created by Jay on 2015/9/6 0006.
 */
public class NewContentFragment extends Fragment {

    NewContentFragment() {
    }

    @Override
    public View onCreateView(LayoutInflater inflater, ViewGroup container, Bundle savedInstanceState) {
        View view = inflater.inflate(R.layout.fg_content, container, false);
        TextView txt_content = (TextView) view.findViewById(R.id.txt_content);
        //getArgument获取传递过来的Bundle对象
        txt_content.setText(getArguments().getString("content"));
        return view;
    }

}
The code is very simple, so I won't explain it step by step~
3. Code Download
FragmentDemo5.zip:Download FragmentDemo5.zip
Section Summary:
Because of time constraints, I didn't explain in too much detail; the example code is also very simple, making it easy for beginners to understand! If it is to be used in an actual project, it still needs to be modified a bit~! Okay, that's all for this section, thanks~