Introduction to this section:
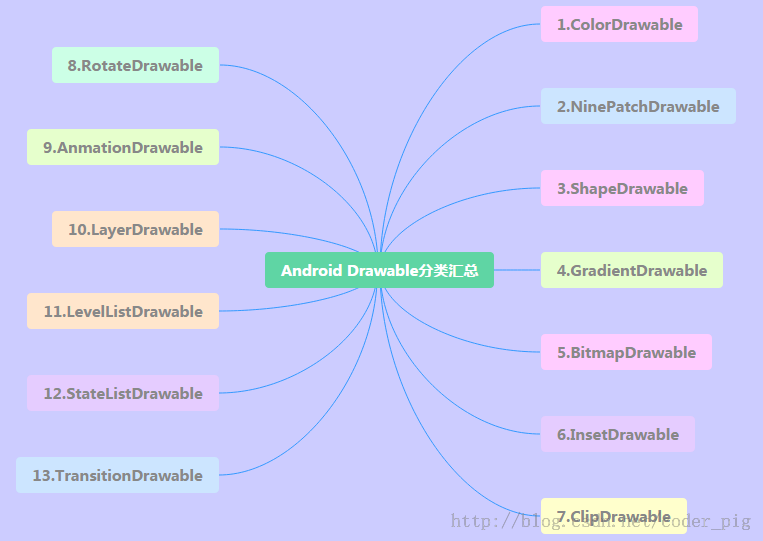
Starting from this section, we will learn some basic knowledge about drawing and animation in Android, laying the foundation for our custom views in the advanced part! In the first section, we will dig into Drawable in Android! Android provides us with as many as 13 types of Drawable, and in this section we will go through them one by one!
Notes on using Drawable resources
- Drawable is divided into two types: one is ourordinary image resources, in Android Studio we generally put them in the res/mipmap directory, unlike Eclipse before! Also, if we switch the project to Android project mode, we can just drop images into the mipmap directory, and AS will automatically split them into hdpi, xhdpi...!XML-form Drawable resources, we generally put them in the res/drawable directory, such as the most common Selector for button click background switching!
- In XML, we can directly set Drawable via @mipmap or @drawable, for example: android:background = "@mipmap/iv_icon_zhu" / "@drawable/btn_back_selctor". In Java code, we can obtain drawable resources through Resource's getDrawable(R.mipmap.xxx). If setting a background for a control, such as ImageView, we can directly call the control's getDrawable() to also get the drawable object!
- Resource names in drawable in Android have constraints; they must be:[a-z0-9_.](i.e., can only be letters, numbers,and .), and cannot start with a digit, otherwise compilation will report an error: Invalid file name: must contain only [a-z0-9.]! Lowercase!!!! Lowercase!!! Lowercase! — Important things said three times~
Alright, these are about the things to note. Next, let's learn about the 13 Drawables provided in Android!
1.ColorDrawable
The simplest kind of Drawable. When we draw ColorDrawable onto Canvas (the canvas), it uses a fixed color to fill Paint, then draws a solid-color area on the canvas!
1). Defining ColorDrawable in Java:
ColorDrawable drawable = new ColorDrawable(0xffff2200);
txtShow.setBackground(drawable);
2). Defining ColorDrawable in XML:
<?xml version="1.0" encoding="utf-8"?>
<color
    xmlns:android="http://schemas.android.com/apk/res/android"
    android:color="#FF0000"/>
Of course, the above usages are not actually used much. More often, we create a color.xml file in the res/values directory, write the color values we need into it, and when needed, get the corresponding value through @color, for example:
3). Create a color.xml file
For example:
<?xml version="1.0" encoding="utf-8"?>
<resources>
    <color name="material_grey_100">#fff5f5f5</color>
    <color name="material_grey_300">#ffe0e0e0</color>
    <color name="material_grey_50">#fffafafa</color>
    <color name="material_grey_600">#ff757575</color>
    <color name="material_grey_800">#ff424242</color>
    <color name="material_grey_850">#ff303030</color>
    <color name="material_grey_900">#ff212121</color>
</resources>
Then if in an XML file, we can get the corresponding color value through @color/xxx. If in Java:
int mycolor = getResources().getColor(R.color.mycolor);
btn.setBackgroundColor(mycolor);
ps: One more thing to note: if we directly define color values in Java, we need to add 0x, and cannot omit the transparency:
int mycolor = 0xff123456;
btn.setBackgroundColor(mycolor);
4). Using system-defined colors:
For example: BLACK (black), BLUE (blue), CYAN (cyan), GRAY (gray), GREEN (green), RED (red), WRITE (white), YELLOW (yellow)! Usage:btn.setBackgroundColor(Color.BLUE);You can also get system colors and then set them:
int getcolor = Resources.getSystem().getColor(android.R.color.holo_green_light);
btn.setBackgroundColor(getcolor);
Using in XML:android:background="@android:color/black"
5). Using the static method argb to set colors:
Android uses an int type data to represent color values, usually hexadecimal, i.e., starting with 0x. A color value is defined by the alpha transparency and the three primary colors RGB (red, green, blue), starting with '#', followed in order by:
Alpha - Red - Green - Blue;eg:#RGB #ARGB #RRGGBB #AARRGGBB
Each element is represented by one byte (8 bits), so the value range is 0~255. In XML, you can omit the transparency when setting colors, but if you are in Java code, you need to explicitly specify the transparency value. If omitted, it means fully transparent, and then it will have no effect~ For example: 0xFF0000 represents red, but if you write it directly, nothing happens; you should write it like this: 0xFFFF0000. Remember that when setting color values in Java code, you need to add transparency in front~ Example: (parameters in order: alpha, red value, green value, blue value)txtShow.setBackgroundColor(Color.argb(0xff, 0x00, 0x00, 0x00));
2.NiewPatchDrawable
It is the .9 image. Earlier we1.6 How to use .9 (Nine Patch) imageshave already explained in detail how to create .9 images! Android Framework uses an efficient graphics optimization algorithm when displaying Nine-Patch images, so we don't need special handling to achieve adaptive image stretching~ In addition, when using AS, note the following points:
- 1. Nine-patch images cannot be placed in the mipmap directory; they need to be placed in the drawable directory!
- 2. The .9 image in AS must have black lines, otherwise compilation won't pass. This morning my cousin Ajun said in the group that his company's designer gave him a .9 image without black lines, said it was made with some software, and it worked on Eclipse. Yes, it was a .9 without black lines, damn, but when I switched to AS, it wouldn't compile directly! It seems one of the standards for AS to recognize .9 images is the need for black dots or black lines! Also, my cousin gave a way to remove black lines:9patch(.9) How to remove the black dots/black lines you drew on itI haven't tried it specifically. If you're interested, you can try it yourself, but are the black lines really that annoying... I don't have OCD, so I don't think so! Another point is that when you decompress someone else's APK and take .9 assets, you find there are no black lines, and it also reports errors! If you want to extract .9 assets with black lines, you need to decompile the APK rather than directly unzip it!!! Decompilation was also introduced earlier, so I won't go into detail here!
Next, let's introduce two things that are not very useful:
Define NinePatchDrawable in XML:
<!--pic9.xml-->
<!--参数依次为:引用的.9图片,是否对位图进行抖动处理-->
<?xml version="1.0" encoding="utf-8"?>
<nine-patch
    xmlns:android="http://schemas.android.com/apk/res/android"
    android:src="@drawable/dule_pic.html"
    android:dither="true"/>
Using Bitmap to wrap .9 images:
<!--pic9.xml-->
<!--参数依次为:引用的.9图片,是否对位图进行抖动处理-->
<?xml version="1.0" encoding="utf-8"?>
<bitmap
    xmlns:android="http://schemas.android.com/apk/res/android"
    android:src="@drawable/dule_pic.html"
    android:dither="true"/>
3.ShapeDrawable
It is the shape Drawable, defining basic geometric shapes such as (rectangle, circle, line, etc.). The root element is <shape../>. There are quite a few nodes; related nodes are as follows:
- ① <shape>:
- ~ visible: Set whether visible
- ~ shape: Shape, optional: rectangle (rectangle, including square), oval (ellipse, including circle), line (line segment), ring (ring)
- ~ innerRadiusRatio: Only valid when shape is ring; indicates the ratio of the ring's inner radius to the total radius. If innerRadius is set, it will be ignored.
- ~ innerRadius: Only valid when shape is ring; indicates the size of the ring's inner radius.
- ~ thicknessRatio: Only valid when shape is ring; indicates the ratio of the ring thickness to the radius.
- ~ thickness: Only valid when shape is ring; indicates the thickness of the ring, i.e., the difference between the outer radius and the inner radius.
- ~ useLevel: Only valid when shape is ring; indicates whether to allow displaying part of the ring based on level.
- ②<size>:
- ~ width: Shape width
- ~ height: Shape height
- ③<gradient>: Will be discussed later in GradientDrawable~
- ④<solid>
- ~ color: Background fill color. After setting solid, it will override all effects set by gradient!!!!!!
- ⑤<stroke>
- ~ width: Border width
- ~ color: Border color
- ~ dashWidth: Dash length of the border
- ~ dashGap: Gap between dashes of the border
- ⑥<conner>
- ~ radius: Corner radius, applicable to all four corners: top, bottom, left, right
- ~ topLeftRadius,topRightRadius,BottomLeftRadius,tBottomRightRadius: In order: top-left, top-right, bottom-left, bottom-right corner values. Set them as needed!
- ⑦<padding>
- left, top, right, bottom: In order, the margins in the left, top, right, bottom directions!
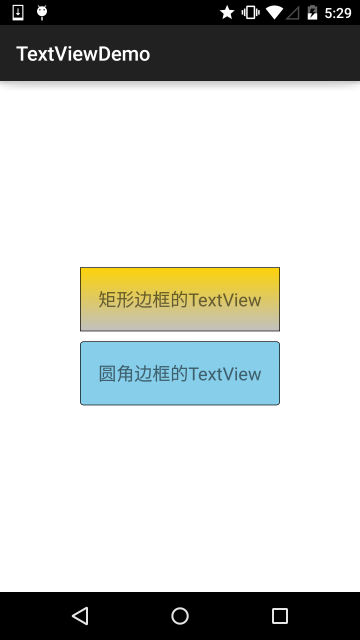
Usage example: 2.3.1 TextView (text box) Detailed Explanation
4.GradientDrawable
A Drawable with gradient areas, which can achieve linear gradient, radial gradient, and sweep gradient effects. Core node: <gradient/>, with the following optional attributes:
- startColor: Gradient start color
- centerColor: Gradient middle color
- endColor: Gradient end color
- type: Gradient type, optional (linear,radial,sweep), linear gradient(can set gradient angle), radial gradient (radiating from center outward), sweep gradient
- centerX: X coordinate of the gradient middle color, value range: 0~1
- centerY: Y coordinate of the gradient middle color, value range: 0~1
- angleOnly linear type gradients are valid, indicating the gradient angle, which must be a multiple of 45.
- gradientRadiusOnly radial and sweep type gradients are valid; for radial, it must be set, indicating the radius of the gradient effect.
- useLevelDetermine whether to draw the gradient effect based on level.
Code example: (Demonstration of the three gradient effects):
Running effect screenshot:
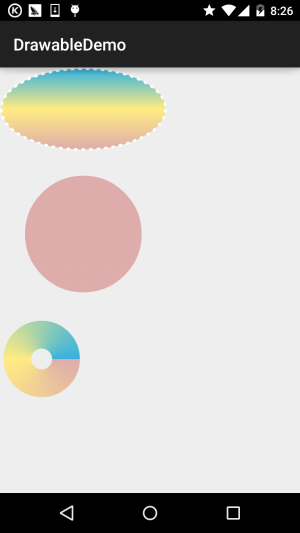
First create three gradient XML files under drawable:
(Linear gradient) gradient_linear.xml:
<?xml version="1.0" encoding="utf-8"?>
<shape
    xmlns:android="http://schemas.android.com/apk/res/android"
    android:shape="oval" >
    <gradient
        android:angle="90"
        android:centerColor="#FFEB82"
        android:endColor="#35B2DE"
        android:startColor="#DEACAB" />

    <stroke
        android:dashGap="5dip"
        android:dashWidth="4dip"
        android:width="3dip"
        android:color="#fff" />
</shape>
(Radial gradient) gradient_radial.xml:
<?xml version="1.0" encoding="utf-8"?>
<shape xmlns:android="http://schemas.android.com/apk/res/android"
    android:innerRadius="0dip"
    android:shape="ring"
    android:thickness="70dip"
    android:useLevel="false" >

    <gradient
        android:centerColor="#FFEB82"
        android:endColor="#35B2DE"
        android:gradientRadius="70"
        android:startColor="#DEACAB"
        android:type="radial"
        android:useLevel="false" />

</shape>
(Sweep gradient) gradient_sweep.xml:
<?xml version="1.0" encoding="utf-8"?>
<shape xmlns:android="http://schemas.android.com/apk/res/android"
    android:innerRadiusRatio="8"
    android:shape="ring"
    android:thicknessRatio="3"
    android:useLevel="false" >

    <gradient
        android:centerColor="#FFEB82"
        android:endColor="#35B2DE"
        android:startColor="#DEACAB"
        android:type="sweep"
        android:useLevel="false" />

</shape>
Call the three drawablesactivity_main.xml:
<LinearLayout xmlns:android="http://schemas.android.com/apk/res/android"
    xmlns:tools="http://schemas.android.com/tools"
    android:layout_width="match_parent"
    android:layout_height="match_parent"
    android:orientation="vertical">

    <TextView
        android:id="@+id/txtShow1"
        android:layout_width="200dp"
        android:layout_height="100dp"
        android:background="@drawable/gradient_linear" />

    <TextView
        android:id="@+id/txtShow2"
        android:layout_width="200dp"
        android:layout_height="200dp"
        android:background="@drawable/gradient_radial" />

    <TextView
        android:id="@+id/txtShow3"
        android:layout_width="100dp"
        android:layout_height="100dp"
        android:background="@drawable/gradient_sweep" />

</LinearLayout>
Okay, that's simply it~ Of course, if you want to draw more complex graphics, using XML files alone is far from enough. More complex effects need to be done with Java code. The following demonstration is a piece of source code taken from the internet:
Running effect screenshot:
Implementation code:
MainActivity.java:
public class MainActivity extends AppCompatActivity {
    @Override
    protected void onCreate(Bundle savedInstanceState) {
        super.onCreate(savedInstanceState);
        setContentView(new SampleView(this));
    }

    private static class SampleView extends View {
        private ShapeDrawable[] mDrawables;

        private static Shader makeSweep() {
            return new SweepGradient(150, 25,
                    new int[] { 0xFFFF0000, 0xFF00FF00, 0xFF0000FF, 0xFFFF0000 },
                    null);
        }

        private static Shader makeLinear() {
            return new LinearGradient(0, 0, 50, 50,
                    new int[] { 0xFFFF0000, 0xFF00FF00, 0xFF0000FF },
                    null, Shader.TileMode.MIRROR);
        }

        private static Shader makeTiling() {
            int[] pixels = new int[] { 0xFFFF0000, 0xFF00FF00, 0xFF0000FF, 0};
            Bitmap bm = Bitmap.createBitmap(pixels, 2, 2,
                    Bitmap.Config.ARGB_8888);

            return new BitmapShader(bm, Shader.TileMode.REPEAT,
                    Shader.TileMode.REPEAT);
        }

        private static class MyShapeDrawable extends ShapeDrawable {
            private Paint mStrokePaint = new Paint(Paint.ANTI_ALIAS_FLAG);

            public MyShapeDrawable(Shape s) {
                super(s);
                mStrokePaint.setStyle(Paint.Style.STROKE);
            }

            public Paint getStrokePaint() {
                return mStrokePaint;
            }

            @Override protected void onDraw(Shape s, Canvas c, Paint p) {
                s.draw(c, p);
                s.draw(c, mStrokePaint);
            }
        }

        public SampleView(Context context) {
            super(context);
            setFocusable(true);

            float[] outerR = new float[] { 12, 12, 12, 12, 0, 0, 0, 0 };
            RectF inset = new RectF(6, 6, 6, 6);
            float[] innerR = new float[] { 12, 12, 0, 0, 12, 12, 0, 0 };

            Path path = new Path();
            path.moveTo(50, 0);
            path.lineTo(0, 50);
            path.lineTo(50, 100);
            path.lineTo(100, 50);
            path.close();

            mDrawables = new ShapeDrawable[7];
            mDrawables[0] = new ShapeDrawable(new RectShape());
            mDrawables[1] = new ShapeDrawable(new OvalShape());
            mDrawables[2] = new ShapeDrawable(new RoundRectShape(outerR, null,
                    null));
            mDrawables[3] = new ShapeDrawable(new RoundRectShape(outerR, inset,
                    null));
            mDrawables[4] = new ShapeDrawable(new RoundRectShape(outerR, inset,
                    innerR));
            mDrawables[5] = new ShapeDrawable(new PathShape(path, 100, 100));
            mDrawables[6] = new MyShapeDrawable(new ArcShape(45, -270));

            mDrawables[0].getPaint().setColor(0xFFFF0000);
            mDrawables[1].getPaint().setColor(0xFF00FF00);
            mDrawables[2].getPaint().setColor(0xFF0000FF);
            mDrawables[3].getPaint().setShader(makeSweep());
            mDrawables[4].getPaint().setShader(makeLinear());
            mDrawables[5].getPaint().setShader(makeTiling());
            mDrawables[6].getPaint().setColor(0x88FF8844);

            PathEffect pe = new DiscretePathEffect(10, 4);
            PathEffect pe2 = new CornerPathEffect(4);
            mDrawables[3].getPaint().setPathEffect(
                    new ComposePathEffect(pe2, pe));

            MyShapeDrawable msd = (MyShapeDrawable)mDrawables[6];
            msd.getStrokePaint().setStrokeWidth(4);
        }

        @Override protected void onDraw(Canvas canvas) {

            int x = 10;
            int y = 10;
            int width = 400;
            int height = 100;

            for (Drawable dr : mDrawables) {
                dr.setBounds(x, y, x + width, y + height);
                dr.draw(canvas);
                y += height + 5;
            }
        }
    }
}
The code uses ShapeDrawable and PathEffect. The former is a wrapper for ordinary shapes, including: ArcShape, OvalShape, PathShape, RectShape, RoundRectShape!
PathEffect, on the other hand, is a path effect, including: CornerPathEffect, DashPathEffect, and DiscretePathEffect, which can be used to create complex shape borders...
That's all for GradientDrawable. If you are interested in the latter stuff, you can go to:appium/android-apidemos
Summary of this section:
Okay, in this section we will first learn about ColorDrawable, NinePatchDrawable, ShapeDrawable, and GradientDrawable.
Let's start with the four Drawables. Of course, these are old topics and have been written before, but for the completeness of the tutorial, I decided to write them again. In addition, after finishing the basic tutorials, some blogs written before will be deleted!