Introduction to This Section:
In the previous two subsections we learned about Drawable and Bitmap, both of which involve loading ready-made images. In this section, we will learn some drawing-related APIs: Canvas, Paint, and Path! This section is very important, and it is also the foundation for custom Views. Okay, without further ado, let's begin this section.
1. Detailed Explanation of Related Methods
1) Paint (Brush):
It is the brush, used to set the drawing style, such as line width (stroke thickness), color, transparency, and fill style. You can create a Paint instance directly using the parameterless constructor:Paint paint = new Paint( );
We can set the relevant properties of Paint through the following methods. In addition, these properties fall into two categories: drawing-related and text-related:
- setARGB(int a,int r,int g,int b): Set the drawing color; a represents alpha transparency, and r, g, b represent the color values.
- setAlpha(int a): Set the transparency of the drawn shape.
- setColor(int color): Set the drawing color, expressed as a color value, which includes alpha and RGB color.
- setAntiAlias(boolean aa): Set whether to use anti-aliasing. It consumes more resources and slows down drawing speed.
- setDither(boolean dither): Set whether to use image dithering. This makes the drawn image colors smoother and fuller, and the image clearer.
- setFilterBitmap(boolean filter): If set to true, the image will skip optimization operations on Bitmap images during animation, speeding up display. This setting depends on the dither and xfermode settings.
- setMaskFilter(MaskFilter maskfilter): Set MaskFilter. Different MaskFilters can be used to achieve filter effects, such as blurring, 3D, etc.
- setColorFilter(ColorFilter colorfilter): Set the color filter, which can achieve different color transformation effects when drawing colors.
- setPathEffect(PathEffect effect): Set the effect for drawing paths, such as dotted lines, etc.
- setShader(Shader shader): Set the image effect. Using Shader can draw various gradient effects.
- setShadowLayer(float radius ,float dx,float dy,int color): Set a shadow layer below the shape to produce a shadow effect; radius is the shadow angle, dx and dy are the distances of the shadow on the x-axis and y-axis, and color is the shadow color.
- setStyle(Paint.Style style): Set the brush style to FILL, FILL_OR_STROKE, or STROKE.
- setStrokeCap(Paint.Cap cap): When the brush style is STROKE or FILL_OR_STROKE, set the graphic style of the brush, such as round Cap.ROUND or square Cap.SQUARE.
- setSrokeJoin(Paint.Join join): Set how shapes are joined when drawn, such as smooth effects, etc.
- setStrokeWidth(float width): When the brush style is STROKE or FILL_OR_STROKE, set the thickness of the brush.
- setXfermode(Xfermode xfermode): Set the handling mode when shapes overlap, such as merging, intersection, or union. It is often used to create eraser effects.
- setFakeBoldText(boolean fakeBoldText): Simulate bold text. The effect will be very poor when set on small fonts.
- setSubpixelText(boolean subpixelText): Setting this to true will improve the text display effect on LCD screens.
- setTextAlign(Paint.Align align): Set the alignment direction for drawing text.
- setTextScaleX(float scaleX): Set the x-axis scaling ratio for drawing text, which can achieve a text stretching effect.
- setTextSize(float textSize): Set the font size for drawing text.
- setTextSkewX(float skewX): Set italic text; skewX is the skew radians.
- setTypeface(Typeface typeface): Set the Typeface object, i.e., the font style, including bold, italic, serif, sans-serif, etc.
- setUnderlineText(boolean underlineText): Set a text effect with an underline.
- setStrikeThruText(boolean strikeThruText): Set a strikethrough effect.
- setStrokeJoin(Paint.Join join): Set the appearance of joints. Miter: sharp joint; Round: arc joint; BEVEL: straight joint.
- setStrokeMiter(float miter): Set the brush tilt.
- setStrokeCap(Paint.Cap cap): Set the style at corners/turns. Other common methods:
- float ascent( ): Measure the distance above the baseline to the top of the character.
- float descent( ): The distance below the baseline to the bottom of the character.
- int breakText(char[] text, int index, int count, float maxWidth, float[] measuredWidth): Detect how much text can be displayed on one line.
- clearShadowLayer( ): Clear the shadow layer. For others, consult the documentation yourself.

2) Canvas:
Now that we have the brush, let's move on to the Canvas. We can't draw out of thin air, right? Common methods are as follows:
First are theconstructors.Canvas has two constructors:
Canvas(): Create an empty canvas; you can use the setBitmap() method to set the specific canvas to draw on.
Canvas(Bitmap bitmap): Create a canvas with a Bitmap object; all content is drawn on the bitmap, so the bitmap must not be null.
Next are the1.drawXXX()draw methods: They draw on the current drawing area at specified coordinate values. In addition, layers stack, meaning later drawn layers cover earlier ones. For example:
- drawRect(RectF rect, Paint paint): Draw a region; the first parameter is a RectF region.
- drawPath(Path path, Paint paint): Draw a path; the first parameter is a Path object.
- drawBitmap(Bitmap bitmap, Rect src, Rect dst, Paint paint): Draw a bitmap. The first parameter is our usual Bitmap object, the second is the source region (here the bitmap), the third is the target region (the position and size on the canvas), and the fourth is the Paint brush object. Because scaling and stretching may be involved, performance will be significantly degraded when the original Rect is not equal to the target Rect.
- drawLine(float startX, float startY, float stopX, float stopY, Paint paint): Draw a line. The first parameter is the x-axis position of the start point, the second is the y-axis position of the start point, the third is the x-axis horizontal position of the end point, the fourth is the y-axis vertical position, and the last parameter is the Paint brush object.
- drawPoint(float x, float y, Paint paint): Draw a point. The first parameter is the horizontal x-axis, the second is the vertical y-axis, and the third parameter is the Paint object.
- drawText(String text, float x, float y, Paint paint): Render text. In addition to the above, the Canvas class can also draw text. The first parameter is a String text, the second is the x-axis, the third is the y-axis, and the fourth is a Paint object.
- drawOval(RectF oval, Paint paint): Draw an ellipse. The first parameter is the scan area, and the second is the Paint object.
- drawCircle(float cx, float cy, float radius, Paint paint): Draw a circle. The first parameter is the x-axis of the center point, the second is the y-axis of the center point, the third is the radius, and the fourth is the Paint object.
- drawArc(RectF oval, float startAngle, float sweepAngle, boolean useCenter, Paint paint): Draw an arc. The first parameter is a RectF object, the boundary of a rectangular oval used to define the shape and size of the arc. The second parameter is the starting angle (in degrees) at the beginning of the arc. The third parameter is the sweep angle (in degrees), measured clockwise from the start. The fourth parameter, if true, includes the center of the oval in the arc and closes it; if false, it will be an arc line. The fifth parameter is the Paint object.
2.clipXXX()Method family: Clip out a new drawing area from the current drawing area; this drawing area becomes the current drawing area of the canvas object. For example: clipRect(new Rect()), then that rectangular area becomes the current drawing area of the canvas.
3.save()andrestore()Method:save( ): Used to save the state of the Canvas. After save, you can perform operations such as translation, scaling, rotation, skewing, and clipping on the Canvas.restore( ): Used to restore the previously saved state of the Canvas. Prevents the operations performed on the Canvas after save from affecting subsequent drawing. save() and restore() must be used in pairs (restore can be fewer than save, but cannot be more). If restore is called more times than save, an error will be reported!
4.translate(float dx, float dy): Translate, moving the coordinate origin of the canvas horizontally by x and vertically by y. The default position of the canvas is at (0,0).
5.scale(float sx, float sy): Scale, x is the horizontal magnification factor, y is the vertical magnification factor.
6.rotate(float degrees): Rotate, angle refers to the rotation angle, rotates clockwise.
3) Path
Simply put, it's plotting points and connecting lines~ After creating our Path, we can call Canvas'sdrawPath(path, paint) to draw the shape~ Common methods are as follows:
- addArc(RectF oval, float startAngle, float sweepAngle: Adds a polygon to the path
- addCircle(float x, float y, float radius, Path.Direction dir): Adds a circle to the path
- addOval(RectF oval, Path.Direction dir): Adds an oval
- addRect(RectF rect, Path.Direction dir): Adds a region
- addRoundRect(RectF rect, float[] radii, Path.Direction dir): Adds a rounded-corner region
- isEmpty( ): Determines whether the path is empty
- transform(Matrix matrix): Applies a matrix transformation
- transform(Matrix matrix, Path dst): Applies a matrix transformation and puts the result into a new path, i.e., the second parameter.
For more advanced effects, you can use the PathEffect class!
Several To methods:
- moveTo(float x, float y): Does not draw; it is only used to move the brush.
- lineTo(float x, float y): Used for drawing straight lines. By default, drawing starts from (0,0); use moveTo to move! For example: mPath.lineTo(300, 300); canvas.drawPath(mPath, mPaint);
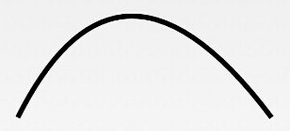
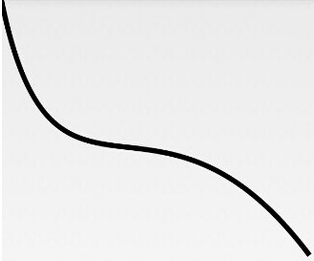
- quadTo(float x1, float y1, float x2, float y2): Used for drawing smooth curves, i.e., Bezier curves. It can also be used with moveTo!
- rCubicTo(float x1, float y1, float x2, float y2, float x3, float y3) Also used to implement Bezier curves. (x1,y1) is a control point, (x2,y2) is a control point, (x3,y3) is the end point. Same as cubicTo, but the coordinates are considered relative to the current point on this contour. It's just one more control point~ To draw the above curve: mPath.moveTo(100, 500); mPath.cubicTo(100, 500, 300, 100, 600, 500); If you don't add the above moveTo, then starting from (0,0), with (100,500) and (300,100) as control points, draw the Bezier curve.
- arcTo(RectF oval, float startAngle, float sweepAngle): Draws an arc (actually intercepting a part of a circle or ellipse). ovalRectF is the rectangle of the ellipse, startAngle is the start angle, sweepAngle is the end angle.
2. Try It Yourself:
There are so many properties; we definitely need to do it hands-on to deepen our impression, right? Hehe, drawing is either on a View or on a SurfaceView. Here, let's draw on a View. We define a View class, and then do the drawing work in onDraw()!
/**
 * Created by Jay on 2015/10/15 0015.
 */
public class MyView extends View{

    private Paint mPaint;


    public MyView(Context context) {
        super(context);
        init();
    }

    public MyView(Context context, AttributeSet attrs) {
        super(context, attrs);
        init();
    }

    public MyView(Context context, AttributeSet attrs, int defStyleAttr) {
        super(context, attrs, defStyleAttr);
        init();
    }

    private void init(){
        mPaint = new Paint();
        mPaint.setAntiAlias(true);          //抗锯齿
        mPaint.setColor(getResources().getColor(R.color.puple));//画笔颜色
        mPaint.setStyle(Paint.Style.FILL);  //画笔风格
        mPaint.setTextSize(36);             //绘制文字大小,单位px
        mPaint.setStrokeWidth(5);           //画笔粗细
    }

    //重写该方法,在这里绘图
    @Override
    protected void onDraw(Canvas canvas) {
        super.onDraw(canvas);
    }

}
Then just set this View in the layout. The following code is all written in onDraw()~
1) Set canvas color:
canvas.drawColor(getResources().getColor(R.color.yellow)); //设置画布背景颜色
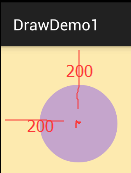
2) Draw a circle:
canvas.drawCircle(200, 200, 100, mPaint); //画实心圆
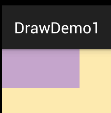
3) Draw a rectangle:
canvas.drawRect(0, 0, 200, 100, mPaint); //画矩形
4) Draw a Bitmap:
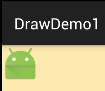
canvas.drawBitmap(BitmapFactory.decodeResource(getResources(), R.mipmap.ic_launcher), 0, 0, mPaint);
5) Draw an arc area:
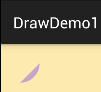
canvas.drawArc(new RectF(0, 0, 100, 100),0,90,true,mPaint); //绘制弧形区域
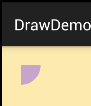
If true is changed to false:
6) Draw a rounded rectangle:
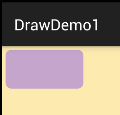
canvas.drawRoundRect(new RectF(10,10,210,110),15,15,mPaint); //画圆角矩形
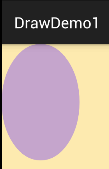
7) Draw an ellipse:
canvas.drawOval(new RectF(0,0,200,300),mPaint); //画椭圆
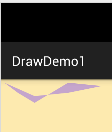
8) Draw a polygon:
Path path = new Path();
path.moveTo(10, 10); //移动到 坐标10,10
path.lineTo(100, 50);
path.lineTo(200,40);
path.lineTo(300, 20);
path.lineTo(200, 10);
path.lineTo(100, 70);
path.lineTo(50, 40);
path.close();
canvas.drawPath(path,mPaint);
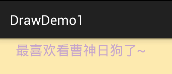
9) Draw text:
canvas.drawText("最喜欢看曹神日狗了~",50,50,mPaint); //绘制文字
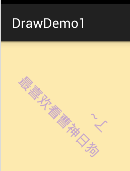
You can also draw this text along a Path:
Path path = new Path();
path.moveTo(50,50);
path.lineTo(100, 100);
path.lineTo(200, 200);
path.lineTo(300, 300);
path.close();
canvas.drawTextOnPath("最喜欢看曹神日狗了~", path, 50, 50, mPaint);    //绘制文字
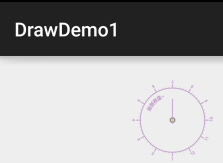
10) Draw a custom shape:
The code is from the internet:
protected void onDraw(Canvas canvas) {
    super.onDraw(canvas);
    canvas.translate(canvas.getWidth()/2, 200); //将位置移动画纸的坐标点:150,150
    canvas.drawCircle(0, 0, 100, mPaint); //画圆圈

    //使用path绘制路径文字
    canvas.save();
    canvas.translate(-75, -75);
    Path path = new Path();
    path.addArc(new RectF(0,0,150,150), -180, 180);
    Paint citePaint = new Paint(mPaint);
    citePaint.setTextSize(14);
    citePaint.setStrokeWidth(1);
    canvas.drawTextOnPath("绘制表盘~", path, 28, 0, citePaint);
    canvas.restore();

    Paint tmpPaint = new Paint(mPaint); //小刻度画笔对象
    tmpPaint.setStrokeWidth(1);

    float  y=100;
    int count = 60; //总刻度数

    for(int i=0 ; i <count ; i++){
        if(i%5 == 0){
            canvas.drawLine(0f, y, 0, y+12f, mPaint);
            canvas.drawText(String.valueOf(i/5+1), -4f, y+25f, tmpPaint);

        }else{
            canvas.drawLine(0f, y, 0f, y +5f, tmpPaint);
        }
        canvas.rotate(360/count,0f,0f); //旋转画纸
    }

    //绘制指针
    tmpPaint.setColor(Color.GRAY);
    tmpPaint.setStrokeWidth(4);
    canvas.drawCircle(0, 0, 7, tmpPaint);
    tmpPaint.setStyle(Paint.Style.FILL);
    tmpPaint.setColor(Color.YELLOW);
    canvas.drawCircle(0, 0, 5, tmpPaint);
    canvas.drawLine(0, 10, 0, -65, mPaint);
}
Summary of This Section:
In this section, we studied three drawing APIs under the android.graphics interface classes: Canvas (canvas), Paint (brush), and Path (path). There are many methods; don't memorize them mechanically. Just look them up when needed. Here we only need a general impression. We'll tackle custom controls slowly later. Okay, that's all. Thanks!
