Introduction to This Section:
In the previous section, we learned some basic concepts of Activity, such as what an Activity is, the Activity lifecycle, and how to start an Activity. In this section, we continue to learn about Activity. As mentioned earlier, an App generally consists of multiple Activities, which involves the problem of data transfer between multiple Activities. So in this section, we continue to learn about the use of Activity! In addition, about passing collections, objects, arrays, and Bitmaps, we will explain those in the Intent section; here we only introduce how to pass basic data!
1. Data Transfer Between Activities:
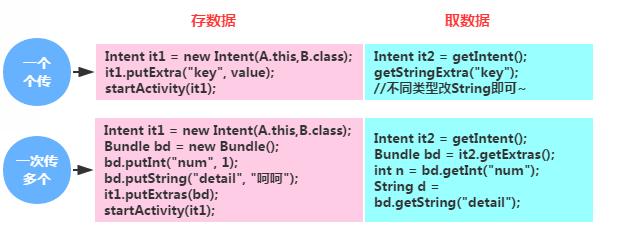
Code Example:
Effect Preview:

Code Download:ActivityTest1.zip
2. Interaction Between Multiple Activities (Passing Back from the Latter to the Former)
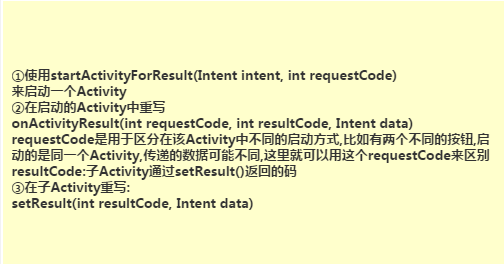
Code Example:
Effect Preview:

Code Download:ActivityTest2.zip
3. Knowing Which Activity Is Currently Active

4. Closing All Activities at Any Time
Sometimes we may have opened many Activities, and suddenly there is a requirement to close all Activities and exit the program on a certain page! Well, below is a method to close all Activities, which is to use a List collection to store all Activities!
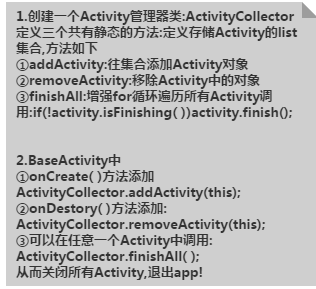
The specific code is as follows:
public class ActivityCollector {
    public static LinkedList<Activity> activities = new LinkedList<Activity>();
    public static void addActivity(Activity activity)
    {
        activities.add(activity);
    }
    public static void removeActivity(Activity activity)
    {
        activities.remove(activity);
    }
    public static void finishAll()
    {
        for(Activity activity:activities)
        {
            if(!activity.isFinishing())
            {
                activity.finish();
            }
        }
    }
}
5. Methods to Completely Exit the App
The above is about closing all Activities, but sometimes we may want to kill the entire App, including background tasks, to completely kill everything. You can use the following code in combination:
Implementation Code:
/**
 * 退出应用程序
 */
public void AppExit(Context context) {
    try {
        ActivityCollector.finishAll();
        ActivityManager activityMgr = (ActivityManager) context
                .getSystemService(Context.ACTIVITY_SERVICE);
        activityMgr.killBackgroundProcesses(context.getPackageName());
        System.exit(0);
    } catch (Exception ignored) {}
}
6. Two Methods for Double-Click to Exit the Program:
1) Define a variable to indicate whether to exit
// 定义一个变量,来标识是否退出
private static boolean isExit = false;
Handler mHandler = new Handler() {
    @Override
    public void handleMessage(Message msg) {
        super.handleMessage(msg);
        isExit = false;
    }
};

public boolean onKeyDown(int keyCode, KeyEvent event) {
    if (keyCode == KeyEvent.KEYCODE_BACK) {
        if (!isExit) {
            isExit = true;
            Toast.makeText(getApplicationContext(), "再按一次退出程序",
                    Toast.LENGTH_SHORT).show();
            // 利用handler延迟发送更改状态信息
            mHandler.sendEmptyMessageDelayed(0, 2000);
        } else {
            exit(this);
        }
        return false;
    }
return super.onKeyDown(keyCode, event);}
2) Save the click time:
//保存点击的时间
private long exitTime = 0;
public boolean onKeyDown(int keyCode, KeyEvent event) {
    if (keyCode == KeyEvent.KEYCODE_BACK) {
        if ((System.currentTimeMillis() - exitTime) > 2000) {
            Toast.makeText(getApplicationContext(), "再按一次退出程序",
                    Toast.LENGTH_SHORT).show();
            exitTime = System.currentTimeMillis();
        } else {
                        exit();
                      }
        return false;
    }
        return super.onKeyDown(keyCode, event);
}
7. Setting Transition Animations for Activities
The so-called transition animations are the switching animations added when switching to another Activity, such as fade in/out, zoom in/out, left-right push, etc.! Of course, we won't explain animations in detail here; there will be a dedicated chapter later for that. Here we only teach you how to load animations, and also provide some commonly used transition animations. As long as you add the relevant animation files to the res/anim directory, then choose one of the two methods below to implement Activity transition animations!
1) Method 1:
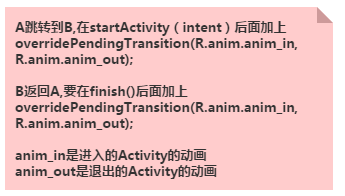
2) Method 2:
Configure via style. This is global, meaning all Activities will load this animation!
The implementation code is as follows:
① Define a custom style in style.xml:
<!-- 默认Activity跳转动画 -->
<style name="default_animation" mce_bogus="1" parent="@android:style/Animation.Activity">
    <item name="android:activityOpenEnterAnimation">@anim/default_anim_in</item>
    <item name="android:activityOpenExitAnimation">@anim/anim_stay</item>
    <item name="android:activityCloseEnterAnimation">@anim/anim_stay</item>
    <item name="android:activityCloseExitAnimation">@anim/default_anim_out</item>
</style>
Explanation:
The 4 items represent:
- The enter animation of Activity B when Activity A jumps to Activity B;
- The exit animation of Activity A when Activity A jumps to Activity B;
- The enter animation of Activity A when Activity B returns to Activity A;
- The exit animation of Activity B when Activity B returns to Activity A;
② Then modify the AppTheme:
<style name="AppTheme" mce_bogus="1" parent="@android:style/Theme.Light">
        <item name="android:windowAnimationStyle">@style/default_animation</item>
        <item name="android:windowNoTitle">true</item>
</style>
③ Finally, set it in the application:
<application
   android:icon="@drawable/logo"
   android:label="@string/app_name"
   android:theme="@style/AppTheme" >
Alright, the animation effects are set up with a "duang" sound~
3) Others
Alright, besides the above two methods, you can also useTransitionManagerto implement it, but the required version is API 19 or above. In addition, there is also another kindaddOnPreDrawListenerof transition animation. This is a bit troublesome to use and may not be suitable for beginners, so I won't cover it here either. Finally, here are some packaged common animation effects; just choose the effects you need and add them to your project!Common Activity Transition Animations.zip
8. Limitations of Passing Data via Bundle
When using Bundle to pass data, note that the size of the Bundle is limited to < 0.5MB. If it exceeds this value, a TransactionTooLargeException will be thrown!!!
9. Command to View All Current Activities Using the Command Line:
Use the following command, provided that you have configured environment variables for the SDK:adb shell dumpsys activity
10. Methods to Set an Activity to Fullscreen:
1) Hide ActionBar in code
Call getActionBar.hide(); in the Activity's onCreate method.
2) Set via requestWindowFeature
requestWindowFeature(Window.FEATURE_NO_TITLE); This code needs to be called before setContentView(), otherwise an error will be thrown!!!
Note:Putting requestWindowFeature(Window.FEATURE_NO_TITLE); before super.onCreate(savedInstanceState); can hide the ActionBar without errors.
3) Via the theme in AndroidManifest.xml
In the tag of the Activity that needs to be fullscreen, set theme = @android:style/Theme.NoTitleBar.FullScreen
11. Clever Use of the onWindowFocusChanged Method:
Let's first look at the official introduction to this method:

That is, when the Activity gains or loses focus, this method will be called back! If we want to monitor whether the Activity has finished loading, we can use this method. If you want to understand it in depth, you can move to this article:Introduction to onWindowFocusChanged Trigger
12. Defining a Dialog-Style Activity
In some cases, we may need to set an Activity to a dialog style. An Activity usually fills the full screen, while a Dialog occupies part of the screen! It is also very simple to implement!
Just set the Activity's theme directly:
android:theme="@android:style/Theme.Dialog"That's it. Of course, you can also set the title and small icon!
//设置左上角小图标
requestWindowFeature(Window.FEATURE_LEFT_ICON);
setContentView(R.layout.main);
getWindow().setFeatureDrawableResource(Window.FEATURE_LEFT_ICON, android.R.drawable.ic_lion_icon);
//设置文字:
setTitle(R.string.actdialog_title);  //XML代码中设置:android:label="@string/activity_dialog"
Summary of This Section:
Alright, in this section we have learned some common problems of Activity in actual development, and I believe it will help you in real development! In the next section, we will learn the concept of the Activity stack and the four loading modes! Stay tuned~ Thank you~