Introduction to this section:
In the previous section, we used LinearLayout + TextView to implement the bottom navigation bar effect. Every time we click, we have to reset the state of all TextViews, and then select the clicked TextView. It's a bit troublesome, right? Next, let's use another method: RadioGroup + RadioButton to implement the effect from the previous section!
1. Some ramblings
What we use in this section is RadioButton, which implements single-choice effects. If you are not familiar with it, or haven't used it, you can first go to:RadioButtonIn simple terms, we just have a RadioGroup containing four RadioButtons, and as before, we divide them by ratio: 1:1:1:1;
In addition, we only need to override RadioGroup's onCheckedChange, and judge the check id to know which RadioButton is clicked! Alright, let's start writing code!
2. Implementation process
PS:As for the resources here, we directly use the resources from the previous section! Also, for the drawable resources, we just change the selected state to checked!
Step 1: Write some resource files for the bottom options
Image Drawable resources:tab_menu_channel.xml
<?xml version="1.0" encoding="utf-8"?>
<selector xmlns:android="http://schemas.android.com/apk/res/android">
    <item android:drawable="@mipmap/tab_channel_pressed" android:state_checked="true" />
    <item android:drawable="@mipmap/tab_channel_normal" />
</selector>
Follow the same pattern for the other three!
Text resources:tab_menu_text.xml
<?xml version="1.0" encoding="utf-8"?>
<selector xmlns:android="http://schemas.android.com/apk/res/android">
    <item android:color="@color/text_yellow" android:state_checked="true" />
    <item android:color="@color/text_gray" />
</selector>
Background resources:tab_menu_bg.xml
<?xml version="1.0" encoding="utf-8"?>
<selector xmlns:android="http://schemas.android.com/apk/res/android">
    <item android:state_selected="true">
        <shape>
            <solid android:color="#FFC4C4C4" />
        </shape>
    </item>
    <item>
        <shape>
            <solid android:color="@color/transparent" />
        </shape>
    </item>
</selector>
Step 2: Write our Activity layout
Earlier, when we used TextView to implement the bottom navigation bar, we noticed a problem: the attributes of each TextView are almost the same. In the suggestions, we also said to extract the same attributes and put them into a Style. Maybe some friends are lazy or don't know how to extract and use them. Here we'll demonstrate:
First, let's take out one of the RadioButton's tags:
<RadioButton
            android:id="@+id/rb_channel"
            android:layout_width="0dp"
            android:layout_height="match_parent"
            android:layout_weight="1"
            android:background="@drawable/tab_menu_bg"
            android:button="@null"
            android:drawableTop="@drawable/tab_menu_channel"
            android:gravity="center"
            android:paddingTop="3dp"
            android:text="@string/tab_menu_alert"
            android:textColor="@drawable/tab_menu_text"
            android:textSize="18sp" />
We can extract the attributes common to each RadioButton and write them intostyle.xmlfile:
<style name="tab_menu_item">
    <item name="android:layout_width">0dp</item>
    <item name="android:layout_weight">1</item>
    <item name="android:layout_height">match_parent</item>
    <item name="android:background">@drawable/tab_menu_bg</item>
    <item name="android:button">@null</item>
    <item name="android:gravity">center</item>
    <item name="android:paddingTop">3dp</item>
    <item name="android:textColor">@drawable/tab_menu_text</item>
    <item name="android:textSize">18sp</item>
</style>
Then, in our activity_main.xml, the RadioButton doesn't need to write the same code every time, just make the RadioButton'sstyle="@style/tab_menu_item"And that's it!
activity_main.xml:
<RelativeLayout xmlns:android="http://schemas.android.com/apk/res/android"
    xmlns:tools="http://schemas.android.com/tools"
    android:layout_width="match_parent"
    android:layout_height="match_parent"
    android:background="@color/bg_gray"
    tools:context=".MainActivity">


    <RelativeLayout
        android:id="@+id/ly_top_bar"
        android:layout_width="match_parent"
        android:layout_height="48dp"
        android:background="@color/bg_topbar">

        <TextView
            android:id="@+id/txt_topbar"
            android:layout_width="match_parent"
            android:layout_height="match_parent"
            android:layout_centerInParent="true"
            android:gravity="center"
            android:text="信息"
            android:textColor="@color/text_topbar"
            android:textSize="18sp" />

        <View
            android:layout_width="match_parent"
            android:layout_height="2px"
            android:layout_alignParentBottom="true"
            android:background="@color/div_white" />

    </RelativeLayout>

    <RadioGroup
        android:id="@+id/rg_tab_bar"
        android:layout_width="match_parent"
        android:layout_height="56dp"
        android:layout_alignParentBottom="true"
        android:background="@color/bg_white"
        android:orientation="horizontal">

        <RadioButton
            android:id="@+id/rb_channel"
            style="@style/tab_menu_item"
            android:drawableTop="@drawable/tab_menu_channel"
            android:text="@string/tab_menu_alert" />

        <RadioButton
            android:id="@+id/rb_message"
            style="@style/tab_menu_item"
            android:drawableTop="@drawable/tab_menu_message"
            android:text="@string/tab_menu_profile" />

        <RadioButton
            android:id="@+id/rb_better"
            style="@style/tab_menu_item"
            android:drawableTop="@drawable/tab_menu_better"
            android:text="@string/tab_menu_pay" />

        <RadioButton
            android:id="@+id/rb_setting"
            style="@style/tab_menu_item"
            android:drawableTop="@drawable/tab_menu_setting"
            android:text="@string/tab_menu_setting"/>

    </RadioGroup>

    <View
        android:id="@+id/div_tab_bar"
        android:layout_width="match_parent"
        android:layout_height="2px"
        android:layout_above="@id/rg_tab_bar"
        android:background="@color/div_white" />

    <FrameLayout
        android:id="@+id/ly_content"
        android:layout_width="match_parent"
        android:layout_height="match_parent"
        android:layout_above="@id/div_tab_bar"
        android:layout_below="@id/ly_top_bar"></FrameLayout>

</RelativeLayout>
Step 3: Hide the top navigation bar
Set the theme attribute in AndroidManifest.xml
android:theme="@style/Theme.AppCompat.NoActionBar"
Step 4: Create a simple layout and class for a Fragment:
Directly copy the layout and Fragment from the previous section:
fg_content.xml:
<?xml version="1.0" encoding="utf-8"?>
<LinearLayout xmlns:android="http://schemas.android.com/apk/res/android"
    android:orientation="vertical" android:layout_width="match_parent"
    android:layout_height="match_parent"
    android:background="@color/bg_white">

    <TextView
        android:id="@+id/txt_content"
        android:layout_width="match_parent"
        android:layout_height="match_parent"
        android:gravity="center"
        android:text="呵呵"
        android:textColor="@color/text_yellow"
        android:textSize="20sp"/>

</LinearLayout>
MyFragment.java:
/**
 * Created by Coder-pig on 2015/8/29 0028.
 */
public class MyFragment extends Fragment {

    private String content;
    public MyFragment(String content) {
        this.content = content;
    }

    @Override
    public View onCreateView(LayoutInflater inflater, ViewGroup container, Bundle savedInstanceState) {
        View view = inflater.inflate(R.layout.fg_content,container,false);
        TextView txt_content = (TextView) view.findViewById(R.id.txt_content);
        txt_content.setText(content);
        return view;
    }
}
Step 5: Write MainActivity.java
This is much simpler than the TextView implementation, so I won't explain it in detail. It's very simple; here is the code directly:
MainActivity.java
/**
 * Created by Coder-pig on 2015/8/29 0028.
 */
public class MainActivity extends AppCompatActivity implements RadioGroup.OnCheckedChangeListener{

    private RadioGroup rg_tab_bar;
    private RadioButton rb_channel;

    //Fragment Object
    private MyFragment fg1,fg2,fg3,fg4;
    private FragmentManager fManager;

    @Override
    protected void onCreate(Bundle savedInstanceState) {
        super.onCreate(savedInstanceState);
        setContentView(R.layout.activity_main);
        fManager = getFragmentManager();
        rg_tab_bar = (RadioGroup) findViewById(R.id.rg_tab_bar);
        rg_tab_bar.setOnCheckedChangeListener(this);
        //获取第一个单选按钮,并设置其为选中状态
        rb_channel = (RadioButton) findViewById(R.id.rb_channel);
        rb_channel.setChecked(true);
    }


    @Override
    public void onCheckedChanged(RadioGroup group, int checkedId) {
        FragmentTransaction fTransaction = fManager.beginTransaction();
        hideAllFragment(fTransaction);
        switch (checkedId){
            case R.id.rb_channel:
                if(fg1 == null){
                    fg1 = new MyFragment("第一个Fragment");
                    fTransaction.add(R.id.ly_content,fg1);
                }else{
                    fTransaction.show(fg1);
                }
                break;
            case R.id.rb_message:
                if(fg2 == null){
                    fg2 = new MyFragment("第二个Fragment");
                    fTransaction.add(R.id.ly_content,fg2);
                }else{
                    fTransaction.show(fg2);
                }
                break;
            case R.id.rb_better:
                if(fg3 == null){
                    fg3 = new MyFragment("第三个Fragment");
                    fTransaction.add(R.id.ly_content,fg3);
                }else{
                    fTransaction.show(fg3);
                }
                break;
            case R.id.rb_setting:
                if(fg4 == null){
                    fg4 = new MyFragment("第四个Fragment");
                    fTransaction.add(R.id.ly_content,fg4);
                }else{
                    fTransaction.show(fg4);
                }
                break;
        }
        fTransaction.commit();
    }

    //隐藏所有Fragment
    private void hideAllFragment(FragmentTransaction fragmentTransaction){
        if(fg1 != null)fragmentTransaction.hide(fg1);
        if(fg2 != null)fragmentTransaction.hide(fg2);
        if(fg3 != null)fragmentTransaction.hide(fg3);
        if(fg4 != null)fragmentTransaction.hide(fg4);
    }

}
PS:In the previous section, I forgot to mention one point: FragmentTransaction can only be used once. Each time you use it, you must call FragmentManager's beginTransaction() method to obtain a FragmentTransaction transaction object!
3. Screenshot of the running effect
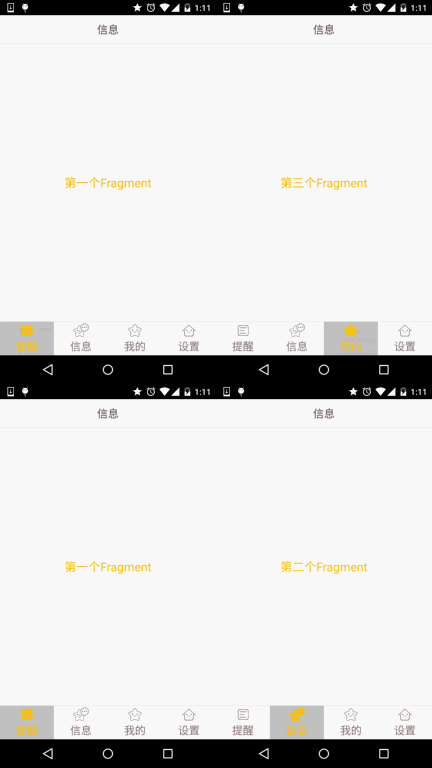
Actually, the effect is the same as the one implemented in the previous section:
4. Code download:
FragmentDemo2.zip:Download FragmentDemo2.zip
5. Summary of this section:
This section explains the second method for implementing the bottom navigation bar: RadioGroup + RadioButton. With single choice, we don't need to, as with TextView, reset the Selected state of all TextViews after each click, and then set the Selected of the clicked TextView to true. In this way, we can write less code. That's all for this section. Thanks!