Introduction to this section:
This section brings you the WindowManager (Window Management Service) among the system services provided by Android. It is the lowest level for displaying Views. Toast, Activity, and Dialog all use this WindowManager at the bottom level. It is global! The core of this class is nothing more than calling the methods addView, removeView, updateViewLayout to display Views and setting related properties through the WindowManager.LayoutParams API!
In this section, let's explore some practical application examples of WindowManager in real development~
Official API documentation:WindowManager
1. Some concepts of WindowManager:
1) Introduction to WindowManager
It is an API provided by Android for interacting with the window manager! We all know that an App's interface is composed of Activities, and an Activity is composed of Views. When we want to display an interface, the first thing that comes to mind is Activity, right? Or Dialog and Toast.
But in some cases, the above three may not meet our needs. For example, for a simple display, using Activity seems a bit redundant, while Dialog requires a Context object, and Toast cannot be clicked... For the above situations, we can use WindowManager, this thing, to add Views to the screen or remove Views from the screen! It is an interface for managing the Android window mechanism, the lowest level for displaying Views!
2) How to obtain a WindowManager instance
①Obtain the WindowManager object:
WindowManager wManager = getApplicationContext().getSystemService(Context. WINDOW_ SERVICE);
②Obtain the WindowManager.LayoutParams object to prepare for subsequent operations
WindowManager.LayoutParams wmParams=new WindowManager.LayoutParams();
2. WindowManager usage examples:
Example 1: Getting screen width and height
Before Android 4.2, we could use the following method to get screen width and height:
public static int[] getScreenHW(Context context) {
    WindowManager manager = (WindowManager)context
    .getSystemService(Context.WINDOW_SERVICE);
    Display display = manager.getDefaultDisplay();
    int width = display.getWidth();
    int height = display.getHeight();
    int[] HW = new int[] { width, height };
    return HW;
}
However, the above method became deprecated after Android 4.2. We can use another method to get screen width and height:
public static int[] getScreenHW2(Context context) {
    WindowManager manager = (WindowManager) context.
    getSystemService(Context.WINDOW_SERVICE);
    DisplayMetrics dm = new DisplayMetrics();
    manager.getDefaultDisplay().getMetrics(dm);
    int width = dm.widthPixels;
    int height = dm.heightPixels;
    int[] HW = new int[] { width, height };
    return HW;
}
Then we can write two separate methods to get width and height. Here we take the second method of getting screen width and height as an example:
public static int getScreenW(Context context) {
    return getScreenHW2(context)[0];
}

public static int getScreenH(Context context) {
    return getScreenHW2(context)[1];
}
Of course, if you don't write a separate utility class, you can directly obtain them, for example:
public class MainActivity extends AppCompatActivity {
    @Override
    protected void onCreate(Bundle savedInstanceState) {
        super.onCreate(savedInstanceState);
        setContentView(R.layout.activity_main);
        WindowManager wManager = (WindowManager) getSystemService(Context.WINDOW_SERVICE);
        DisplayMetrics dm = new DisplayMetrics();
        wManager.getDefaultDisplay().getMetrics(dm);
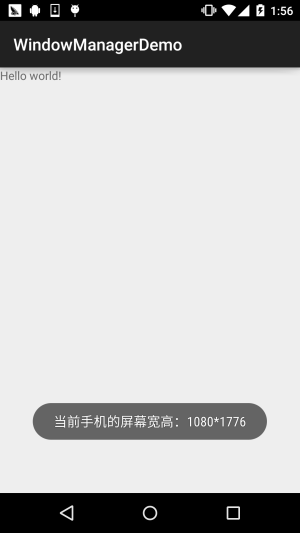
        Toast.makeText(MainActivity.this, "当前手机的屏幕宽高:" + dm.widthPixels + "*" +
                dm.heightPixels, Toast.LENGTH_SHORT).show();
    }
}
Running result:
Example 2: Setting the window to full-screen display
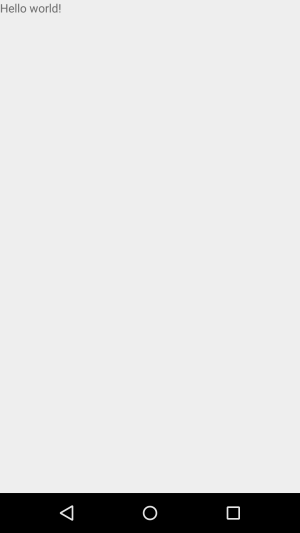
getWindow().setFlags(WindowManager.LayoutParams.FLAG_FULLSCREEN,
                WindowManager.LayoutParams.FLAG_FULLSCREEN);
        getSupportActionBar().hide();
Running result:
Example 3: Keeping the screen always on
public void setKeepScreenOn(Activity activity,boolean keepScreenOn)
{
    if(keepScreenOn)
    {
        activity.getWindow().addFlags(WindowManager.LayoutParams.FLAG_KEEP_SCREEN_ON);
    }else{
        activity.getWindow().clearFlags(WindowManager.LayoutParams.FLAG_KEEP_SCREEN_ON);
    }
}
Example 4: Implementation of a simple floating window
Effect screenshot:

Implementation code:
First, we need a background Service to wait for our operations in the background, such as completing the drawing and removal of the floating window. Therefore, we define a Service:MyService.javaWe need a method to create the floating window View:
private void createWindowView() {
    btnView = new Button(getApplicationContext());
    btnView.setBackgroundResource(R.mipmap.ic_launcher);
    windowManager = (WindowManager) getApplicationContext()
            .getSystemService(Context.WINDOW_SERVICE);
    params = new WindowManager.LayoutParams();

    // 设置Window Type
    params.type = WindowManager.LayoutParams.TYPE_SYSTEM_ALERT;
    // 设置悬浮框不可触摸
    params.flags = WindowManager.LayoutParams.FLAG_NOT_TOUCH_MODAL
            | WindowManager.LayoutParams.FLAG_NOT_FOCUSABLE;
    // 悬浮窗不可触摸,不接受任何事件,同时不影响后面的事件响应
    params.format = PixelFormat.RGBA_8888;
    // 设置悬浮框的宽高
    params.width = 200;
    params.height = 200;
    params.gravity = Gravity.LEFT;
    params.x = 200;
    params.y = 000;
    // 设置悬浮框的Touch监听
    btnView.setOnTouchListener(new View.OnTouchListener() {
        //保存悬浮框最后位置的变量
        int lastX, lastY;
        int paramX, paramY;

        @Override
        public boolean onTouch(View v, MotionEvent event) {
            switch (event.getAction()) {
                case MotionEvent.ACTION_DOWN:
                    lastX = (int) event.getRawX();
                    lastY = (int) event.getRawY();
                    paramX = params.x;
                    paramY = params.y;
                    break;
                case MotionEvent.ACTION_MOVE:
                    int dx = (int) event.getRawX() - lastX;
                    int dy = (int) event.getRawY() - lastY;
                    params.x = paramX + dx;
                    params.y = paramY + dy;
                    // 更新悬浮窗位置
                    windowManager.updateViewLayout(btnView, params);
                    break;
            }
            return true;
        }
    });
    windowManager.addView(btnView, params);
    isAdded = true;
}
Then we just need to call the above createWindowView() method in the OnCreate() method to start loading the floating window. But we noticed one thing: this thing seems cannot be closed, damn, okay, next we need to analyze the requirements!
It should only be displayed when the phone is on the normal interface, i.e., the desktop. When we launch other apps, this floating window should disappear. When we exit the app and return to the desktop, this floating window should reappear!
Then we first need to determine whether the App is on the desktop, so we add the following code:
/**
 * 判断当前界面是否是桌面
 */
public boolean isHome(){
    if(mActivityManager == null) {
        mActivityManager = (ActivityManager)getSystemService(Context.ACTIVITY_SERVICE);
    }
    List<RunningTaskInfo> rti = mActivityManager.getRunningTasks(1);
    return homeList.contains(rti.get(0).topActivity.getPackageName());
}

/**
 * 获得属于桌面的应用的应用包名称
 * @return 返回包含所有包名的字符串列表
 */
private List<String> getHomes() {
    List<String> names = new ArrayList<String>();
    PackageManager packageManager = this.getPackageManager();
    // 属性
    Intent intent = new Intent(Intent.ACTION_MAIN);
    intent.addCategory(Intent.CATEGORY_HOME);
    List<ResolveInfo> resolveInfo = packageManager.queryIntentActivities(intent,
            PackageManager.MATCH_DEFAULT_ONLY);
    for(ResolveInfo ri : resolveInfo) {
        names.add(ri.activityInfo.packageName);
    }
    return names;
}
Okay, next we need to perform a series of judgments at regular intervals, such as: whether it is on the desktop, whether the floating window has been loaded; if not, load it; otherwise, if it has been loaded, remove the floating window! Here we use a handler~, because we cannot directly update the UI in a child thread, so, you know, we write our own handler to complete the above operations:
//定义一个更新界面的Handler
private Handler mHandler = new Handler() {
    @Override
    public void handleMessage(Message msg) {
        switch(msg.what) {
        case HANDLE_CHECK_ACTIVITY:
            if(isHome()) {
                if(!isAdded) {
                    windowManager.addView(btnView, params);
                    isAdded = true;
                new Thread(new Runnable() {
                    public void run() {
                        for(int i=0;i<10;i++){
                            try {
                                Thread.sleep(1000);
                            } catch (InterruptedException e) {e.printStackTrace();}
                            Message m = new Message();
                            m.what=2;
                            mHandler.sendMessage(m);
                        }
                    }
                }).start();}
            } else {
                if(isAdded) {
                    windowManager.removeView(btnView);
                    isAdded = false;
                }
            }
            mHandler.sendEmptyMessageDelayed(HANDLE_CHECK_ACTIVITY, 0);
            break;
        }
    }
};
The last thing to do is to override the Service's onStartCommand() method, which is to make judgments, extract data from the Intent, and determine whether to add the floating window or remove it!
@Override
public int onStartCommand(Intent intent, int flags, int startId) {
    int operation = intent.getIntExtra(OPERATION, OPERATION_SHOW);
    switch(operation) {
    case OPERATION_SHOW:
        mHandler.removeMessages(HANDLE_CHECK_ACTIVITY);
        mHandler.sendEmptyMessage(HANDLE_CHECK_ACTIVITY);
        break;
    case OPERATION_HIDE:
        mHandler.removeMessages(HANDLE_CHECK_ACTIVITY);
        break;
    }
    return super.onStartCommand(intent, flags, startId);
}
Alright, at this point, the main work is done. Next are some trivial things: use an Activity to start this Service:MainActivity.java:
public class MainActivity extends AppCompatActivity implements View.OnClickListener {

    private Button btn_on;

    @Override
    protected void onCreate(Bundle savedInstanceState) {
        super.onCreate(savedInstanceState);
        setContentView(R.layout.activity_main);
        bindViews();
    }

    private void bindViews() {
        btn_on = (Button) findViewById(R.id.btn_on);
        btn_on.setOnClickListener(this);
    }

    @Override
    public void onClick(View v) {
        switch (v.getId()) {
            case R.id.btn_on:
                Intent mIntent = new Intent(MainActivity.this, MainService.class);
                mIntent.putExtra(MainService.OPERATION, MainService.OPERATION_SHOW);
                startService(mIntent);
                Toast.makeText(MainActivity.this, "悬浮框已开启~", Toast.LENGTH_SHORT).show();
                break;
        }
    }
}
Then add permissions in AndroidManifest.xml and register MainService:
<uses-permission android:name="android.permission.SYSTEM_ALERT_WINDOW" />
<uses-permission android:name="android.permission.GET_TASKS" />

<service android:name=".MainService"/>
Alright, the logic is still relatively easy to understand~ You can take a look yourself~
3. Extended reading:
From the fourth example, you may have noticed: WindowManager.LayoutParams, this thing, is a flag, such as full-screen~ Due to time constraints, I won't list them one by one. You can check the official website or the following links:
Official documentation: WindowManager.LayoutParams
Android system service - WindowManager
In addition, if you are interested in the above floating window and want to study it more deeply, you can refer to Uncle Guo (Guo Lin)'s blog:
4. Code examples download for this section:
WindowManagerDemo2.zip
Summary of this section:
In this section, we learned about WindowManager in Android system services. The first three examples may be used more in actual development. It is recommended to write the first example as a utility class, after all, screen width and height are used quite a lot~ As for the floating window, if you can understand it, fine; if you don't, it doesn't matter~ In actual development, you are rarely asked to make a floating window... Well, okay, that's all for this section, thank you~
