Introduction:
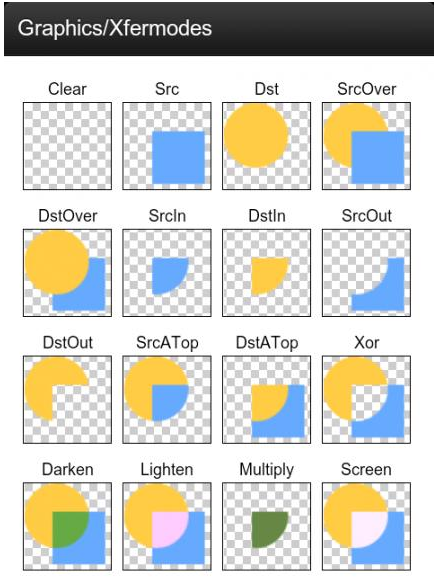
In the previous section, we learned about the three subclasses of Xfermode: the parameter in the PorterDuffXfermode constructor is:PorterDuff.ModeAfter looking at the 16 image blending modes, we also wrote code to verify the 18 different blending modes in the documentation. The 18 modes add two new modes: ADD and OVERLAY! Of course, just verifying and knowing is not enough. In this section, we will write an example to help us become familiar with how to actually use these blending modes provided by PorterDuff.Mode. The example brought in this section is: the implementation of circular & rounded corner images!
In2.3.4 ImageView (Image View)At the end, we explained the simplest implementation of drawing a circular ImageView. The principle is to call clipPath on the image to cut out a circle!
And this section is usingPorterDuff.ModeinDST_INmode to implement. Without further ado, let's begin this section!PS: The example in this section is from the great Hong Yang —Android Xfermode in Action: Implementing Circular and Rounded Corner Images
1. The effect to be achieved and implementation process analysis:
Effect diagram after running:
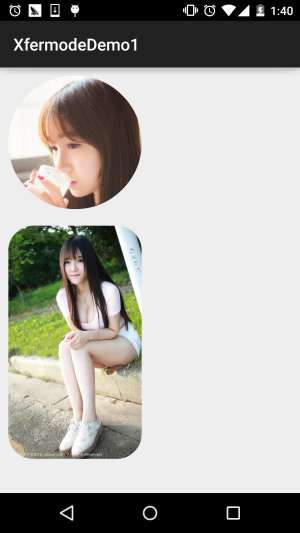
Well, the above is the effect we want to achieve. Through thisPorterDuff.Mode.DST_INmode to implement! Let's analyze the implementation process:
- Step 1:DST_INmode!
- Step 2:
- Well, now that we know the principle, next we need to consider issues related to custom ImageView:
- What we want to draw is a View with rounded corners or a circle, so we need to add an attribute to determine that, and rounded corners also need a parameter for the corner radius. Therefore, we can use custom attributes (attrs.xml), and then in the custom View constructor, extract these parameters!Next is the calculation of the image size:First, if we set it to a circle, then we need to make the width and height equal, based on the smaller value. We can call getMeasuredXxx() in the onMesure() method to get the width and height, see which one is smaller, and call setMeasuredDimension(x, x) to set the width and height!Thenin the onDraw() method, we get the image width and height, then calculate the scaling ratio according to the image width/height and the View width/height. If the image width/height does not match the View's width/height, the scaled image width and height must be larger than the View's width and height, so take the larger value!
- Next,it comes to drawing the image. Define a method to draw the shape, then after initializing the brush, set setXfermode to PorterDuff.Mode.DST_IN, first draw the image, then draw the shape.
- Finally,it is something about image caching. Here, WeakReference is used to cache the image, avoiding allocating memory and redrawing every time onDraw is called. Finally, clear the cache in invalidate!
The general implementation process is as above. Once you know the process, looking at the code is much simpler!
2. Code implementation:
Custom control attributes:res/attrs.xml:
<?xml version="1.0" encoding="utf-8"?>
<resources>
    <declare-styleable name="CircleImageView">
        <attr name="Radius" format="dimension"/>
        <attr name="type">
            <enum name="circle" value="0"/>
            <enum name="round" value="1"/>
        </attr>
    </declare-styleable>
</resources>
Next is the custom ImageView:CircleImageView.java:
/**
 * Created by Jay on 2015/10/25 0025.
 */
public class CircleImageView extends ImageView {

    private Paint mPaint;
    private Xfermode mXfermode = new PorterDuffXfermode(PorterDuff.Mode.DST_IN);
    private Bitmap mMaskBitmap;
    private WeakReference<Bitmap> mWeakBitmap;

    //图片相关的属性
    private int type;                           //类型,圆形或者圆角
    public static final int TYPE_CIRCLE = 0;
    public static final int TYPE_ROUND = 1;
    private static final int BODER_RADIUS_DEFAULT = 10;     //圆角默认大小值
    private int mBorderRadius;                  //圆角大小


    public CircleImageView(Context context) {
        this(context, null);
    }

    public CircleImageView(Context context, AttributeSet attrs) {
        super(context, attrs);
        mPaint = new Paint();
        mPaint.setAntiAlias(true);
        //取出attrs中我们为View设置的相关值
        TypedArray tArray = context.obtainStyledAttributes(attrs, R.styleable.CircleImageView);
        mBorderRadius = tArray.getDimensionPixelSize(R.styleable.CircleImageView_Radius, BODER_RADIUS_DEFAULT);
        type = tArray.getInt(R.styleable.CircleImageView_type, TYPE_CIRCLE);
        tArray.recycle();
    }

    public CircleImageView(Context context, AttributeSet attrs, int defStyleAttr) {
        super(context, attrs, defStyleAttr);
    }


    @Override
    protected void onMeasure(int widthMeasureSpec, int heightMeasureSpec) {
        super.onMeasure(widthMeasureSpec, heightMeasureSpec);
        if (type == TYPE_CIRCLE) {
            int width = Math.min(getMeasuredWidth(), getMeasuredHeight());
            setMeasuredDimension(width, width);    //设置当前View的大小
        }
    }

    @Override
    protected void onDraw(Canvas canvas) {

        //在缓存中取出bitmap
        Bitmap bitmap = mWeakBitmap == null ? null : mWeakBitmap.get();
        if (bitmap == null || bitmap.isRecycled()) {
            //获取图片宽高
            Drawable drawable = getDrawable();
            int width = drawable.getIntrinsicWidth();
            int height = drawable.getIntrinsicHeight();

            if (drawable != null) {
                bitmap = Bitmap.createBitmap(getWidth(), getHeight(), Bitmap.Config.ARGB_8888);
                Canvas drawCanvas = new Canvas(bitmap);
                float scale = 1.0f;
                if (type == TYPE_ROUND) {
                    scale = Math.max(getWidth() * 1.0f / width, getHeight()
                            * 1.0f / height);
                } else {
                    scale = getWidth() * 1.0F / Math.min(width, height);
                }
                //根据缩放比例,设置bounds,相当于缩放图片了
                drawable.setBounds(0, 0, (int) (scale * width),
                        (int) (scale * height));

                drawable.draw(drawCanvas);
                if (mMaskBitmap == null || mMaskBitmap.isRecycled()) {
                    mMaskBitmap = getBitmap();
                }

                mPaint.reset();
                mPaint.setFilterBitmap(false);
                mPaint.setXfermode(mXfermode);

                //绘制形状
                drawCanvas.drawBitmap(mMaskBitmap, 0, 0, mPaint);

                //bitmap缓存起来,避免每次调用onDraw,分配内存
                mWeakBitmap = new WeakReference<Bitmap>(bitmap);

                //绘制图片
                canvas.drawBitmap(bitmap, 0, 0, null);
                mPaint.setXfermode(null);

            }
        }
        if (bitmap != null) {
            mPaint.setXfermode(null);
            canvas.drawBitmap(bitmap, 0.0f, 0.0f, mPaint);
            return;
        }
    }

    //缓存Bitmap,避免每次OnDraw都重新分配内存与绘图
    @Override
    public void invalidate() {
        mWeakBitmap = null;
        if (mWeakBitmap != null) {
            mMaskBitmap.recycle();
            mMaskBitmap = null;
        }
        super.invalidate();
    }

    //定义一个绘制形状的方法

    private Bitmap getBitmap() {
        Bitmap bitmap = Bitmap.createBitmap(getWidth(), getHeight(),
                Bitmap.Config.ARGB_8888);

        Canvas canvas = new Canvas(bitmap);
        Paint paint = new Paint(Paint.ANTI_ALIAS_FLAG);   //抗锯齿
        paint.setColor(Color.BLACK);
        if (type == TYPE_ROUND) {
            canvas.drawRoundRect(new RectF(0, 0, getWidth(), getHeight()),
                    mBorderRadius, mBorderRadius, paint);
        } else {
            canvas.drawCircle(getWidth() / 2, getWidth() / 2, getWidth() / 2, paint);
        }
        return bitmap;
    }
}
Finally, call it in the layout file:activity_main.xml:
<LinearLayout xmlns:android="http://schemas.android.com/apk/res/android"
    xmlns:app="http://schemas.android.com/apk/res-auto"
    android:layout_width="match_parent"
    android:layout_height="match_parent"
    android:orientation="vertical">

    <com.jay.xfermodedemo1.CircleImageView
        android:layout_width="160dp"
        android:layout_height="240dp"
        android:layout_margin="10dp"
        android:src="@mipmap/ic_bg_meizi2.html"
        app:type="circle" />

    <com.jay.xfermodedemo1.CircleImageView
        android:layout_width="160dp"
        android:layout_height="280dp"
        android:layout_margin="10dp"
        android:src="@mipmap/ic_bg_meizi1.html"
        app:Radius="30dp"
        app:type="round" />

</LinearLayout>
Okay, if you don't understand the code the first time, read it twice more and you'll understand~
3. Code example download for this section:
XfermodeDemo1.zip
Section summary:
In this section, we explained the first application example of Xfermode and PorterDuff, using the DST_IN mode to implement custom circular and rounded corner ImageViews. I believe everyone now has some idea about the simple application of PorterDuff. Strike while the iron is hot; in the next section, we will also write an example to practice. Okay, that's all, thank you~