Introduction to this section:
This section continues with LayoutInflater (Layout Service), a system service in Android. When it comes to layouts, the first thing that may come to mind is writing a layout XML, then calling Activity's setContentView() to load the layout and display it on the screen, right? Actually, underneath, it still goes through LayoutInflater, which uses Android's built-in Pull parser to parse the layout. It is generally used more often when dynamically loading layouts or adding controls in Android. In this section, we will learn about some of its usages in actual development~
Official API documentation:LayoutInflater
1. Introduction to LayoutInflater
1) What the heck is Layout?
Answer: It is a system service used to load layouts, that is, it instantiates View objects corresponding to Layout XML files. It cannot be used directly; you need to obtain a LayoutInflater instance bound to the current Context through thegetLayoutInflater( ) method orgetSystemService( ) method to obtain a LayoutInflater instance bound to the current Context!
2) Usage of LayoutInflater
① Three methods to obtain a LayoutInflater instance:
LayoutInflater inflater1 = LayoutInflater.from(this);
LayoutInflater inflater2 = getLayoutInflater();
LayoutInflater inflater3 = (LayoutInflater) getSystemService(LAYOUT_INFLATER_SERVICE);
PS: Actually, the latter two go through the first method at the underlying level~
② Methods for loading layouts:
public View inflate(int resource, ViewGroup root, boolean attachToRoot) The three parameters of this method are in order:
① The resource ID corresponding to the layout to be loaded
② Nest another parent layout on the outside of this layout. If not needed, just write null!
③ Whether to wrap the outermost layer of the loaded layout file with a root layout. If this parameter is not set: If root is not null, it defaults to true If root is null, attachToRoot has no effect! If root is not null and attachToRoot is true, a root layout will be nested around the outermost layer of the loaded layout file; If false, root has no effect! Simply put:Whether to add an outer root container for the loaded layout~!
③ Setting related attributes through LayoutInflater.LayoutParams:
For example, RelativeLayout can also add rules through the addRule method, which is to set the position: is it relative to the parent container? Or relative to child controls? Or set margins, etc. It's up to you~
2. Loading layouts with pure Java code
We are already accustomed to using XML to generate the layouts we need, but in some specific situations, we need to use Java code to dynamically add components or layouts to our layouts!
However, it is not recommended to completely use Java code to write Android page layouts. First of all, there will be more code, and when it gets long it can easily become messy, and it is not conducive to separating business logic. We still recommend using XML to complete layouts, and then modifying the components inside through Java code. Of course, sometimes you may need to use Java to dynamically add components!
Flow of loading layouts with pure Java code:
——Step 1:
①Create a container:LinearLayout ly = new LinearLayout(this);
②Create components:Button btnOne = new Button(this);
——Step 2:
You can set related attributes for the container or components: For example:LinearLayout, we can set the arrangement direction of the components:ly.setOrientation(LinearLayout.VERTICAL);And components can also: for example, Button:btnOne.setText("Button1");For methods of setting attributes, refer to the Android API. Usually, for attributes set in XML, you just need to add 'set' before them, for examplesetPadding(left, top, right, bottom);
——Step 3:
Add the component or container to a container. At this time, we may need to set the component's addition position, or set its size: We need to use a class: LayoutParams. We can think of it as an information package for the layout container! A class that encapsulates information such as position and size! First, let's demonstrate the method of setting size: (the LinearLayout in front can be changed according to different containers)
LinearLayout.LayoutParams lp1 = new LinearLayout.LayoutParams(
        LayoutParams.WRAP_CONTENT, LayoutParams.WRAP_CONTENT);
Very simple. Next comes setting the position. When setting position, usually we only consider RelativeLayout! At this time, use the addRule() method of LayoutParams! You can add multiple addRule() calls! Set the position of the component in the parent container,
For exampleSet the alignment method of the component:
RelativeLayout rly = new RelativeLayout(this);
RelativeLayout.LayoutParams lp2 = new RelativeLayout.LayoutParams(
                LayoutParams.WRAP_CONTENT, LayoutParams.WRAP_CONTENT);
lp2.addRule(RelativeLayout.ALIGN_PARENT_BOTTOM);
Button btnOne = new Button(this);
rly.addView(btnOne, lp2);
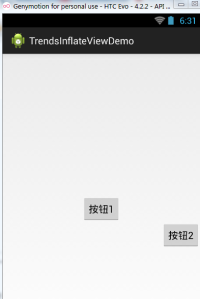
Alignment relative to other components: (There is a drawback: you need to manually set an id for the reference component, which ismanual!!!!) For example: after setting btnOne to center, make BtnTwo be positioned below btnOne and to the right of the parent container!
public class MainActivity extends Activity {
    @Override
    protected void onCreate(Bundle savedInstanceState) {
        super.onCreate(savedInstanceState);
        RelativeLayout rly = new RelativeLayout(this);
        Button btnOne = new Button(this);
        btnOne.setText("按钮1");
        Button btnTwo = new Button(this);
        btnTwo.setText("按钮2");
        // 为按钮1设置一个id值
        btnOne.setId(123);
        // 设置按钮1的位置,在父容器中居中
        RelativeLayout.LayoutParams rlp1 = new RelativeLayout.LayoutParams(
                LayoutParams.WRAP_CONTENT, LayoutParams.WRAP_CONTENT);
        rlp1.addRule(RelativeLayout.CENTER_IN_PARENT);
        // 设置按钮2的位置,在按钮1的下方,并且对齐父容器右面
        RelativeLayout.LayoutParams rlp2 = new RelativeLayout.LayoutParams(
                LayoutParams.WRAP_CONTENT, LayoutParams.WRAP_CONTENT);
        rlp2.addRule(RelativeLayout.BELOW, 123);
        rlp2.addRule(RelativeLayout.ALIGN_PARENT_RIGHT);
        // 将组件添加到外部容器中
        rly.addView(btnTwo, rlp2);
        rly.addView(btnOne, rlp1);
        // 设置当前视图加载的View即rly
        setContentView(rly);
    }
}
——step 4:
Just call the setContentView() method to load the layout object! In addition, if you want to remove a View from a container, you can call the container'sremoveView(component to be removed);
Running screenshot:
3. Dynamically adding controls or XML layouts with Java code
In the second point, we explained loading layouts with pure Java code. It is not used much in practice; more often, it is about dynamically adding View controls and dynamically loading XML layouts!
1) Dynamically adding Views with Java code
There are two ways to dynamically add components. The difference is whether you need to first ;setContentView(R.layout.activity_main)Below is a demonstration of adding a Button using the two different approaches:
First, write a layout file:activity_main.xml:
<RelativeLayout xmlns:android="http://schemas.android.com/apk/res/android"
    android:id="@+id/RelativeLayout1"
    android:layout_width="match_parent"
    android:layout_height="match_parent" >

    <TextView
        android:id="@+id/txtTitle"
        android:layout_width="match_parent"
        android:layout_height="wrap_content"
        android:text="我是xml文件加载的布局"/>

</RelativeLayout>
The first approach: no need to call setContentView() to load the layout file first:
public class MainActivity extends Activity {
    @Override
    protected void onCreate(Bundle savedInstanceState) {
        super.onCreate(savedInstanceState);
        Button btnOne = new Button(this);
        btnOne.setText("我是动态添加的按钮");
        RelativeLayout.LayoutParams lp2 = new RelativeLayout.LayoutParams(
                LayoutParams.WRAP_CONTENT, LayoutParams.WRAP_CONTENT);
        lp2.addRule(RelativeLayout.CENTER_IN_PARENT);
        LayoutInflater inflater = LayoutInflater.from(this);
        RelativeLayout rly = (RelativeLayout) inflater.inflate(
                R.layout.activity_main, null)
                .findViewById(R.id.RelativeLayout1);
        rly.addView(btnOne,lp2);
        setContentView(rly);
    }
}
The second approach: no need to call setContentView() to load the layout file first:
public class MainActivity extends Activity {
    @Override
    protected void onCreate(Bundle savedInstanceState) {
        super.onCreate(savedInstanceState);
        setContentView(R.layout.activity_main);
        Button btnOne = new Button(this);
        btnOne.setText("我是动态添加的按钮");
        RelativeLayout.LayoutParams lp2 = new RelativeLayout.LayoutParams(
                LayoutParams.WRAP_CONTENT, LayoutParams.WRAP_CONTENT);
        lp2.addRule(RelativeLayout.CENTER_IN_PARENT);
        RelativeLayout rly = (RelativeLayout) findViewById(R.id.RelativeLayout1);
        rly.addView(btnOne,lp2);
    }
}
Analysis and summary:
The code is very simple. After creating the button, we also created a LayoutParams object to set the Button's size, and set the Button's position through the addRule() method!
The first approach: Load the activity_main layout through LayoutInflater's inflate() method, obtain the outer container, then addView to add the button into the container, and finally setContentView();
The second approach: Because we have already loaded the layout through the setContentView() method, at this point we can use findViewById to find the outer container, then addView, and finally setContentView()!
In addition, regarding setContentView(), the view node it sets is the root node of the entire XML!
2) Dynamically loading XML layouts with Java code
Next, let's try something different. This time, what's loaded is an XML file!Dynamically add an XML file !First, write the main layout file and the dynamically loaded layout file:
activity_main.xml:
<RelativeLayout xmlns:android="http://schemas.android.com/apk/res/android"
    android:id="@+id/RelativeLayout1"
    android:layout_width="match_parent"
    android:layout_height="match_parent" >
    <Button
        android:id="@+id/btnLoad"
        android:layout_width="match_parent"
        android:layout_height="wrap_content"
        android:text="动态加载布局"/>
</RelativeLayout>
inflate.xml:
<?xml version="1.0" encoding="utf-8"?>
<LinearLayout xmlns:android="http://schemas.android.com/apk/res/android"
    android:layout_width="match_parent"
    android:layout_height="match_parent"
    android:gravity="center"
    android:orientation="vertical"
    android:id="@+id/ly_inflate" >

    <TextView
        android:layout_width="wrap_content"
        android:layout_height="wrap_content"
        android:text="我是Java代码加载的布局" />

    <Button
        android:layout_width="wrap_content"
        android:layout_height="wrap_content"
        android:text="我是布局里的一个小按钮" />

</LinearLayout>
Then go to ourMainActivity.javaDynamically load the XML layout here:
public class MainActivity extends Activity {
    @Override
    protected void onCreate(Bundle savedInstanceState) {
        super.onCreate(savedInstanceState);
        setContentView(R.layout.activity_main);
        //获得LayoutInflater对象;
        final LayoutInflater inflater = LayoutInflater.from(this);
        //获得外部容器对象
        final RelativeLayout rly = (RelativeLayout) findViewById(R.id.RelativeLayout1);
        Button btnLoad = (Button) findViewById(R.id.btnLoad);
        btnLoad.setOnClickListener(new OnClickListener() {
            @Override
            public void onClick(View v) {
                //加载要添加的布局对象
                LinearLayout ly = (LinearLayout) inflater.inflate(
                        R.layout.inflate, null, false).findViewById(
                        R.id.ly_inflate);
                //设置加载布局的大小与位置
                RelativeLayout.LayoutParams lp = new RelativeLayout.LayoutParams(
                        LayoutParams.WRAP_CONTENT, LayoutParams.WRAP_CONTENT);
                lp.addRule(RelativeLayout.CENTER_IN_PARENT);
                rly.addView(ly,lp);
            }
        });
    }
}
Running screenshot:
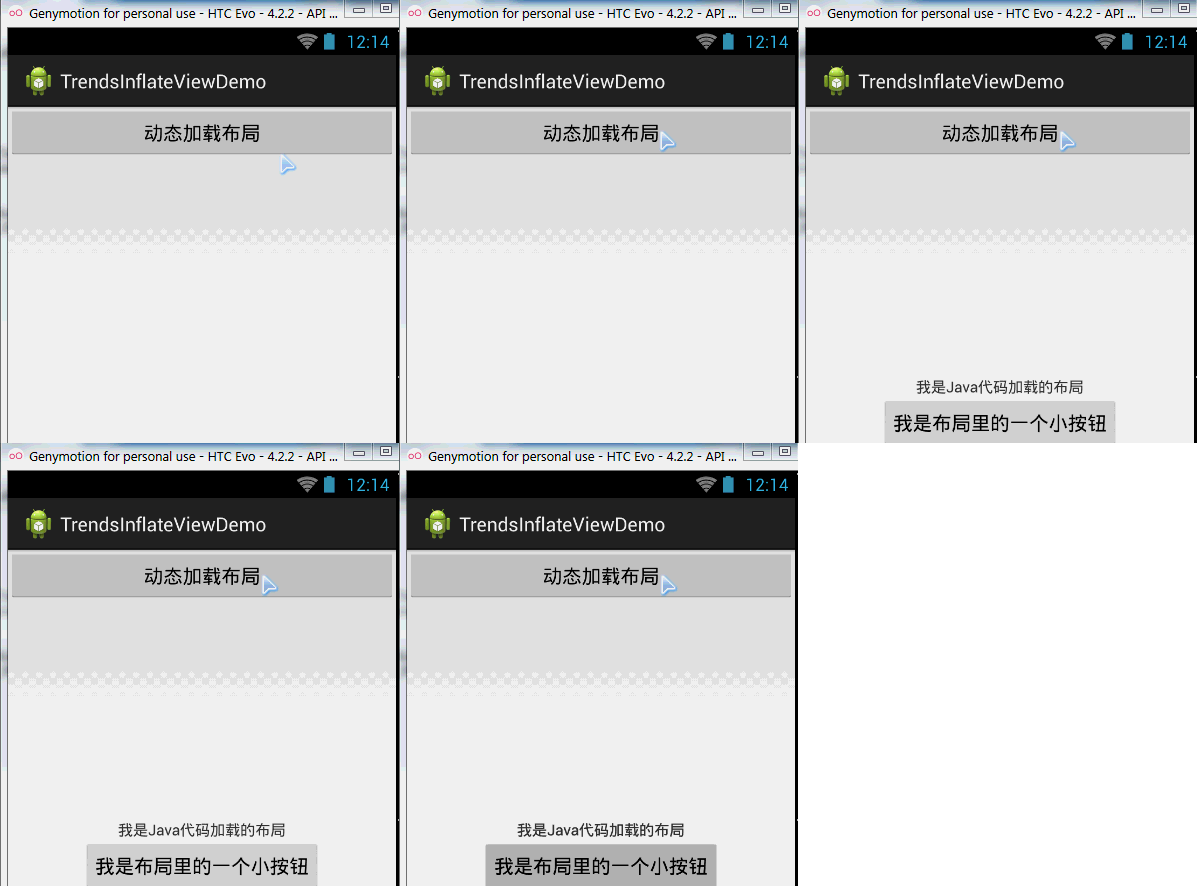
Code analysis:
① Get the container object:
final RelativeLayout rly = (RelativeLayout) findViewById(R.id.RelativeLayout1);② Get the Inflater object, load the XML of the added layout, and use findViewById to find the outermost root node
final LayoutInflater inflater = LayoutInflater.from(this);
LinearLayout ly = (LinearLayout) inflater.inflate(R.layout.inflate, null, false)
   .findViewById(R.id.ly_inflate);
③ Set size and position information for this container:
RelativeLayout.LayoutParams lp = new RelativeLayout.LayoutParams(
               LayoutParams.WRAP_CONTENT, LayoutParams.WRAP_CONTENT);
       lp.addRule(RelativeLayout.CENTER_IN_PARENT);
④ Add it to the outer container:
rly.addView(ly,lp);
4. Source code of LayoutInflater's inflate() method
Finally, here is the source code of LayoutInflater's inflate() method. If you are interested, you can take a look~ It is actually just Pull parsing~
public View inflate(XmlPullParser parser, ViewGroup root, boolean attachToRoot) {
    synchronized (mConstructorArgs) {
        final AttributeSet attrs = Xml.asAttributeSet(parser);
        mConstructorArgs[0] = mContext;
        View result = root;
        try {
            int type;
            while ((type = parser.next()) != XmlPullParser.START_TAG &&
                    type != XmlPullParser.END_DOCUMENT) {
            }
            if (type != XmlPullParser.START_TAG) {
                throw new InflateException(parser.getPositionDescription()
                        + ": No start tag found!");
            }
            final String name = parser.getName();
            if (TAG_MERGE.equals(name)) {
                if (root == null || !attachToRoot) {
                    throw new InflateException("merge can be used only with a valid "
                            + "ViewGroup root and attachToRoot=true");
                }
                rInflate(parser, root, attrs);
            } else {
                View temp = createViewFromTag(name, attrs);
                ViewGroup.LayoutParams params = null;
                if (root != null) {
                    params = root.generateLayoutParams(attrs);
                    if (!attachToRoot) {
                        temp.setLayoutParams(params);
                    }
                }
                rInflate(parser, temp, attrs);
                if (root != null && attachToRoot) {
                    root.addView(temp, params);
                }
                if (root == null || !attachToRoot) {
                    result = temp;
                }
            }
        } catch (XmlPullParserException e) {
            InflateException ex = new InflateException(e.getMessage());
            ex.initCause(e);
            throw ex;
        } catch (IOException e) {
            InflateException ex = new InflateException(
                    parser.getPositionDescription()
                    + ": " + e.getMessage());
            ex.initCause(e);
            throw ex;
        }
        return result;
    }
}
Summary of this section:
In this section, we explained LayoutInflater (Layout Service) in Android, as well as things related to dynamically loading Views and controls. I believe this will be helpful for friends who are new to controls. Alright, that's all for this section, thank you~
