Introduction to This Section:
After finishing the previous section, you have mastered the basic operations of SQLite in Android. In this section, we will learn some slightly more advanced things: database transactions, how to store large binary data in the database, and how the database should be handled during version upgrades! Alright, let's begin this section!
1. SQLite Transactions

In simple terms: if all database operations written in a transaction succeed, the transaction is committed; otherwise, the transaction rolls back, returning to the previous state — when the database operations were not executed! In addition, as we also mentioned earlier, in the data/data/<package name>/database/ directory, besides the db file we created, there is also a xxx.db-journal file, which is a temporary log file generated to enable the database to support transactions!
2. Storing Large Binary Files in SQLite
Of course, we rarely store large binary files, such as images, audio, and video, in the database. For these, we generally store the file path. But there will always be some weird requirements; one day you suddenly want to store these files in the database. Below we use images as an example to save images to SQLite and to read images from SQLite!

3. SimpleCursorAdapter Binding Database Data
Of course, this is fine for playing around, but it is still not recommended for use, even though it is very simple to use! Actually, when talking about ContentProvider, we already used this thing to bind the contacts list! We won't write an example here; we'll directly give the core code! If you need it, you can tinker with it yourself. In addition, these days we rarely write database-related code ourselves; we generally use third-party frameworks: ormlite, greenDao, etc. We'll learn about them again in the advanced part~

4. A Collection of Database Upgrade Tips
PS: Well, I haven't actually done this myself; my project experience is insufficient. The company's products are all location-based. I just looked at the company project and found that the code left by predecessors was: onCreate() creates the DB, then onUpgrade() deletes the previous DB, and then calls onCreate()! After looking at several versions of the code, I found there was no database upgrade operation... There was nothing to borrow from, so I could only refer to others' practices. Below are some summaries after I (Little Pig) consulted various materials. If there is anything wrong, please point it out. Some third-party frameworks may have already handled this, but due to time constraints, I won't slowly investigate! If you know, you can leave a comment, thanks!
1) What is database version upgrade? How to upgrade?
Answer: Suppose we develop an app that uses a database. We assume the database version is v1.0. In this version, we create a database file named x.db. Through the onCreate() method, we create the first table, t_user, which contains two fields: _id, user_id. Later, we want to add a field user_name. At this point, we need to modify the structure of the database table, and we can put the database update operations into the onUpgrade() method. We only need to change the version number when instantiating the custom SQLiteOpenHelper, for example, change 1 to 2, and onUpgrade() will be called automatically! In addition, for each database version, we should keep corresponding records (documents), similar to the following:
| Database version | Corresponding Android version | Content |
|---|---|---|
| v1.0 | 1 | First version, contains two fields... |
| v1.1 | 2 | Data retained, new user_name field added |
2) Some questions and related solutions
① When the app is upgraded, will the database file be deleted?
Answer: No! All the data is still there!
② If I want to delete a field from a table or add a new field, will the original data still be there?
Answer: Yes, it will still be there!
③ Can you paste the crude way of updating the database version you just mentioned, the one that does not retain data?
Answer: Sure. Here we use the third-party ormlite; you can also write your own database creation and deletion code:
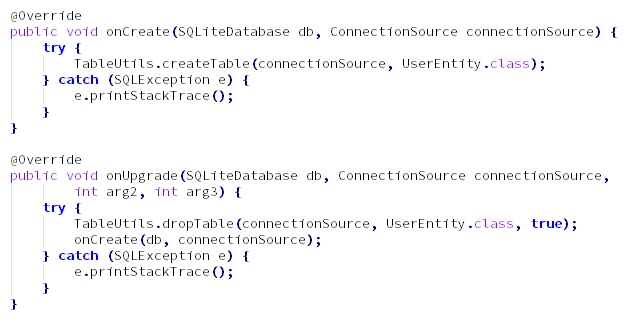
④ For example, suppose we have already upgraded to the third version. In the second version, we added a table, and in the third version we also added a table. If a user upgrades directly from the first version to the third version, then since they didn't go through the second version, that added table will be missing. How can this be solved?
Answer: Very simple. We can write a switch() in onUpgrade(), with the structure as follows:
public void onUpgrade(SQLiteDatabase db, ConnectionSource connectionSource,
            int arg2, int arg3) {
    switch(arg2){
        case 1:
            db.execSQL(第一个版本的建表语句);
        case 2:
            db.execSQL(第二个版本的建表语句);
        case 3:
            db.execSQL(第三个版本的建表语句);
    }
}
Careful readers may notice that break is not written here, and that's correct. This is to ensure that during cross-version upgrades, every database modification can be executed! This guarantees that the table structure is always up to date! Also, it doesn't have to be a CREATE TABLE statement; modifying the table structure works too!
⑤ The old table design is too bad; many fields need to be changed, too many modifications. I want to create a new table, but the table name must be the same, and some previous data must be saved to the new table!
Answer: Hehe, you've got me. Of course, there is a solution. Let me describe the approach:
1. Rename the old table to a temporary table:ALTER TABLE User RENAME TO _temp_User;
2. Create a new table:CREATE TABLE User (u_id INTEGER PRIMARY KEY,u_name VARCHAR(20),u_age VARCHAR(4));
3. Import data;INSERT INTO User SELECT u_id,u_name,"18" FROM _temp_User;// Set a default value yourself for fields not present in the original table
4. Drop the temporary table;DROP TABLE_temp_User;
Section Summary:
Alright, in this section we explored SQLite transactions, large binary storage, SimpleCursorAdapter, and some issues regarding database upgrades. As for SQLite-related things, we'll learn this much for now. We'll study the use of third-party frameworks and some advanced topics together with everyone when we get to the advanced part. This section ends here, thank you~