Introduction
Starting from this section, the UI controls we will discuss all deal with Adapter. It is very important to understand and learn to use this Adapter. Adapter is an intermediate bridge that helps fill data. Simply put, it displays various data to the view in an appropriate form for users to see!
1. A Simple Understanding of the MVC Pattern
Before starting to learn Adapter, we need to understand the concept of the MVC pattern. For example: large commercial programs are usually developed by multiple people. For instance, some are responsible for the planning and design of the operation interface, and some are responsible for writing the program code. To achieve division of labor in a program project, proper arrangements must be made in the program structure. If interface design and modifications involve changes to the program code, then the division of labor between the two will cause difficulties in implementation. A good program architect divides the entire program project into three parts as shown in the figure:
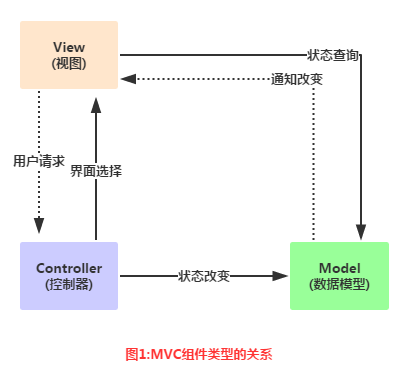
Diagram Analysis:
- ModelModel: It can usually be understood as data, which is responsible for executing the core operations and judgment logic of the program. It obtains user input data through the view, then queries relevant information from the database, performs operations and judgments, and finally hands the results to the view for display.
- viewView: The user's operation interface, plainly speaking, is the GUI. It needs to be designed which interface components to use, as well as the arrangement and order of components.
- ControllerController: As the hub between the model and the view, it is responsible for controlling the program's execution flow and the interaction between objects.
And this Adapter is the Controller part in the middle:Model(Data) --->Controller(In what way to display it) --->View(User Interface) This is a simple understanding of the MVC components!
2. Adapter Concept Analysis
Official Documentation:Adapter
First, let's take a look at its inheritance structure diagram:
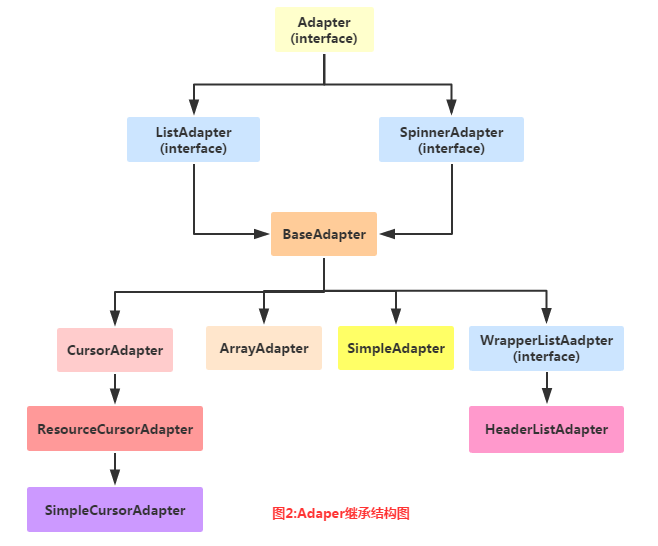
Above is the Adapter and its inheritance structure diagram. Next, let's introduce a few Adapters that are also used in actual development!
- BaseAdapterBaseAdapter: An abstract class. In actual development, we inherit this class and override related methods. It is the most commonly used Adapter!
- ArrayAdapter
ArrayAdapter: Supports generic operations. It is the simplest Adapter and can only display a line of text~ - SimpleAdapterSimpleAdapter: Also an Adapter with good extensibility, and can customize various effects!
- SimpleCursorAdapterSimpleCursorAdapter: Used to display ListViews of simple text type. It is generally used with databases, but it is a bit outdated and not recommended!
In fact, a BaseAdapter is enough to play with. As for the others, they are not used much in actual development. We'll explain them later when needed~
3. Code Examples:
Okay, enough talk, writing code is the most practical thing. Next, let's write a few simple Adapter examples to help us understand the convenience that Adapter brings us. In addition, because Adapter needs to be explained together with controls such as ListView and GridView, some more advanced usages will be covered in the ListView section! Here we just simply demonstrate the effect. Also, the control used here is ListView, which will be explained in the next section. It doesn't matter if you don't understand it now!
1) ArrayAdapter Usage Example:
Running effect screenshot:
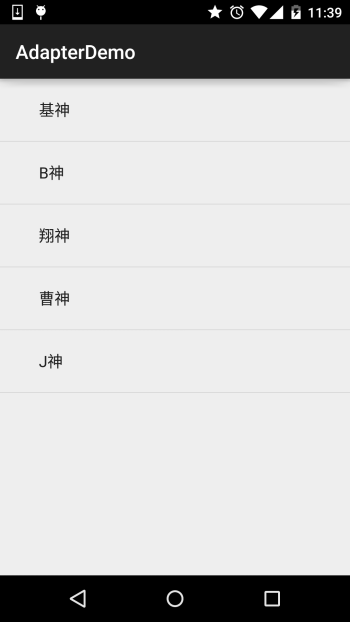
Code implementation:
public class MainActivity extends AppCompatActivity {

    @Override
    protected void onCreate(Bundle savedInstanceState) {
        super.onCreate(savedInstanceState);
        setContentView(R.layout.activity_main);
        //要显示的数据
        String[] strs = {"基神","B神","翔神","曹神","J神"};
        //创建ArrayAdapter
        ArrayAdapter<String> adapter = new ArrayAdapter<String>
                (this,android.R.layout.simple_expandable_list_item_1,strs);
        //获取ListView对象,通过调用setAdapter方法为ListView设置Adapter设置适配器
        ListView list_test = (ListView) findViewById(R.id.list_test);
        list_test.setAdapter(adapter);
    }
}
Some related things:
1.Besides using arrays, we can also write them into an array resource file:
For example: create an XML file with array resources under res\valuse:arrays.xml:
<?xml version="1.0" encoding="utf-8"?>
<resources>
    <string-array name="myarray">
    <item>语文</item>
    <item>数学</item>
    <item>英语</item>
    </string-array>
</resources>
Then set this list item in the layout's ListView attribute:
<ListView
        android:id="@id/list_test"
        android:layout_height="match_parent"
        android:layout_width="match_parent"
        android:entries="@array/myarray"/>
That's all~
Of course, we can also write it like this in Java code:
ArrayAdapter<CharSequence> adapter = ArrayAdapter.createFromResource(this,
        R.array.myarray,android.R.layout.simple_list_item_multiple_choice );
This is also acceptable!
2.As mentioned earlier, this ArrayAdapter supports generics, so collections are essential. For example, write it like this:
List<String> data = new ArrayList<String>();
data.add("基神");
data.add("B神");
ArrayAdapter<String> adapter = new ArrayAdapter<String>
                (this,android.R.layout.simple_expandable_list_item_1,data);
That's all~
3.We saw the second parameter when instantiating ArrayAdapter:android.R.layout.simple_expandable_list_item_1In fact, these are some ListView templates provided by the system. There are the following types:
simple_list_item_1: A single-line text box
simple_list_item_2: Composed of two text boxes
simple_list_item_checked: Each item is a checked list item
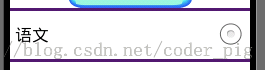
simple_list_item_multiple_choice: Each item has a check box
simple_list_item_single_choice: Each item has a radio button
2) SimpleAdapter Usage Example:
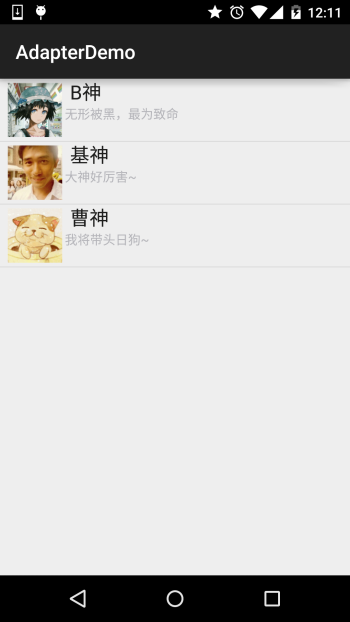
SimpleAdapter: A simple Adapter, seemingly simple, but powerful. Next, let's write a slightly more complex list layout!
Running effect screenshot:
Code implementation:
First, let's write the layout for each item in the list:
list_item.xml
<?xml version="1.0" encoding="utf-8"?>
<LinearLayout xmlns:android="http://schemas.android.com/apk/res/android"
    android:layout_width="match_parent"
    android:layout_height="match_parent"
    android:orientation="horizontal">

    <!-- 定义一个用于显示头像的ImageView -->
    <ImageView
        android:id="@+id/imgtou"
        android:layout_width="64dp"
        android:layout_height="64dp"
        android:baselineAlignBottom="true"
        android:paddingLeft="8dp" />

    <!-- 定义一个竖直方向的LinearLayout,把QQ呢称与说说的文本框设置出来 -->
    <LinearLayout
        android:layout_width="match_parent"
        android:layout_height="wrap_content"
        android:orientation="vertical">

        <TextView
            android:id="@+id/name"
            android:layout_width="wrap_content"
            android:layout_height="wrap_content"
            android:paddingLeft="8dp"
            android:textColor="#1D1D1C"
            android:textSize="20sp" />

        <TextView
            android:id="@+id/says"
            android:layout_width="wrap_content"
            android:layout_height="wrap_content"
            android:paddingLeft="8px"
            android:textColor="#B4B4B9"
            android:textSize="14sp" />

    </LinearLayout>

</LinearLayout>
Next isMainActivity.java:
public class MainActivity extends AppCompatActivity {

    private String[] names = new String[]{"B神", "基神", "曹神"};
    private String[] says = new String[]{"无形被黑,最为致命", "大神好厉害~", "我将带头日狗~"};
    private int[] imgIds = new int[]{R.mipmap.head_icon1, R.mipmap.head_icon2, R.mipmap.head_icon3};

    @Override
    protected void onCreate(Bundle savedInstanceState) {
        super.onCreate(savedInstanceState);
        setContentView(R.layout.activity_main);

        List<Map<String, Object>> listitem = new ArrayList<Map<String, Object>>();
        for (int i = 0; i < names.length; i++) {
            Map<String, Object> showitem = new HashMap<String, Object>();
            showitem.put("touxiang", imgIds[i]);
            showitem.put("name", names[i]);
            showitem.put("says", says[i]);
            listitem.add(showitem);
        }

        //创建一个simpleAdapter
        SimpleAdapter myAdapter = new SimpleAdapter(getApplicationContext(), listitem, R.layout.list_item, new String[]{"touxiang", "name", "says"}, new int[]{R.id.imgtou, R.id.name, R.id.says});
        ListView listView = (ListView) findViewById(R.id.list_test);
        listView.setAdapter(myAdapter);
    }
}
Okay, the above is the simple usage of SimpleAdapter. It's kind of interesting~
3) SimpleCursorAdapter Usage Example:
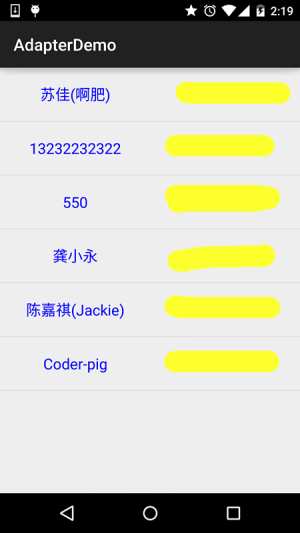
Although this thing is outdated, it is still quite convenient for beginners who are not very familiar with SQLite! Do you remember the example of reading contacts that we wrote earlier when learning ContentProvider? It was previously displayed by printing logs. Now we use this SimpleCursorAdapter to display it on a ListView!
Implementation effect screenshot:
Code implementation:
First write the layout for each item of the ListView:
list_item.xml:
<?xml version="1.0" encoding="utf-8"?>
<LinearLayout xmlns:android="http://schemas.android.com/apk/res/android"
    android:layout_width="match_parent"
    android:layout_height="match_parent"
    android:orientation="horizontal">


    <TextView
        android:id="@+id/list_name"
        android:layout_width="0dp"
        android:layout_height="64dp"
        android:layout_weight="1"
        android:gravity="center"
        android:text="小猪"
        android:textColor="#0000FF"
        android:textSize="18sp" />

    <TextView
        android:id="@+id/list_phone"
        android:layout_width="0dp"
        android:layout_height="64dp"
        android:layout_weight="1"
        android:gravity="center"
        android:text="13798989898"
        android:textColor="#EA5C4D"
        android:textSize="18sp" />


</LinearLayout>
Then the activity_main layout is the same as before, just a simple ListView, and then
MainActivity.java:
public class MainActivity extends AppCompatActivity {

    @Override
    protected void onCreate(Bundle savedInstanceState) {
        super.onCreate(savedInstanceState);
        setContentView(R.layout.activity_main);
        ListView list_test = (ListView) findViewById(R.id.list_test);
        //读取联系人
        Cursor cursor = getContentResolver()
                .query(ContactsContract.CommonDataKinds.Phone.CONTENT_URI, null, null, null, null);
        SimpleCursorAdapter spcAdapter = new SimpleCursorAdapter(this,R.layout.list_item,cursor,
                new String[]{ContactsContract.CommonDataKinds.Phone.DISPLAY_NAME,ContactsContract.CommonDataKinds.Phone.NUMBER},
                new int[]{R.id.list_name,R.id.list_phone});
        list_test.setAdapter(spcAdapter);
    }
}
Finally, just add a permission to read contacts in AndroidManifest.xml!
<uses-permission android:name="android.permission.READ_CONTACTS"/>
Q&A:
askQuestion: Is it really that simple?
— AnswerAnswer: Yes, just get the Cursor directly and bind it. You don't need to write any SQL statements yourself!
askQuestion: You said this thing is outdated, so what is used to replace it?
— AnswerAnswer: The common approach is to rewrite BaseAdapter yourself, and after obtaining the data collection, bind it to the corresponding controls!
askQuestion: Are there any other things to pay attention to with this SimpleCursorAdapter?
— AnswerAnswer: Yes. When using SimpleCursorAdapter, the bound database table must havethe id field, or as id;And when binding, the retrieved data must contain thisiditem, otherwise the following error will be reported!java.lang.IllegalArgumentException: column 'id' does not exist**
Section Summary:
Okay, that's all for the basic explanation of Adapter. Of course, the three Adapters we explained here are basically not used in actual development... haha, except that SimpleAdapter may be used occasionally. Generally, we rewrite BaseAdapter!
In addition, there is a lot to explain about BaseAdapter, so we'll leave it to be explained together in the ListView section. After all, Adapter is always related to View, and ListView is one of the controls we use the most~ Okay, that's all for this section, thank you~