Introduction to this section:
In the previous two sections, we learned about Bitmap and the properties and common methods of some basic drawing APIs, but we still feel a bit unsettled. We need to write something to deepen our impression, right? Well, in this section, we'll write two simple examples:
- 1. Implementation of a Simple Drawing Board
- 2. A Simple Implementation to Help Erase the Beauty's Clothes
Hehe, the second example is a small Demo that Little Pig wrote when he was just learning Android~ Hehe~ Let's start the content of this section~
1. Practical Example 1: Implementation of a Simple Drawing Board:
This is surely familiar to everyone. Many phones come with a drawing board for users to doodle. Here we'll write a simple example. First, let's analyze the logic for implementing this thing:
Q1: Where should this drawing board be placed?
A: In a View. We customize a View, and perform drawing in onDraw(). Additionally, View has an onTouchEvent() method, where we can obtain the user's gesture operations!
Q2. What do we need to prepare?
A: A paintbrush (Paint), a canvas (Canvas), and a path (Path) to record the user's drawing route. Additionally, when drawing lines, each time it goes from the point of the previous drag event to the point of the current drag event! In that case, what was drawn previously will be lost. To preserve the previously drawn content, we can introduce the so-calleddouble bufferingTechnology: Actually, instead of drawing directly onto the Canvas each time, we first draw onto a Bitmap. When the drawing on the Bitmap is complete, it is then drawn onto the View all at once!
Q3. What is the specific implementation process?
A: Initialize the paintbrush, set parameters such as color; in the View's onMeasure() method, create a Bitmap the size of the View, and also create a Canvas; obtain X and Y coordinates in onTouchEvent(), draw connecting lines, and finally call invalidate() to redraw, i.e., invoke the onDraw method to draw the Bitmap content onto the Canvas!
Alright, we understand the logic. Next, let's present the code:
MyView.java:
/**
 * Created by Jay on 2015/10/15 0015.
 */
public class MyView extends View{

    private Paint mPaint;  //绘制线条的Path
    private Path mPath;      //记录用户绘制的Path
    private Canvas mCanvas;  //内存中创建的Canvas
    private Bitmap mBitmap;  //缓存绘制的内容

    private int mLastX;
    private int mLastY;

    public MyView(Context context) {
        super(context);
        init();
    }

    public MyView(Context context, AttributeSet attrs) {
        super(context, attrs);
        init();
    }

    public MyView(Context context, AttributeSet attrs, int defStyleAttr) {
        super(context, attrs, defStyleAttr);
        init();
    }

    private void init(){
        mPath = new Path();
        mPaint = new Paint();   //初始化画笔
        mPaint.setColor(Color.GREEN);
        mPaint.setAntiAlias(true);
        mPaint.setDither(true);
        mPaint.setStyle(Paint.Style.STROKE);
        mPaint.setStrokeJoin(Paint.Join.ROUND); //结合处为圆角
        mPaint.setStrokeCap(Paint.Cap.ROUND); // 设置转弯处为圆角
        mPaint.setStrokeWidth(20);   // 设置画笔宽度
    }

    @Override
    protected void onMeasure(int widthMeasureSpec, int heightMeasureSpec) {
        super.onMeasure(widthMeasureSpec, heightMeasureSpec);
        int width = getMeasuredWidth();
        int height = getMeasuredHeight();
        // 初始化bitmap,Canvas
        mBitmap = Bitmap.createBitmap(width, height, Bitmap.Config.ARGB_8888);
        mCanvas = new Canvas(mBitmap);
    }

    //重写该方法,在这里绘图
    @Override
    protected void onDraw(Canvas canvas) {
        drawPath();
        canvas.drawBitmap(mBitmap, 0, 0, null);
    }

    //绘制线条
    private void drawPath(){
        mCanvas.drawPath(mPath, mPaint);
    }

    @Override
    public boolean onTouchEvent(MotionEvent event) {

        int action = event.getAction();
        int x = (int) event.getX();
        int y = (int) event.getY();

        switch (action)
        {
            case MotionEvent.ACTION_DOWN:
                mLastX = x;
                mLastY = y;
                mPath.moveTo(mLastX, mLastY);
                break;
            case MotionEvent.ACTION_MOVE:
                int dx = Math.abs(x - mLastX);
                int dy = Math.abs(y - mLastY);
                if (dx > 3 || dy > 3)
                    mPath.lineTo(x, y);
                mLastX = x;
                mLastY = y;
                break;
        }

        invalidate();
        return true;
    }
}
Screenshot of Running Effect:
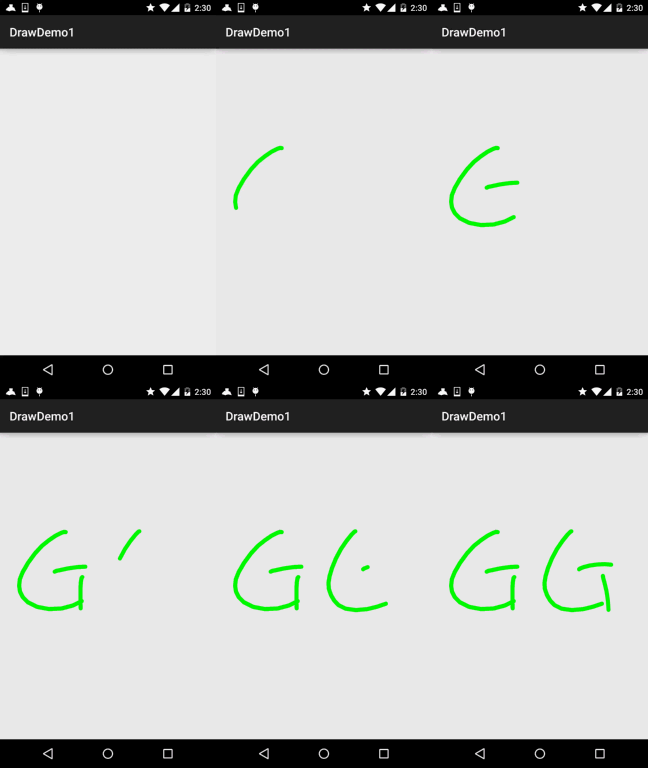
You can extend it according to your own needs, such as adding the ability to modify brush size, change brush color, save the images you draw, etc.! Use divergent thinking and do it yourself~
2. Practical Example 2: Erasing the Beauty's Clothes
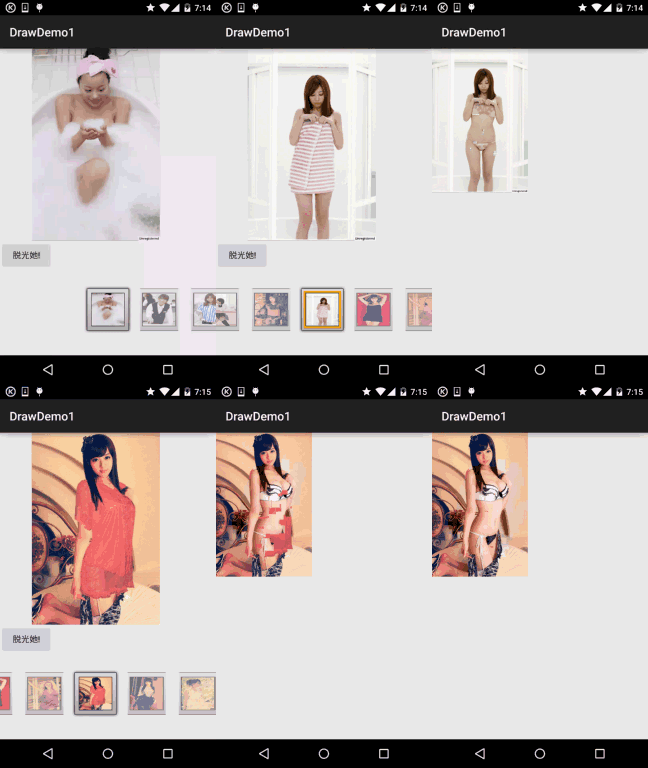
The core idea is: Use a FrameLayout with two ImageViews, front and back. The front one displays the state before erasing the clothes, and the back one displays the state after erasing the clothes!
After setting the beauty image for the two ImageViews, then set an OnTouchListener for the front ImageView! Here, set the 20*20 pixels around the finger touch point to transparent!
Screenshot of Running Effect:
Code Implementation:
Step 1: The first Activity for selecting the beauty. First is the layout: an ImageView, Button, and Gallery!
activity_main.xml:
<?xml version="1.0" encoding="utf-8"?>
<LinearLayout xmlns:android="http://schemas.android.com/apk/res/android"
    android:layout_width="match_parent"
    android:layout_height="match_parent"
    android:orientation="vertical">

    <ImageView
        android:id="@+id/img_choose"
        android:layout_width="320dp"
        android:layout_height="320dp" />

    <Button
        android:id="@+id/btn_choose"
        android:layout_width="wrap_content"
        android:layout_height="wrap_content"
        android:text="脱光她!" />

    <Gallery
        android:id="@+id/gay_choose"
        android:layout_width="match_parent"
        android:layout_height="wrap_content"
        android:layout_marginTop="25dp"
        android:spacing="1pt"
        android:unselectedAlpha="0.6" />

</LinearLayout>
Next is the Adapter class for our Gallery. Here we rewrite BaseAdapter, and since it simply displays an image, we won't write another layout!
MeiziAdapter.java:
/**
 * Created by Jay on 2015/10/16 0016.
 */
public class MeiziAdapter extends BaseAdapter{

    private Context mContext;
    private int[] mData;

    public MeiziAdapter() {
    }

    public MeiziAdapter(Context mContext,int[] mData) {
        this.mContext = mContext;
        this.mData = mData;
    }

    @Override
    public int getCount() {
        return mData.length;
    }

    @Override
    public Object getItem(int position) {
        return mData[position];
    }

    @Override
    public long getItemId(int position) {
        return position;
    }

    @Override
    public View getView(int position, View convertView, ViewGroup parent) {
        ImageView imgMezi = new ImageView(mContext);
        imgMezi.setImageResource(mData[position]);         //创建一个ImageView
        imgMezi.setScaleType(ImageView.ScaleType.FIT_XY);      //设置imgView的缩放类型
        imgMezi.setLayoutParams(new Gallery.LayoutParams(250, 250));    //为imgView设置布局参数
        TypedArray typedArray = mContext.obtainStyledAttributes(R.styleable.Gallery);
        imgMezi.setBackgroundResource(typedArray.getResourceId(R.styleable.Gallery_android_galleryItemBackground, 0));
        return imgMezi;
    }
}
Finally, our Activity is also simple. It just sets the onSelected event for the gallery, and after clicking the button, passes the currently selected Position to the next page!
MainActivity.java:
public class MainActivity extends AppCompatActivity implements AdapterView.OnItemSelectedListener,
        View.OnClickListener {

    private Context mContext;
    private ImageView img_choose;
    private Button btn_choose;
    private Gallery gay_choose;
    private int index = 0;
    private MeiziAdapter mAdapter = null;
    private int[] imageIds = new int[]
            {
                    R.mipmap.pre1, R.mipmap.pre2, R.mipmap.pre3, R.mipmap.pre4,
                    R.mipmap.pre5, R.mipmap.pre6, R.mipmap.pre7, R.mipmap.pre8,
                    R.mipmap.pre9, R.mipmap.pre10, R.mipmap.pre11, R.mipmap.pre12,
                    R.mipmap.pre13, R.mipmap.pre14, R.mipmap.pre15, R.mipmap.pre16,
                    R.mipmap.pre17, R.mipmap.pre18, R.mipmap.pre19, R.mipmap.pre20,
                    R.mipmap.pre21
            };

    @Override
    protected void onCreate(Bundle savedInstanceState) {
        super.onCreate(savedInstanceState);
        setContentView(R.layout.activity_main);
        mContext = MainActivity.this;
        bindViews();
    }

    private void bindViews() {
        img_choose = (ImageView) findViewById(R.id.img_choose);
        btn_choose = (Button) findViewById(R.id.btn_choose);
        gay_choose = (Gallery) findViewById(R.id.gay_choose);


        mAdapter = new MeiziAdapter(mContext, imageIds);
        gay_choose.setAdapter(mAdapter);
        gay_choose.setOnItemSelectedListener(this);
        btn_choose.setOnClickListener(this);

    }


    @Override
    public void onItemSelected(AdapterView<?> parent, View view, int position, long id) {
        img_choose.setImageResource(imageIds[position]);
        index = position;
    }

    @Override
    public void onNothingSelected(AdapterView<?> parent) {
    }

    @Override
    public void onClick(View v) {
        Intent it = new Intent(mContext,CaClothes.class);
        Bundle bundle = new Bundle();
        bundle.putCharSequence("num", Integer.toString(index));
        it.putExtras(bundle);
        startActivity(it);
    }
}
Next is the page for erasing the beauty's clothes. The layout is relatively simple: FrameLayout + front and back two ImageViews:
activity_caclothes.xml:
<?xml version="1.0" encoding="utf-8"?>
<FrameLayout xmlns:android="http://schemas.android.com/apk/res/android"
    android:layout_width="match_parent"
    android:layout_height="match_parent">

    <ImageView
        android:id="@+id/img_after"
        android:layout_width="wrap_content"
        android:layout_height="wrap_content" />

    <ImageView
        android:id="@+id/img_before"
        android:layout_width="wrap_content"
        android:layout_height="wrap_content" />

</FrameLayout>
Next is the code for the Java part:
CaClothes.java:
/**
 * Created by Jay on 2015/10/16 0016.
 */
public class CaClothes extends AppCompatActivity implements View.OnTouchListener {

    private ImageView img_after;
    private ImageView img_before;
    private Bitmap alterBitmap;
    private Canvas canvas;
    private Paint paint;
    private Bitmap after;
    private Bitmap before;
    private int position;

    int[] imageIds1 = new int[]
            {
                    R.mipmap.pre1, R.mipmap.pre2, R.mipmap.pre3, R.mipmap.pre4,
                    R.mipmap.pre5, R.mipmap.pre6, R.mipmap.pre7, R.mipmap.pre8,
                    R.mipmap.pre9, R.mipmap.pre10, R.mipmap.pre11, R.mipmap.pre12,
                    R.mipmap.pre13, R.mipmap.pre14, R.mipmap.pre15, R.mipmap.pre16,
                    R.mipmap.pre17, R.mipmap.pre18, R.mipmap.pre19, R.mipmap.pre20,
                    R.mipmap.pre21
            };


    int[] imageIds2 = new int[]
            {
                    R.mipmap.after1, R.mipmap.after2, R.mipmap.after3, R.mipmap.after4,
                    R.mipmap.after5, R.mipmap.after6, R.mipmap.after7, R.mipmap.after8,
                    R.mipmap.after9, R.mipmap.after10, R.mipmap.after11, R.mipmap.after12,
                    R.mipmap.after13, R.mipmap.after14, R.mipmap.after15, R.mipmap.after16,
                    R.mipmap.after17, R.mipmap.after18, R.mipmap.after19, R.mipmap.after20,
                    R.mipmap.after21
            };


    @Override
    public void onCreate(Bundle savedInstanceState) {
        super.onCreate(savedInstanceState);
        setContentView(R.layout.activity_caclothes);

        Bundle bd = getIntent().getExtras();
        position = Integer.parseInt(bd.getString("num"));
        bindViews();

    }

    private void bindViews() {
        img_after = (ImageView) findViewById(R.id.img_after);
        img_before = (ImageView) findViewById(R.id.img_before);


        BitmapFactory.Options opts = new BitmapFactory.Options();
        opts.inSampleSize = 1;
        after = BitmapFactory.decodeResource(getResources(), imageIds2[position], opts);
        before = BitmapFactory.decodeResource(getResources(), imageIds1[position], opts);
        //定义出来的是只读图片

        alterBitmap = Bitmap.createBitmap(before.getWidth(), before.getHeight(), Bitmap.Config.ARGB_4444);
        canvas = new Canvas(alterBitmap);
        paint = new Paint();
        paint.setStrokeCap(Paint.Cap.ROUND);
        paint.setStrokeJoin(Paint.Join.ROUND);
        paint.setStrokeWidth(5);
        paint.setColor(Color.BLACK);
        paint.setAntiAlias(true);
        canvas.drawBitmap(before, new Matrix(), paint);
        img_after.setImageBitmap(after);
        img_before.setImageBitmap(before);
        img_before.setOnTouchListener(this);
    }

    @Override
    public boolean onTouch(View v, MotionEvent event) {
        switch (event.getAction()) {
            case MotionEvent.ACTION_DOWN:
                break;
            case MotionEvent.ACTION_MOVE:
                int newX = (int) event.getX();
                int newY = (int) event.getY();
                //setPixel方法是将某一个像素点设置成一个颜色,而这里我们把他设置成透明
                //另外通过嵌套for循环将手指触摸区域的20*20个像素点设置为透明
                for (int i = -20; i < 20; i++) {
                    for (int j = -20; j < 20; j++) {
                        if (i + newX >= 0 && j + newY >= 0 && i + newX < before.getWidth() && j + newY < before.getHeight())
                            alterBitmap.setPixel(i + newX, j + newY, Color.TRANSPARENT);
                    }
                }
                img_before.setImageBitmap(alterBitmap);
                break;
        }
        return true;
    }
}
The code is not too hard to understand; it's still relatively simple. Well, just look at the screenshots, don't do too many right-hand screw rule actions... Heh.
3. Code Example Download:
DrawDemo1.zipThe project is relatively large, over 20 MB, with quite a lot of image resources. You know~
Section Summary:
Well, this section wrote two small examples about drawing, which are quite interesting. I believe you noticed that in the beauty clothes erasing part, the erasing effect is square blocks, not so perfect, right? It's okay. In the next section, we will learn about PorterDuff and write several more examples. Compared to this, the code will be much simpler. In addition, due to time constraints, the code has not been optimized or organized, and you can modify it according to your own needs~ Alright, that's all for now. I wish everyone a happy weekend~