Introduction to this section:
Earlier, we have already learned about the EditText control. In this section, we will talk about how to listen to content changes in the input box! This is very useful in actual development. In addition, we will also cover how to make EditText password visible and invisible. Okay, let's start this section!
1. Listening to EditText content changes
As the title suggests, it is based on the event handling mechanism of listeners. Just as the previous click event uses OnClickListener, the listener for text content changes is TextWatcher. We can call EditText.addTextChangedListener(mTextWatcher); to set up a content change listener for EditText!
Briefly about TextWatcher: to implement this class, you need to implement three methods:
public void beforeTextChanged(CharSequence s, int start,int count, int after);
public void onTextChanged(CharSequence s, int start, int before, int count);
public void afterTextChanged(Editable s);
They are triggered in order in the following situations:
- 1. Before content changes
- 2. During content changes
- 3. After content changes
We can override the relevant methods according to actual needs. Generally, the third method is the most commonly overridden!
There are many scenarios for listening to EditText content changes: limiting input word count, restricting input content, etc.~
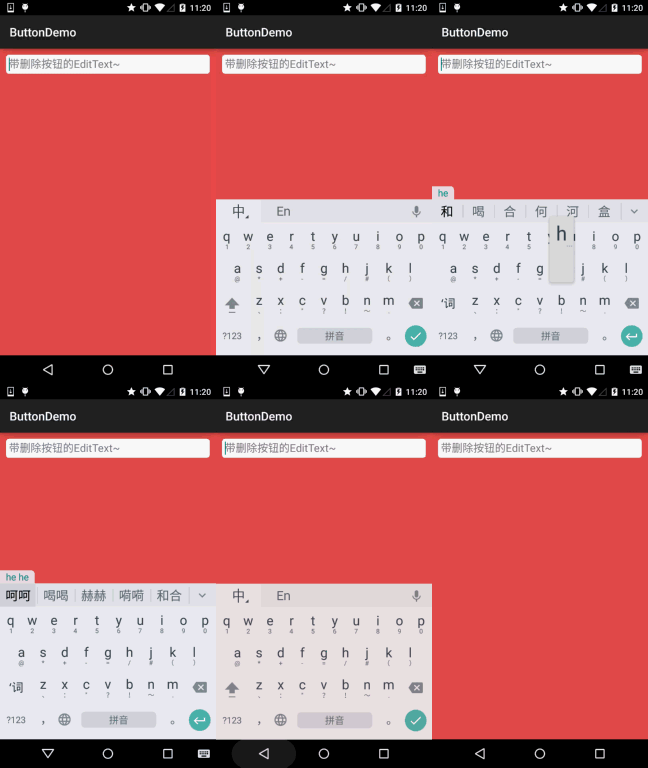
Here we will implement a simple custom EditText. After entering content, a circle with a cross will appear on the right side. When the user clicks it, the text field can be cleared. Of course, you can also not customize it and just add a TextWatcher to the EditText and set up a delete button~
Implementation effect diagram:
Custom EditText:DelEditText.java
package demo.com.jay.buttondemo;

import android.content.Context;
import android.graphics.Rect;
import android.graphics.drawable.Drawable;
import android.text.Editable;
import android.text.TextWatcher;
import android.util.AttributeSet;
import android.view.MotionEvent;
import android.widget.EditText;

/**
 * Created by coder-pig on 2015/7/16 0016.
 */
public class DelEditText extends EditText {

    private Drawable imgClear;
    private Context mContext;

    public DelEditText(Context context, AttributeSet attrs) {
        super(context, attrs);
        this.mContext = context;
        init();
    }

    private void init() {
        imgClear = mContext.getResources().getDrawable(R.drawable.delete_gray);
        addTextChangedListener(new TextWatcher() {
            @Override
            public void beforeTextChanged(CharSequence s, int start, int count, int after) {

            }

            @Override
            public void onTextChanged(CharSequence s, int start, int before, int count) {

            }

            @Override
            public void afterTextChanged(Editable editable) {
                setDrawable();
            }
        });
    }


    //绘制删除图片
    private void setDrawable(){
        if (length() < 1)
            setCompoundDrawablesWithIntrinsicBounds(null, null, null, null);
        else
            setCompoundDrawablesWithIntrinsicBounds(null, null, imgClear, null);
    }


    //当触摸范围在右侧时,触发删除方法,隐藏叉叉
    @Override
    public boolean onTouchEvent(MotionEvent event) {
        if(imgClear != null && event.getAction() == MotionEvent.ACTION_UP)
        {
            int eventX = (int) event.getRawX();
            int eventY = (int) event.getRawY();
            Rect rect = new Rect();
            getGlobalVisibleRect(rect);
            rect.left = rect.right - 100;
            if (rect.contains(eventX, eventY))
                setText("");
        }
        return super.onTouchEvent(event);
    }


    @Override
    protected void finalize() throws Throwable {
        super.finalize();
    }

}
EditText background drawable:bg_frame_search.xml
<?xml version="1.0" encoding="utf-8"?>
<shape xmlns:android="http://schemas.android.com/apk/res/android" >
    <solid android:color="@color/background_white" />
    <corners android:radius="5dp" />
    <stroke android:width="1px" android:color="@color/frame_search"/>
</shape>
Color resource: color.xml
<?xml version="1.0" encoding="utf-8"?>
<resources>
    <color name="reveal_color">#FFFFFF</color>
    <color name="bottom_color">#3086E4</color>
    <color name="bottom_bg">#40BAF8</color>
    <color name="frame_search">#ADAEAD</color>
    <color name="background_white">#FFFFFF</color>
    <color name="back_red">#E75049</color>
</resources>
Layout file:activity_main.xml
<LinearLayout xmlns:android="http://schemas.android.com/apk/res/android"
    xmlns:tools="http://schemas.android.com/tools"
    android:layout_width="match_parent"
    android:layout_height="match_parent"
    android:background="@color/back_red"
    android:orientation="vertical"
    tools:context=".MainActivity">

    <demo.com.jay.buttondemo.DelEditText
        android:id="@+id/edit_search"
        android:layout_width="match_parent"
        android:layout_height="32dp"
        android:layout_margin="10dp"
        android:background="@drawable/bg_frame_search"
        android:hint="带删除按钮的EditText~"
        android:maxLength="20"
        android:padding="5dp"
        android:singleLine="true" />


</LinearLayout>
PS: The code is very simple, so we won't explain it~
2. Making EditText password visible and invisible
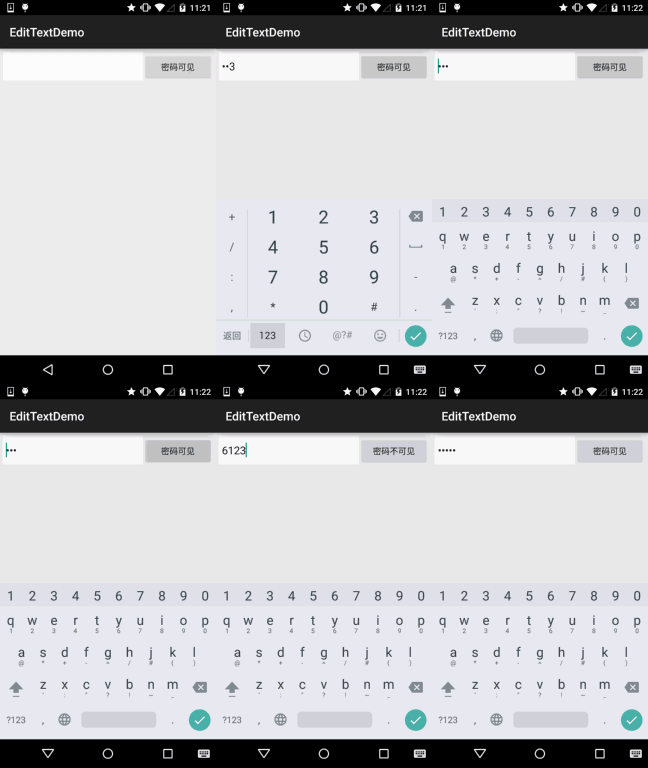
This is also a very practical requirement. That is, after the user clicks a button, the password in the EditText can be made visible or invisible~
Implementation effect diagram:
Implementation code:activity_main.xml
<LinearLayout xmlns:android="http://schemas.android.com/apk/res/android"
    xmlns:tools="http://schemas.android.com/tools"
    android:layout_width="match_parent"
    android:layout_height="match_parent"
    tools:context=".MainActivity"
    android:layout_margin="5dp"
    android:orientation="horizontal">

    <EditText
        android:id="@+id/edit_pawd"
        android:layout_width="0dp"
        android:layout_weight="2"
        android:layout_height="48dp"
        android:inputType="textPassword"
        android:background="@drawable/editborder"/>

    <Button
        android:id="@+id/btnChange"
        android:layout_width="0dp"
        android:layout_weight="1"
        android:layout_height="48dp"
        android:text="密码可见"/>

</LinearLayout>
MainActivity.java
package com.jay.demo.edittextdemo;

import android.support.v7.app.AppCompatActivity;
import android.os.Bundle;
import android.text.method.HideReturnsTransformationMethod;
import android.text.method.PasswordTransformationMethod;
import android.view.Menu;
import android.view.MenuItem;
import android.view.View;
import android.widget.Button;
import android.widget.EditText;

public class MainActivity extends AppCompatActivity {

    private EditText edit_pawd;
    private Button btnChange;
    private boolean flag = false;

    @Override
    protected void onCreate(Bundle savedInstanceState) {
        super.onCreate(savedInstanceState);
        setContentView(R.layout.activity_main);
        edit_pawd = (EditText) findViewById(R.id.edit_pawd);
        btnChange = (Button) findViewById(R.id.btnChange);
        edit_pawd.setHorizontallyScrolling(true);    //设置EditText不换行
        btnChange.setOnClickListener(new View.OnClickListener() {
            @Override
            public void onClick(View view) {
                if(flag == true){
                    edit_pawd.setTransformationMethod(HideReturnsTransformationMethod.getInstance());
                    flag = false;
                    btnChange.setText("密码不可见");
                }else{
                    edit_pawd.setTransformationMethod(PasswordTransformationMethod.getInstance());
                    flag = true;
                    btnChange.setText("密码可见");
                }
            }
        });
    }
}
editborder.xml
<?xml version="1.0" encoding="utf-8"?>
<shape xmlns:android="http://schemas.android.com/apk/res/android" >

    <!-- 设置透明背景色 -->
    <solid android:color="#FFFFFF" />

    <!-- 设置一个白色边框 -->
    <stroke
        android:width="1px"
        android:color="#FFFFFF" />
    <!-- 设置一下边距,让空间大一点 -->
    <padding
        android:bottom="5dp"
        android:left="5dp"
        android:right="5dp"
        android:top="5dp" />

</shape>
Summary of this section:
That's all for this section, thanks~