Introduction to this section:
This section brings the second of Android's three animation types - Tween animation. Unlike the frame animation learned earlier, which simulates animation effects by playing images continuously, in tween animation the developer only needs to specifythe animation startandthe animation end"key frames," while the "intermediate frames" of the animation changes are calculated and filled in by the system! Alright, let's start learning this section~
1. Classification of Tween Animation and Interpolator
Android supports the following five tween animation effects, or maybe four, because the fifth is just a combination of the previous ones~
- AlphaAnimation:Alpha gradient effect: when creating, specify the start and end transparency, as well as the animation duration. The transparency range is (0,1), 0 is fully transparent, 1 is fully opaque; corresponds to <alpha/> tag!
- ScaleAnimation: Scale gradient effect: when creating, you need to specify the start and end scale ratios, the scale reference point, and the animation duration; corresponds to <scale/> tag!
- TranslateAnimation: Translation gradient effect: when creating, specify the start and end positions, and the animation duration; corresponds to <translate/> tag!
- RotateAnimation: Rotation gradient effect: when creating, specify the start and end rotation angles of the animation, as well as the animation duration and the axis of rotation; corresponds to <rotate/> tag
- AnimationSet: Combination gradient, which is a combination of the previous multiple gradients; corresponds to <set/> tag
Before explaining the usage of various animations, we first need to explain one thing:Interpolator
It is used to control the speed of animation changes and can be understood as an animation renderer. Of course, we can also implement the Interpolator interface ourselves to control the speed of animation changes. Android has already provided us with five implementation classes to choose from:
- LinearInterpolator: The animation changes at a uniform speed
- AccelerateInterpolator: The speed changes slowly at the beginning of the animation, then starts to accelerate
- AccelerateDecelerateInterpolator: The speed changes slowly at the beginning and end of the animation, and accelerates in the middle
- CycleInterpolator: The animation loops a specific number of times, and the change speed follows a sine curve: Math.sin(2 * mCycles * Math.PI * input)
- DecelerateInterpolator: The speed changes quickly at the beginning of the animation, then starts to decelerate
- AnticipateInterpolator: Reverse, first changes in the opposite direction for a while, then accelerates playback
- AnticipateOvershootInterpolator: Starts by moving backward, then swings forward by a certain value, and finally returns to the last value
- BounceInterpolator: Jumping: when approaching the target value, the value jumps. For example, if the target value is 100, the subsequent values might be 85, 77, 70, 80, 90, 100
- OvershottInterpolator: Rebound: finally overshoots the target value and then slowly changes to the target value
And this thing is generally used when writing animation XML files; the attribute is:android:interpolatorAnd the corresponding value for the above is:@android:anim/linear_interpolatorActually, it is just camelCase converted to underscores. AccelerateDecelerateInterpolator corresponds to: @android:anim/accelerate_decelerate_interpolator!
2. Detailed explanation of various animations
Here,android:durationthey are all the duration of the animation, in milliseconds~
1) AlphaAnimation (Alpha gradient)
anim_alpha.xml:
<alpha xmlns:android="http://schemas.android.com/apk/res/android"
    android:interpolator="@android:anim/accelerate_decelerate_interpolator"
    android:fromAlpha="1.0"
    android:toAlpha="0.1"
    android:duration="2000"/>
Property explanation:
fromAlpha: Start transparency
toAlpha: End transparency
The transparency range is: 0-1, fully transparent to fully opaque
2) ScaleAnimation (Scale gradient)
anim_scale.xml:
<scale xmlns:android="http://schemas.android.com/apk/res/android"
    android:interpolator="@android:anim/accelerate_interpolator"
    android:fromXScale="0.2"
    android:toXScale="1.5"
    android:fromYScale="0.2"
    android:toYScale="1.5"
    android:pivotX="50%"
    android:pivotY="50%"
    android:duration="2000"/>
Property explanation:
- fromXScale/fromYScale: Starting scale ratio along the X/Y axis
- toXScale/toYScale: Ending scale ratio along the X/Y axis
- pivotX/pivotY: The X/Y coordinates of the scaling pivot point, that is, the position from the left edge of itself. For example, 50% uses the center of the image as the pivot point
3) TranslateAnimation (Translation gradient)
anim_translate.xml:
<translate xmlns:android="http://schemas.android.com/apk/res/android"
    android:interpolator="@android:anim/accelerate_decelerate_interpolator"
    android:fromXDelta="0"
    android:toXDelta="320"
    android:fromYDelta="0"
    android:toYDelta="0"
    android:duration="2000"/>
Property explanation:
- fromXDelta/fromYDelta: X/Y coordinates of the animation start position
- toXDelta/toYDelta: X/Y coordinates of the animation end position
4) RotateAnimation (Rotation gradient)
anim_rotate.xml:
<rotate xmlns:android="http://schemas.android.com/apk/res/android"
    android:interpolator="@android:anim/accelerate_decelerate_interpolator"
    android:fromDegrees="0"
    android:toDegrees="360"
    android:duration="1000"
    android:repeatCount="1"
    android:repeatMode="reverse"/>
Property explanation:
- fromDegrees/toDegrees: Start/end angle of rotation
- repeatCount: Number of rotations. The default value is 0, representing one rotation. If it is another value, such as 3, it rotates 4 times. In addition, when the value is -1 or infinite, it means the animation never stops.
- repeatMode: Set the repeat mode. Defaultrestart, but it is only effective when repeatCount is greater than 0 or is infinite or -1. It can also be set toreverse, which means the animation will move in the opposite direction when displayed an even number of times!
5) AnimationSet (Combination gradient)
Very simple, it just combines the previous several animations together~
anim_set.xml:
<set xmlns:android="http://schemas.android.com/apk/res/android"
    android:interpolator="@android:anim/decelerate_interpolator"
    android:shareInterpolator="true" >

    <scale
        android:duration="2000"
        android:fromXScale="0.2"
        android:fromYScale="0.2"
        android:pivotX="50%"
        android:pivotY="50%"
        android:toXScale="1.5"
        android:toYScale="1.5" />

    <rotate
        android:duration="1000"
        android:fromDegrees="0"
        android:repeatCount="1"
        android:repeatMode="reverse"
        android:toDegrees="360" />

    <translate
        android:duration="2000"
        android:fromXDelta="0"
        android:fromYDelta="0"
        android:toXDelta="320"
        android:toYDelta="0" />

    <alpha
        android:duration="2000"
        android:fromAlpha="1.0"
        android:toAlpha="0.1" />

</set>
3. Write an example to experience it
Alright, below we will use the animations written above to create an example, allowing us to experience what tween animation is. First, let's create a simple layout:activity_main.xml:
<LinearLayout xmlns:android="http://schemas.android.com/apk/res/android"
    android:layout_width="match_parent"
    android:layout_height="match_parent"
    android:orientation="vertical">

    <Button
        android:id="@+id/btn_alpha"
        android:layout_width="wrap_content"
        android:layout_height="wrap_content"
        android:text="透明度渐变" />

    <Button
        android:id="@+id/btn_scale"
        android:layout_width="wrap_content"
        android:layout_height="wrap_content"
        android:text="缩放渐变" />

    <Button
        android:id="@+id/btn_tran"
        android:layout_width="wrap_content"
        android:layout_height="wrap_content"
        android:text="位移渐变" />

    <Button
        android:id="@+id/btn_rotate"
        android:layout_width="wrap_content"
        android:layout_height="wrap_content"
        android:text="旋转渐变" />

    <Button
        android:id="@+id/btn_set"
        android:layout_width="wrap_content"
        android:layout_height="wrap_content"
        android:text="组合渐变" />

    <ImageView
        android:id="@+id/img_show"
        android:layout_width="wrap_content"
        android:layout_height="wrap_content"
        android:layout_gravity="center"
        android:layout_marginTop="48dp"
        android:src="@mipmap/img_face.html" />

</LinearLayout>
Okay, then let's go to ourMainActivity.javaIt is also very simple. Just call AnimationUtils.loadAnimation() to load the animation, then our View control calls startAnimation to start the animation~
public class MainActivity extends AppCompatActivity implements View.OnClickListener{

    private Button btn_alpha;
    private Button btn_scale;
    private Button btn_tran;
    private Button btn_rotate;
    private Button btn_set;
    private ImageView img_show;
    private Animation animation = null;

    @Override
    protected void onCreate(Bundle savedInstanceState) {
        super.onCreate(savedInstanceState);
        setContentView(R.layout.activity_main);
        bindViews();
    }

    private void bindViews() {
        btn_alpha = (Button) findViewById(R.id.btn_alpha);
        btn_scale = (Button) findViewById(R.id.btn_scale);
        btn_tran = (Button) findViewById(R.id.btn_tran);
        btn_rotate = (Button) findViewById(R.id.btn_rotate);
        btn_set = (Button) findViewById(R.id.btn_set);
        img_show = (ImageView) findViewById(R.id.img_show);

        btn_alpha.setOnClickListener(this);
        btn_scale.setOnClickListener(this);
        btn_tran.setOnClickListener(this);
        btn_rotate.setOnClickListener(this);
        btn_set.setOnClickListener(this);

    }

    @Override
    public void onClick(View v) {
        switch (v.getId()){
            case R.id.btn_alpha:
                animation = AnimationUtils.loadAnimation(this,
                        R.anim.anim_alpha);
                img_show.startAnimation(animation);
                break;
            case R.id.btn_scale:
                animation = AnimationUtils.loadAnimation(this,
                        R.anim.anim_scale);
                img_show.startAnimation(animation);
                break;
            case R.id.btn_tran:
                animation = AnimationUtils.loadAnimation(this,
                        R.anim.anim_translate);
                img_show.startAnimation(animation);
                break;
            case R.id.btn_rotate:
                animation = AnimationUtils.loadAnimation(this,
                        R.anim.anim_rotate);
                img_show.startAnimation(animation);
                break;
            case R.id.btn_set:
                animation = AnimationUtils.loadAnimation(this,
                        R.anim.anim_set);
                img_show.startAnimation(animation);
                break;
        }
    }
}
Running effect screenshot:
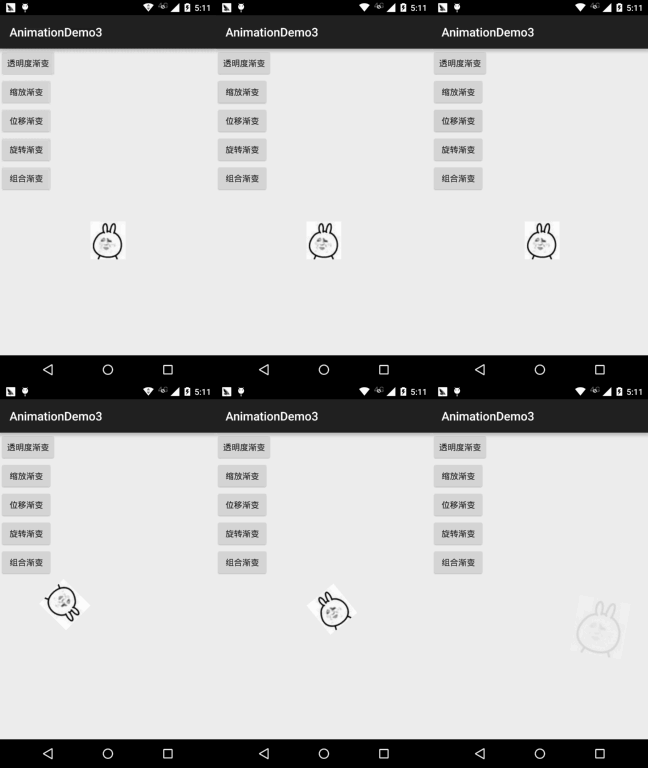
Hehe, it's interesting, right? Why don't you try it yourself, change something, or freely combine animations to make cool effects~
4. Monitoring animation states
We can monitor the execution state of the animation by calling the animation object's:
- setAnimationListener(new AnimationListener())method, and overriding the following three methods:
- onAnimationStart(): animation start
- onAnimtaionRepeat(): animation repeat
- onAnimationEnd(): animation end
Then the monitoring of the animation execution state is completed~
5. Dynamically setting animation effects for View
First callAnimationUtils.loadAnimation(animation XML file), then the View control calls startAnimation(anim) to start the animation. This is the static loading method. Of course, you can also directly create an animation object, complete the settings with Java code, and then call startAnimation to start the animation.
6. Setting transition animations for Fragment
One thing to note here is whether the Fragment uses thev4 packageorapp packageFragment under that package! We can callFragmentTransactionobject'ssetTransition(int transit)to specify a standard transition animation for the Fragment. The optional values of transit are as follows:
- TRANSIT_NONE: No animation
- TRANSIT_FRAGMENT_OPEN: Opening-form animation
- TRANSIT_FRAGMENT_CLOSE: Closing-form animation
The standard transition animations above can be called by both, while the difference lies in the custom transition animation
setCustomAnimations() method!
Fragment under the app package: setCustomAnimations(int enter, int exit, int popEnter, int popExit)They are the animations for adding, removing, pushing to stack, and popping from stack, respectively! Another thing to note is that the corresponding animation type is property animation, that is, the root tag of the animation file should be: <objectAnimator>,<valueAnimator> or put the previous two into a <set>;
Fragment under the v4 package: The v4 package supports two setCustomAnimations() methods
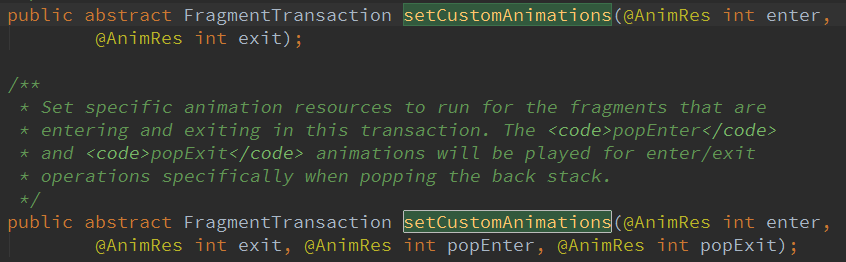
Another thing to note is that the corresponding animation type is Tween animation, same as the View above~
You may be wondering how you know the corresponding animation type. In fact, you just need to look in the Fragment source code:
You will know by looking at a return value of the onCreateAnimation() method:
v4 package:

app package:

7. Setting transition animations for Activity
Setting transition animations for Activity is very simple; the method called is:overridePendingTransition(int enterAnim, int exitAnim)
The usage is very simple:After startActivity(intent)orfinish()afterwards add
The parameters in order are:when the new Activity enters,the animation at that time, andwhen the old Activity exits,the animation at that time.
Below are a few relatively simple and commonly used transition animations for everyone to use~
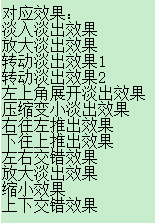
Download portal:Common Activity Transition Animations.zip
8. Write an example of login and registration buttons popping up from the bottom after entering the APP:
Screenshot of the running effect:

Code implementation:
First, our layout file:activity_main.xml:
<RelativeLayout xmlns:android="http://schemas.android.com/apk/res/android"
    xmlns:tools="http://schemas.android.com/tools"
    android:layout_width="match_parent"
    android:layout_height="match_parent"
    android:background="#DDE2E3"
    tools:context=".MainActivity">

    <LinearLayout
        android:id="@+id/start_ctrl"
        android:layout_width="match_parent"
        android:layout_height="wrap_content"
        android:layout_alignParentBottom="true"
        android:orientation="vertical"
        android:visibility="gone">

        <Button
            android:id="@+id/start_login"
            android:layout_width="match_parent"
            android:layout_height="wrap_content"
            android:background="#F26968"
            android:gravity="center"
            android:paddingBottom="15dp"
            android:paddingTop="15dp"
            android:text="登陆"
            android:textColor="#FFFFFF"
            android:textSize="18sp" />

        <Button
            android:id="@+id/start_register"
            android:layout_width="match_parent"
            android:layout_height="wrap_content"
            android:background="#323339"
            android:gravity="center"
            android:paddingBottom="15dp"
            android:paddingTop="15dp"
            android:text="注册"
            android:textColor="#FFFFFF"
            android:textSize="18sp" />
    </LinearLayout>

</RelativeLayout>
Next isMainActivity.java:
public class MainActivity extends AppCompatActivity {
    private LinearLayout start_ctrl;
    @Override
    protected void onCreate(Bundle savedInstanceState) {
        super.onCreate(savedInstanceState);
        setContentView(R.layout.activity_main);
        start_ctrl = (LinearLayout) findViewById(R.id.start_ctrl);
        //设置动画,从自身位置的最下端向上滑动了自身的高度,持续时间为500ms
        final TranslateAnimation ctrlAnimation = new TranslateAnimation(
                TranslateAnimation.RELATIVE_TO_SELF, 0, TranslateAnimation.RELATIVE_TO_SELF, 0,
                TranslateAnimation.RELATIVE_TO_SELF, 1, TranslateAnimation.RELATIVE_TO_SELF, 0);
        ctrlAnimation.setDuration(500l);     //设置动画的过渡时间
        start_ctrl.postDelayed(new Runnable() {
            @Override
            public void run() {
                start_ctrl.setVisibility(View.VISIBLE);
                start_ctrl.startAnimation(ctrlAnimation);
            }
        }, 2000);
    }
}
The comments are very clear, so I won't blabber on here. If you have doubts about TranslateAnimation.RELATIVE_TO_SELF, please Google or Baidu it yourself. Due to space limitations (I'm lazy), I won't cover it here; it's pretty simple~

9. Download the code examples for this section
AnimationDemo3.zip
AnimationDemo4.zip
Summary of this section:
In this section, we explained in detail the second type of animation in Android (tween animation), the detailed breakdown of the four animations, and setting animation listeners, as well as how to set animations for View, Fragment, and Activity. Finally, we also wrote an example of the login and register buttons popping up from the bottom of the app after entering. It may be a bit long, but it's all very easy to understand. I believe everyone will be rewarded with a lot after reading it! Alright, that's all for this section, thank you~