Introduction to This Section
This section starts to discuss layouts in Android. There are six major layouts in Android: LinearLayout (linear layout), RelativeLayout (relative layout), TableLayout (table layout), FrameLayout (frame layout), AbsoluteLayout (absolute layout), and GridLayout (grid layout). Today we are going to explain the first layout, LinearLayout. In screen adaptation, the most commonly used feature is LinearLayout's weight property. In this section, we will analyze LinearLayout in detail, including some basic attributes, the use of the weight property, and how proportions are calculated. In addition, we will also mention a less frequently used attribute: android:divider for drawing divider lines.
1. Learning diagram for this section

2. Detailed explanation of the weight property:
① Simplest usage:
As shown in the figure:
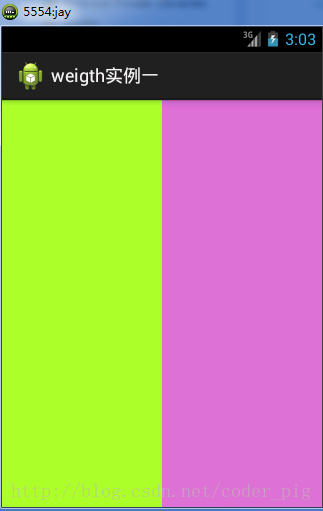
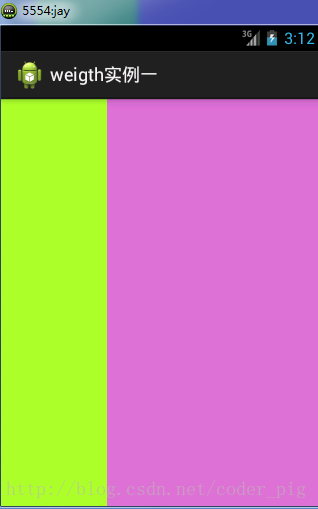
Implementation code:
<LinearLayout xmlns:android="http://schemas.android.com/apk/res/android"
    xmlns:tools="http://schemas.android.com/tools"
    android:id="@+id/LinearLayout1"
    android:layout_width="match_parent"
    android:layout_height="match_parent"
    android:orientation="horizontal">

    <LinearLayout
        android:layout_width="0dp"
        android:layout_height="fill_parent"
        android:background="#2F97FF"
        android:layout_weight="1"/>


    <LinearLayout
        android:layout_width="0dp"
        android:layout_height="fill_parent"
        android:background="#DA70D6"
        android:layout_weight="2"/>

</LinearLayout>
To achieve the first 1:1 effect, you only need to set the weight of the two LinearLayouts to 1 and 1 respectively. Summary of usage: To divide proportionally in the horizontal direction: set the android:width attribute of the involved Views to 0dp, then set the android:weight attribute to specify the proportion. Similarly, for the vertical direction, just set android:height to 0dp, then set the weight attribute. You can write a vertical proportional division yourself to experience this simple usage!
② Detailed explanation of the weight property:
Of course, if we don't use the above method of setting 0dp and directly use wrap_content or match_parent, then we need to further analyze the weight property. There are two cases: wrap_content and match_parent! In addition, we also need to look at whether the orientation of the LinearLayout is horizontal or vertical, because this determines in which direction the proportional division is applied.
1) wrap_content is simpler; it is directly divided by proportion.
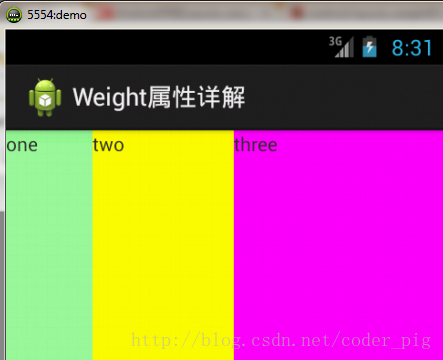
Implementation code:
<LinearLayout xmlns:android="http://schemas.android.com/apk/res/android"
    xmlns:tools="http://schemas.android.com/tools"
    android:id="@+id/LinearLayout1"
    android:layout_width="match_parent"
    android:layout_height="match_parent"
    android:orientation="horizontal" >

    <TextView
        android:layout_weight="1"
        android:layout_width="wrap_content"
        android:layout_height="fill_parent"
        android:text="one"
        android:background="#8AC3FB"
     />
     <TextView
        android:layout_weight="2"
        android:layout_width="wrap_content"
        android:layout_height="fill_parent"
        android:text="two"
        android:background="#FFFF00"
     />
     <TextView
        android:layout_weight="3"
        android:layout_width="wrap_content"
        android:layout_height="fill_parent"
        android:text="three"
        android:background="#FF00FF"
     />

</LinearLayout>
2) match_parent (fill_parent): this requires calculation.
Let's write this simple piece of code:
<LinearLayout xmlns:android="http://schemas.android.com/apk/res/android"
    xmlns:tools="http://schemas.android.com/tools"
    android:id="@+id/LinearLayout1"
    android:layout_width="match_parent"
    android:layout_height="match_parent" >

    <TextView
        android:layout_weight="1"
        android:layout_width="fill_parent"
        android:layout_height="fill_parent"
        android:text="one"
        android:background="#8AC3FB"
     />
     <TextView
        android:layout_weight="2"
        android:layout_width="fill_parent"
        android:layout_height="fill_parent"
        android:text="two"
        android:background="#FFFF00"
     />
     <TextView
        android:layout_weight="3"
        android:layout_width="fill_parent"
        android:layout_height="fill_parent"
        android:text="three"
        android:background="#FF00FF"
     />

</LinearLayout>
Screenshot of the running result:
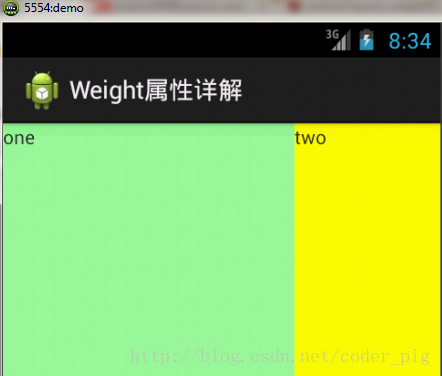
At this point you may have questions: Why is it like this? The ratio seems to be 2:1, right? So where did "three" go? The code clearly has "three", and it is set to 3. Also, the ratio between 1 and 2 is wrong: 1:2:3 has become 2:1:0. How did this happen? Answer: It is actually not that simple here; we still need to calculate. There are several algorithms given online. Here I will present the one that the author finds easier to understand:step 1:Every one is fill_parent, but there is only one screen, so 1 - 3 = -2 fill_parent.step 2:The proportions are 1/6, 2/6, 3/6 respectively.step 3:First come, first served. First give to "one": calculate 1 - 2 * (1/6) = 2/3 fill_parent. Then to "two": calculate 1 - 2 * (2/6) = 1/3 fill_parent. Finally to "three": calculate 1 - 2 * (3/6) = 0 fill_parent.step 4:So the final result is: "one" takes two shares, "two" takes one share, and "three" gets nothing at all. That is why "three" does not appear. Maybe you are still a bit confused after reading this. It's okay, let's try a few more examples and you will understand!
The ratio is 1:1:1.
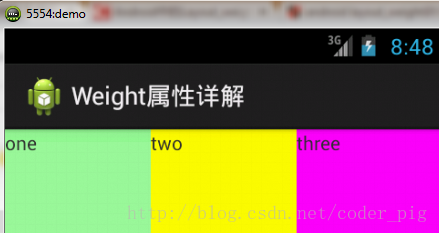
Calculate once according to the above method; the result is 1/3 1/3 1/3, that's right.
Next, let's try 2:3:4.
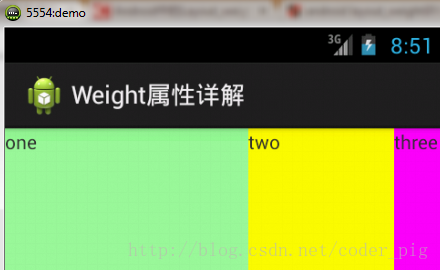
Calculation result: 5/9 3/9 1/9. Comparing with the effect screenshot, 5:3:1, it's also correct. So you should mark this calculation method down!
③ Setting the weight property in Java code:
setLayoutParams(new LayoutParams(LayoutParams.FILL_PARENT,
        LayoutParams.WRAP_CONTENT, 1));
3. Setting a divider for LinearLayout
In many UI development projects, some underlines or dividers are set to make the interface cleaner and more beautiful, such as the Kugou Music registration page below:
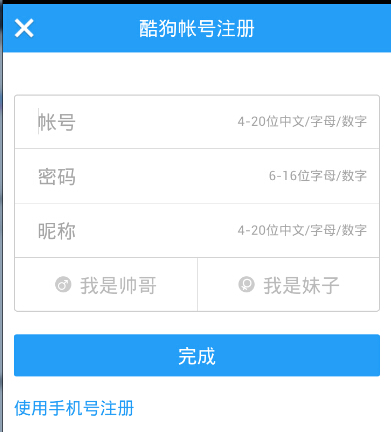
For this kind of line, we usually have two approaches:① Directly add a View in the layoutThis View is only used to display a line, and the code is also very simple:
<View
    android:layout_width="match_parent"
    android:layout_height="1px"
    android:background="#000000" />
This is a horizontal black line. Of course, you can also change it to other colors or use an image.

② The second approach is to use the divider property of LinearLayout,which directly sets a divider for the LinearLayout. Here you need to prepare an image of a line yourself. 1) android:divider: set the image used as the divider. 2) android:showDividers: set the position of the dividers: none (none), beginning (start), end (end), middle (between each two components). 3) dividerPadding: set the padding of the divider.
Usage example:
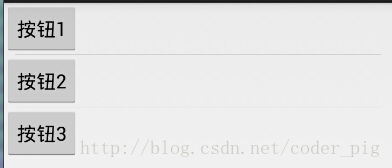
Implementation code:
<LinearLayout xmlns:android="http://schemas.android.com/apk/res/android"
    xmlns:tools="http://schemas.android.com/tools"
    android:id="@+id/LinearLayout1"
    android:layout_width="match_parent"
    android:layout_height="match_parent"
    android:divider="@drawable/ktv_line_div"
    android:orientation="vertical"
    android:showDividers="middle"
    android:dividerPadding="10dp"
    tools:context="com.jay.example.linearlayoutdemo.MainActivity" >

    <Button
        android:layout_width="wrap_content"
        android:layout_height="wrap_content"
        android:text="按钮1" />

    <Button
        android:layout_width="wrap_content"
        android:layout_height="wrap_content"
        android:text="按钮2" />

    <Button
        android:layout_width="wrap_content"
        android:layout_height="wrap_content"
        android:text="按钮3" />

</LinearLayout>
4. Simple examples of LinearLayout:
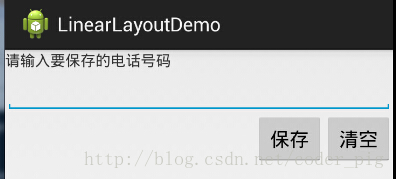
The implementation code is as follows:
<LinearLayout xmlns:android="http://schemas.android.com/apk/res/android"
    xmlns:tools="http://schemas.android.com/tools"
    android:id="@+id/LinearLayout1"
    android:layout_width="fill_parent"
    android:layout_height="fill_parent"
    android:orientation="vertical"
    tools:context=".MainActivity" >

    <TextView
        android:layout_width="wrap_content"
        android:layout_height="wrap_content"
        android:text="请输入要保存的电话号码"/>
    <EditText
        android:layout_width="fill_parent"
        android:layout_height="wrap_content"/>
    <LinearLayout
        android:layout_width="fill_parent"
        android:layout_height="wrap_content"
        android:orientation="horizontal"
        android:gravity="right">
        <Button
            android:layout_width="wrap_content"
            android:layout_height="wrap_content"
            android:text="保存"/>
        <Button
            android:layout_width="wrap_content"
            android:layout_height="wrap_content"
            android:text="清空"/>
    </LinearLayout>
</LinearLayout>
5. Notes:
A very important issue with using layout_gravity!!! Question: In a horizontal LinearLayout, there are two TextViews. You want one on the left and one on the right. How do you do it? Perhaps you would blurt out: "Set gravity to left for one and right for the other, and that's it!" Is it really that simple? Have you tried it? Write a simple layout and you will find that things turn out contrary to your wishes: The code is as follows:
<LinearLayout xmlns:android="http://schemas.android.com/apk/res/android"
    xmlns:tools="http://schemas.android.com/tools"
    android:layout_width="match_parent"
    android:layout_height="match_parent"
    android:orientation="horizontal"
    tools:context="com.jay.example.getscreendemo.MainActivity" >

    <TextView
        android:layout_width="wrap_content"
        android:layout_height="200dp"
        android:layout_gravity="left"
        android:background="#FF7878"
        android:gravity="center"
        android:text="O(∩_∩)O哈哈~" />

    <TextView
        android:layout_width="wrap_content"
        android:layout_height="200dp"
        android:layout_gravity="right"
        android:background="#FF7428"
        android:gravity="center"
        android:text="(*^__^*) 嘻嘻……" />

</LinearLayout>
Screenshot of the running result:
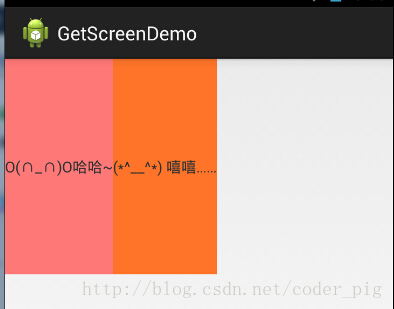
Seeing this, you would say: Oh, it really doesn't work. How about adding a gravity="left" attribute to the outer LinearLayout, and then setting the layout_gravity of the second TextView to right? Okay, let's try it:
<LinearLayout xmlns:android="http://schemas.android.com/apk/res/android"
    xmlns:tools="http://schemas.android.com/tools"
    android:layout_width="match_parent"
    android:layout_height="match_parent"
    android:orientation="horizontal"
    android:gravity="left"
    tools:context="com.jay.example.getscreendemo.MainActivity" >

    <TextView
        android:layout_width="wrap_content"
        android:layout_height="200dp"
        android:background="#FF7878"
        android:gravity="center"
        android:text="O(∩_∩)O哈哈~" />

    <TextView
        android:layout_width="wrap_content"
        android:layout_height="200dp"
        android:layout_gravity="right"
        android:background="#FF7428"
        android:gravity="center"
        android:text="(*^__^*) 嘻嘻……" />

</LinearLayout>
The result is still the same:
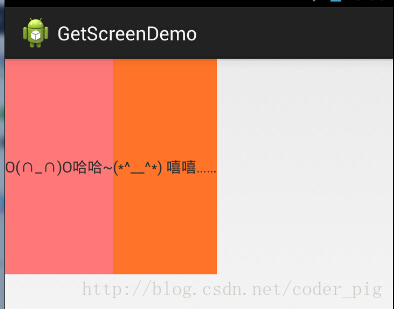
Well, there is no way around it. What should we do?
When android:orientation="vertical", only horizontal alignment settings take effect; vertical alignment settings do not take effect. That is: left, right, center_horizontal are effective. When android:orientation="horizontal", only vertical alignment settings take effect; horizontal alignment settings do not take effect. That is: top, bottom, center_vertical are effective.
However, this method seems to be of no use. For example: If only the vertical direction can be used to set left/right alignment, the following effect will appear:
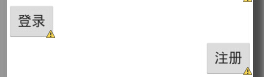
This is obviously not the result we want! To sum up, either layout according to the rules given above, but for this case it is better to use RelativeLayout! The Internet doesn't give a specific reason; people just say to change it this way, and some say it is related to the priority of orientation. Let's mark it down for now and explain later if we know the reason! As mentioned earlier in the screen adaptation section,it is still recommended to use RelativeLayout for layout!