Introduction to This Section:
This section brings us the last control in the basic UI controls part:DrawerLayout, an official side sliding menu control provided by Google. Like ViewPager from the previous section, it was introduced after 3.0. For lower versions, the v4 compatibility package is needed. Speaking of side sliding, I believe many people have used SlidingMenu on GitHub, but it seems there are two versions: one is standalone, and the other needs to depend on another open-source project: ActionBarSherlock. Since Google has provided us with this control, why not use it? Moreover, in the Material Design specification, many side sliding menu animations can be seen everywhere, and most of them can be achieved through Toolbar + DrawerLayout~ In this section, let's explore the basic usage of DrawerLayout~ Some people also like to call it the drawer control~ Official documentation:DrawerLayout
1. Usage Notes
- 1. The main content view must be the first child view of DrawerLayout
- 2. The width and height of the main content view need to be match_parent
- 3. You must explicitly specify the android:layout_gravity attribute of the side sliding viewWhen android:layout_gravity = "start", the menu slides out from left to right When android:layout_gravity = "end", the menu slides out from right to left It is not recommended to use left and right!!!
- The width of the side sliding view is in dp, and it is not recommended to exceed320dp(so that you can always see some of the main content view)
- Setting the side sliding event: mDrawerLayout.setDrawerListener(DrawerLayout.DrawerListener);
- One thing to mention: it can be used with the ActionBar. When the user clicks the app icon on the ActionBar, the side sliding menu pops out! This is done throughActionBarDrawerToggle, which is a concrete implementation class of DrawerLayout.DrawerListener. We can override ActionBarDrawerToggle's onDrawerOpened() and onDrawerClosed() to listen for drawer pulled-out or hidden events! But we won't cover this here, because after 5.0 we use Toolbar! If you're interested, you can consult the related documentation yourself!
2. Code Usage Examples
Example 1: Implementation of a Single Side Sliding Menu
Runtime Effect Screenshots:
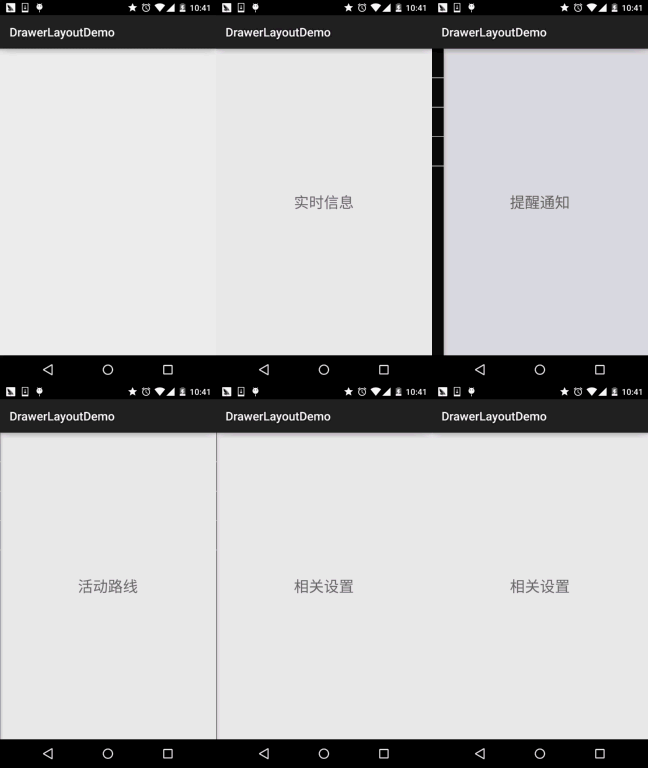
Key Implementation Code:
First is our main layout. Note: the outermost layer must be DrawerLayout!!!!
activity_main.xml:
<android.support.v4.widget.DrawerLayout xmlns:android="http://schemas.android.com/apk/res/android"
    android:id="@+id/drawer_layout"
    android:layout_width="match_parent"
    android:layout_height="match_parent">

    <FrameLayout
        android:id="@+id/ly_content"
        android:layout_width="match_parent"
        android:layout_height="match_parent" />

    <ListView
        android:id="@+id/list_left_drawer"
        android:layout_width="180dp"
        android:layout_height="match_parent"
        android:layout_gravity="start"
        android:background="#080808"
        android:choiceMode="singleChoice"
        android:divider="#FFFFFF"
        android:dividerHeight="1dp" />

</android.support.v4.widget.DrawerLayout>
Next are the ListView layout code and the domain class. The Item is relatively simple, so I won't provide it. Let's go directly to the layout and code of the middle Fragment! In addition, for the Adapter, we directly reuse the reusable MyAdapter we wrote before!
fg_content.xml:
<?xml version="1.0" encoding="utf-8"?>
<RelativeLayout xmlns:android="http://schemas.android.com/apk/res/android"
    android:layout_width="match_parent"
    android:layout_height="match_parent"
    android:orientation="vertical">

    <TextView
        android:id="@+id/tv_content"
        android:layout_width="wrap_content"
        android:layout_height="wrap_content"
        android:layout_centerInParent="true"
        android:textSize="25sp" />

</RelativeLayout>
ContentFragment.java:
/**
 * Created by Jay on 2015/10/8 0008.
 */
public class ContentFragment extends Fragment {

    private TextView tv_content;

    @Override
    public View onCreateView(LayoutInflater inflater, ViewGroup container, Bundle savedInstanceState) {
        View view = inflater.inflate(R.layout.fg_content, container, false);
        tv_content = (TextView) view.findViewById(R.id.tv_content);
        String text = getArguments().getString("text");
        tv_content.setText(text);
        return view;
    }
}
Finally, our Activity class
MainActivity.java:
public class MainActivity extends AppCompatActivity implements AdapterView.OnItemClickListener{

    private DrawerLayout drawer_layout;
    private ListView list_left_drawer;
    private ArrayList<Item> menuLists;
    private MyAdapter<Item> myAdapter = null;


    @Override
    protected void onCreate(Bundle savedInstanceState) {
        super.onCreate(savedInstanceState);
        setContentView(R.layout.activity_main);

        drawer_layout = (DrawerLayout) findViewById(R.id.drawer_layout);
        list_left_drawer = (ListView) findViewById(R.id.list_left_drawer);

        menuLists = new ArrayList<Item>();
        menuLists.add(new Item(R.mipmap.iv_menu_realtime,"实时信息"));
        menuLists.add(new Item(R.mipmap.iv_menu_alert,"提醒通知"));
        menuLists.add(new Item(R.mipmap.iv_menu_trace,"活动路线"));
        menuLists.add(new Item(R.mipmap.iv_menu_settings,"相关设置"));
        myAdapter = new MyAdapter<Item>(menuLists,R.layout.item_list) {
            @Override
            public void bindView(ViewHolder holder, Item obj) {
                holder.setImageResource(R.id.img_icon,obj.getIconId());
                holder.setText(R.id.txt_content, obj.getIconName());
            }
        };
        list_left_drawer.setAdapter(myAdapter);
        list_left_drawer.setOnItemClickListener(this);
    }


    @Override
    public void onItemClick(AdapterView<?> parent, View view, int position, long id) {
        ContentFragment contentFragment = new ContentFragment();
        Bundle args = new Bundle();
        args.putString("text", menuLists.get(position).getIconName());
        contentFragment.setArguments(args);
        FragmentManager fm = getSupportFragmentManager();
        fm.beginTransaction().replace(R.id.ly_content,contentFragment).commit();
        drawer_layout.closeDrawer(list_left_drawer);
    }
}
The code is very simple, so I won't say much more~
Example 2: Implementation of Left and Right Side Sliding Menus
Hmm, I don't know if you've noticed, but from the DrawerLayout layout above, we can roughly guess that DrawerLayout consists of at most three parts: the middle content part, the left side sliding menu part, and the right side sliding menu part! Next, let's write an example with two side sliding menus!
Runtime Effect Screenshots:
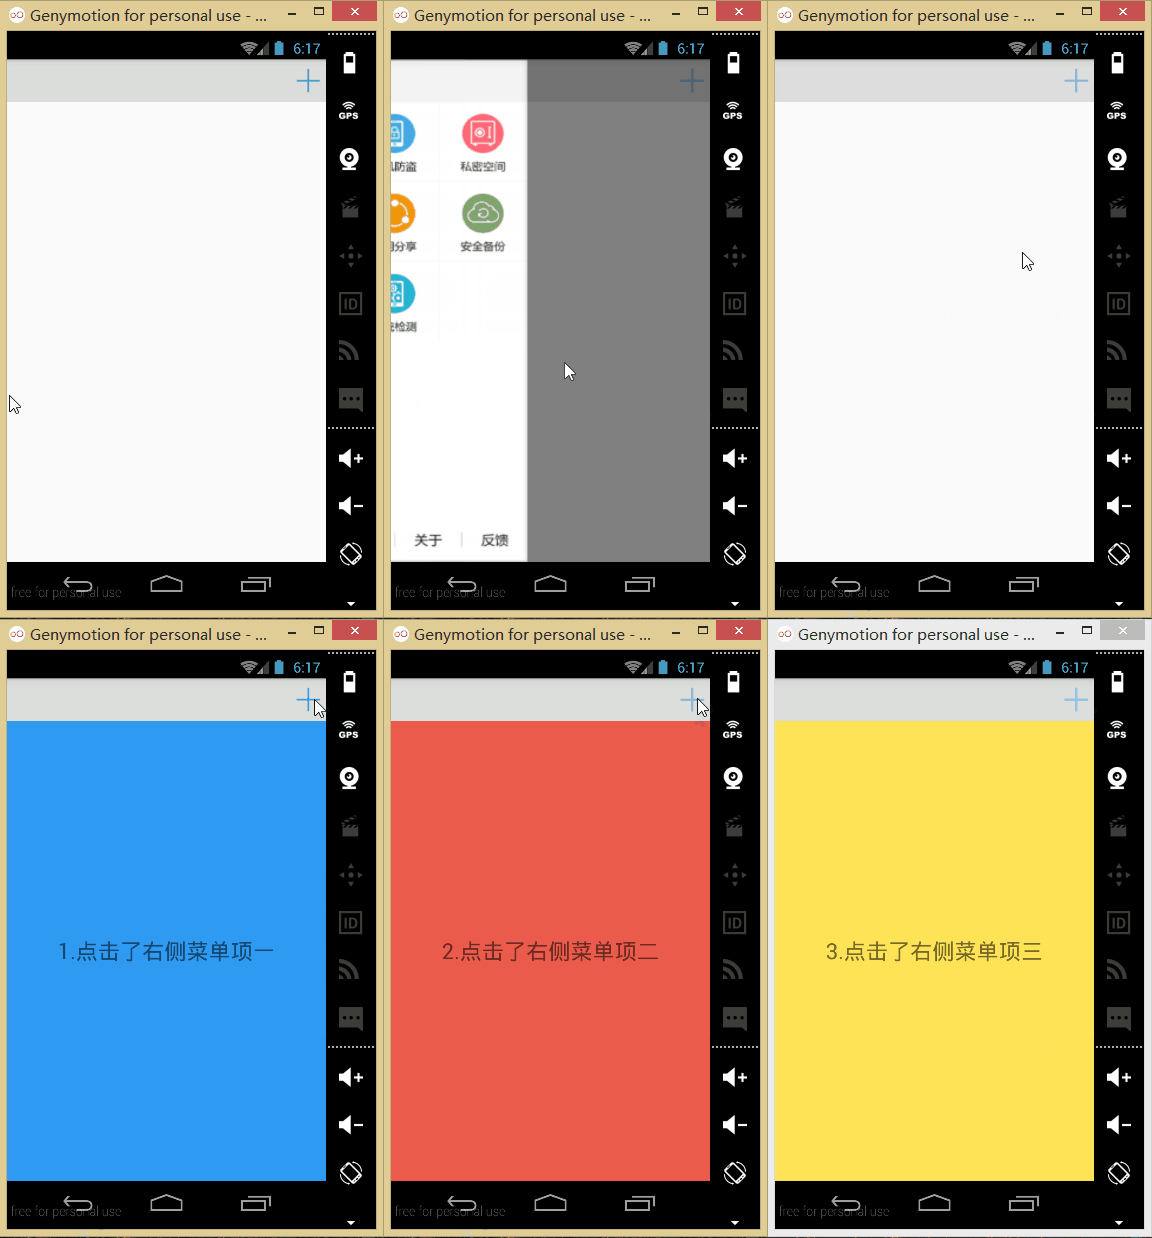
Code Implementation:
First, we create two Fragments and their corresponding layouts; they are respectively the left and right side sliding menus!
Left Fragment:
Layout:fg_left.xml, here we just used an image. When clicked, it pops up a new Activity; of course, you can extend it according to your own needs!
<?xml version="1.0" encoding="utf-8"?>
<LinearLayout xmlns:android="http://schemas.android.com/apk/res/android"
    android:orientation="vertical" android:layout_width="match_parent"
    android:layout_height="match_parent">

    <ImageView
        android:id="@+id/img_bg"
        android:layout_width="match_parent"
        android:layout_height="match_parent"
        android:background="@mipmap/bg_menu_left"/>

</LinearLayout>
The correspondingLeftFragment.java:
/**
 * Created by Jay on 2015/10/9 0009.
 */
public class LeftFragment extends Fragment{

    private DrawerLayout drawer_layout;

    @Override
    public View onCreateView(LayoutInflater inflater, ViewGroup container, Bundle savedInstanceState) {
        View view = inflater.inflate(R.layout.fg_left, container, false);
        ImageView img_bg = (ImageView) view.findViewById(R.id.img_bg);
        img_bg.setOnClickListener(new View.OnClickListener() {
            @Override
            public void onClick(View v) {
                getActivity().startActivity(new Intent(getActivity(),OtherActivity.class));
                drawer_layout.closeDrawer(Gravity.START);
            }
        });
        return view;
    }

    //暴露给Activity,用于传入DrawerLayout,因为点击后想关掉DrawerLayout
    public void setDrawerLayout(DrawerLayout drawer_layout){
        this.drawer_layout = drawer_layout;
    }
}
Right Fragment:
The layout just has three buttons. When clicked, they replace the Fragment in the middle. Layoutfg_right.xmlThe code is as follows:
<?xml version="1.0" encoding="utf-8"?>
<LinearLayout xmlns:android="http://schemas.android.com/apk/res/android"
    android:layout_width="match_parent"
    android:layout_height="match_parent"
    android:background="#2F9AF2"
    android:gravity="center"
    android:orientation="vertical">

    <Button
        android:id="@+id/btn_one"
        android:layout_width="wrap_content"
        android:layout_height="wrap_content"
        android:text="菜单项一" />

    <Button
        android:id="@+id/btn_two"
        android:layout_width="wrap_content"
        android:layout_height="wrap_content"
        android:text="菜单项二" />

    <Button
        android:id="@+id/btn_three"
        android:layout_width="wrap_content"
        android:layout_height="wrap_content"
        android:text="菜单项三" />

</LinearLayout>
Then the corresponding one isRightFragment.java:
/**
 * Created by Jay on 2015/10/9 0009.
 */
public class RightFragment extends Fragment implements View.OnClickListener{

    private DrawerLayout drawer_layout;
    private FragmentManager fManager;

    @Override
    public View onCreateView(LayoutInflater inflater, ViewGroup container, Bundle savedInstanceState) {
        View view = inflater.inflate(R.layout.fg_right, container, false);
        view.findViewById(R.id.btn_one).setOnClickListener(this);
        view.findViewById(R.id.btn_two).setOnClickListener(this);
        view.findViewById(R.id.btn_three).setOnClickListener(this);
        fManager = getActivity().getSupportFragmentManager();
        return view;
    }

    @Override
    public void onClick(View v) {
        switch (v.getId()){
            case R.id.btn_one:
                ContentFragment cFragment1 = new ContentFragment("1.点击了右侧菜单项一",R.color.blue);
                fManager.beginTransaction().replace(R.id.fly_content,cFragment1).commit();
                drawer_layout.closeDrawer(Gravity.END);
                break;
            case R.id.btn_two:
                ContentFragment cFragment2 = new ContentFragment("2.点击了右侧菜单项二",R.color.red);
                fManager.beginTransaction().replace(R.id.fly_content,cFragment2).commit();
                drawer_layout.closeDrawer(Gravity.END);
                break;
            case R.id.btn_three:
                ContentFragment cFragment3 = new ContentFragment("3.点击了右侧菜单项三",R.color.yellow);
                fManager.beginTransaction().replace(R.id.fly_content,cFragment3).commit();
                drawer_layout.closeDrawer(Gravity.END);
                break;
        }
    }

    public void setDrawerLayout(DrawerLayout drawer_layout){
        this.drawer_layout = drawer_layout;
    }

}
In addition, there is also a ContentFragment that fills the middle part. Layout:fg_content.xmlAs follows:
<?xml version="1.0" encoding="utf-8"?>
<RelativeLayout xmlns:android="http://schemas.android.com/apk/res/android"
    android:layout_width="match_parent"
    android:layout_height="match_parent"
    android:orientation="vertical">

    <TextView
        android:id="@+id/tv_content"
        android:layout_width="wrap_content"
        android:layout_height="wrap_content"
        android:layout_centerInParent="true"
        android:textSize="25sp" />

</RelativeLayout>
ContentFragment.java:
public class ContentFragment extends Fragment {

    private TextView tv_content;
    private String strContent;
    private int bgColor;

    public ContentFragment(String strContent,int bgColor) {
        this.strContent = strContent;
        this.bgColor = bgColor;
    }

    @Override
    public View onCreateView(LayoutInflater inflater, ViewGroup container, Bundle savedInstanceState) {
        View view = inflater.inflate(R.layout.fg_content, container, false);
        view.setBackgroundColor(getResources().getColor(bgColor));
        tv_content = (TextView) view.findViewById(R.id.tv_content);
        tv_content.setText(strContent);
        return view;
    }
}
After writing that, we come to our Activity's layout and the Activity's code: Before that, we also need to write a top bar layout:
view_topbar.xml:
<?xml version="1.0" encoding="utf-8"?>
<RelativeLayout xmlns:android="http://schemas.android.com/apk/res/android"
    android:layout_width="match_parent"
    android:layout_height="wrap_content"
    android:background="#DCDEDB">

    <Button
        android:id="@+id/btn_right"
        android:layout_width="40dp"
        android:layout_height="40dp"
        android:layout_centerVertical="true"
        android:layout_alignParentRight="true"
        android:background="@drawable/btn_selctor"/>

</RelativeLayout>
Then it'sactivity_main.xml:
<android.support.v4.widget.DrawerLayout xmlns:android="http://schemas.android.com/apk/res/android"
    xmlns:tools="http://schemas.android.com/tools"
    android:id="@+id/drawer_layout"
    android:layout_width="match_parent"
    android:layout_height="match_parent">

    <LinearLayout
        android:layout_width="match_parent"
        android:layout_height="match_parent"
        android:orientation="vertical">

        <include
            android:id="@+id/topbar"
            layout="@layout/view_topbar"
            android:layout_width="wrap_content"
            android:layout_height="48dp" />

        <FrameLayout
            android:id="@+id/fly_content"
            android:layout_width="match_parent"
            android:layout_height="match_parent" />

    </LinearLayout>

    <fragment
        android:id="@+id/fg_left_menu"
        android:name="jay.com.drawerlayoutdemo2.LeftFragment"
        android:layout_width="300dp"
        android:layout_height="match_parent"
        android:layout_gravity="start"
        android:tag="LEFT"
        tools:layout="@layout/fg_left" />

    <fragment
        android:id="@+id/fg_right_menu"
        android:name="jay.com.drawerlayoutdemo2.RightFragment"
        android:layout_width="100dp"
        android:layout_height="match_parent"
        android:layout_gravity="end"
        android:tag="RIGHT"
        tools:layout="@layout/fg_right" />

</android.support.v4.widget.DrawerLayout>
Finally it'sMainActivity.java:
public class MainActivity extends AppCompatActivity implements View.OnClickListener {

    private DrawerLayout drawer_layout;
    private FrameLayout fly_content;
    private View topbar;
    private Button btn_right;
    private RightFragment fg_right_menu;
    private LeftFragment fg_left_menu;
    private FragmentManager fManager;

    @Override
    protected void onCreate(Bundle savedInstanceState) {
        super.onCreate(savedInstanceState);
        setContentView(R.layout.activity_main);
        fManager = getSupportFragmentManager();
        fg_right_menu = (RightFragment) fManager.findFragmentById(R.id.fg_right_menu);
        fg_left_menu = (LeftFragment) fManager.findFragmentById(R.id.fg_left_menu);
        initViews();
    }

    private void initViews() {
        drawer_layout = (DrawerLayout) findViewById(R.id.drawer_layout);
        fly_content = (FrameLayout) findViewById(R.id.fly_content);
        topbar = findViewById(R.id.topbar);
        btn_right = (Button) topbar.findViewById(R.id.btn_right);
        btn_right.setOnClickListener(this);

        //设置右面的侧滑菜单只能通过编程来打开
        drawer_layout.setDrawerLockMode(DrawerLayout.LOCK_MODE_LOCKED_CLOSED,
                Gravity.END);

        drawer_layout.setDrawerListener(new DrawerLayout.DrawerListener() {
            @Override
            public void onDrawerSlide(View view, float v) {

            }

            @Override
            public void onDrawerOpened(View view) {

            }

            @Override
            public void onDrawerClosed(View view) {
                drawer_layout.setDrawerLockMode(
                        DrawerLayout.LOCK_MODE_LOCKED_CLOSED, Gravity.END);
            }

            @Override
            public void onDrawerStateChanged(int i) {

            }
        });

        fg_right_menu.setDrawerLayout(drawer_layout);
        fg_left_menu.setDrawerLayout(drawer_layout);
    }

    @Override
    public void onClick(View v) {
        drawer_layout.openDrawer(Gravity.RIGHT);
        drawer_layout.setDrawerLockMode(DrawerLayout.LOCK_MODE_UNLOCKED,
                Gravity.END);    //解除锁定
    }
}
Okay, at this point it's done~ Phew, let me explain some doubts you might have when looking at the code:
- 1. drawer_layout.openDrawer(Gravity.END);
This line sets which menu is opened. START represents the left side, END represents the right side- 2. drawer_layout.setDrawerLockMode(DrawerLayout.LOCK_MODE_LOCKED_CLOSED,Gravity.END); Lock the right side sliding menu. It cannot be closed or opened by gesture; it can only be opened through code! That is, calling the openDrawer method! Then drawer_layout.setDrawerLockMode(DrawerLayout.LOCK_MODE_UNLOCKED,Gravity.END); Unlock the locked state, allowing the side sliding menu to be closed by gesture. Finally, when the drawer is closed, call: drawer_layout.setDrawerLockMode(DrawerLayout.LOCK_MODE_LOCKED_CLOSED, Gravity.END); Lock the right side sliding menu again!
- 3. What is the purpose of the Tag attribute in the layout code? Answer: It's not used here. When overriding the onDrawerSlide method of DrawerListener, we can use its first parameter, drawerView, and call drawerView.getTag().equals("START") to determine which menu triggered the menu event! Then we can perform the corresponding operations!
3. Code Example Download
DrawerLayoutDemo.zip
DrawerLayoutDemo2.zip
Section Summary:
Okay, in this section we introduced the basic usage of the official side sliding control DrawerLayout. It's very convenient to use! Of course, this is just a simple usage demonstration. Also, I saw that the master developer Hongyang wrote an article:Android DrawerLayout High-Fidelity Recreation of QQ 5.2 Bidirectional Side Sliding MenuIf you're interested, you can take a look. After reading the content of this section, I believe you won't find it too difficult~ Okay!
This section ends here. Say goodbye to the UI controls chapter~ In the next chapter, we start drawing and animation, laying the foundation for the custom controls series in the advanced part!
