Introduction to This Section:
In this section, we introduce the second Adapter-type control — GridView (grid view). As the name implies, ListView is a list, while GridView displays a grid! Like ListView, it is a subclass of AbsListView! Many things are common with ListView. In this section, we will learn its basic usage~
1. Related Attributes:
Below are some attributes of GridView:
- android:columnWidth: Set the column width
- android:gravity: Alignment of the component
- android:horizontalSpacing: Horizontal spacing between each cell
- android:verticalSpacing: Vertical spacing between each cell
- android:numColumns: Set the number of columns
- android:stretchMode: Set the stretch mode, optional values are as follows:none: No stretching;spacingWidth: Stretch the spacing gaps between elementscolumnWidth: Only stretch the grid elements themselvesspacingWidthUniform: Stretch both the element spacing and the gaps between them
2. Usage Example:
Below we will use a simple example to get familiar with the usage of this control. (The Adapter used here is the reusable BaseAdapter we taught you to write in Section 2.5.0~)
Screenshot of the implemented effect:
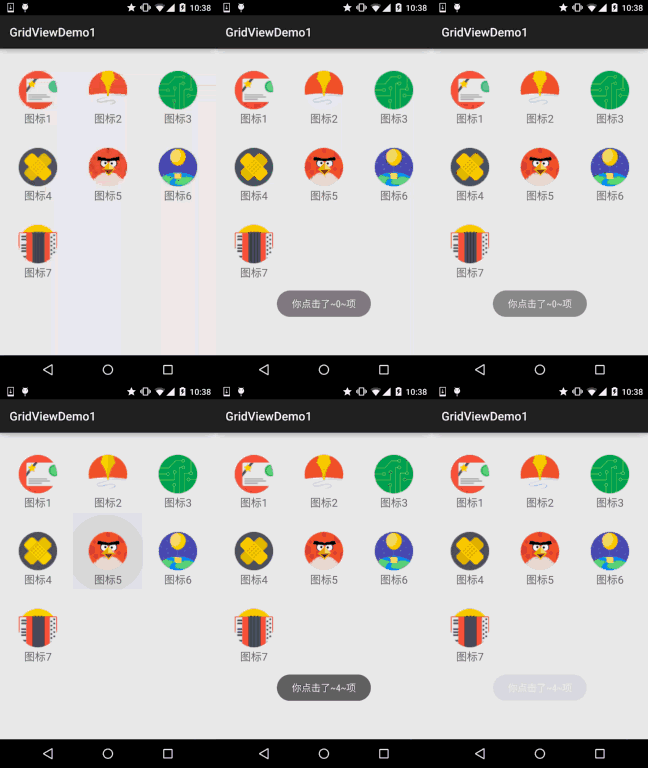
Code Implementation:
First, the layout of the GridView item:item_grid_icon.xml:
<?xml version="1.0" encoding="utf-8"?>
<RelativeLayout xmlns:android="http://schemas.android.com/apk/res/android"
    android:layout_width="match_parent"
    android:layout_height="match_parent"
    android:padding="5dp">

    <ImageView
        android:id="@+id/img_icon"
        android:layout_width="64dp"
        android:layout_height="64dp"
        android:layout_centerInParent="true"
        android:src="@mipmap/iv_icon_1.html" />

    <TextView
        android:id="@+id/txt_icon"
        android:layout_width="wrap_content"
        android:layout_height="wrap_content"
        android:layout_below="@id/img_icon"
        android:layout_centerHorizontal="true"
        android:layout_marginTop="30dp"
        android:text="呵呵"
        android:textSize="18sp" />

</RelativeLayout>
Next, let's write an entity class:Icon.java:
/**
 * Created by Jay on 2015/9/24 0024.
 */
public class Icon {
    private int iId;
    private String iName;

    public Icon() {
    }

    public Icon(int iId, String iName) {
        this.iId = iId;
        this.iName = iName;
    }

    public int getiId() {
        return iId;
    }

    public String getiName() {
        return iName;
    }

    public void setiId(int iId) {
        this.iId = iId;
    }

    public void setiName(String iName) {
        this.iName = iName;
    }
}
Finally, the MainActivity layout and the Java code
activity_main.xml:
<RelativeLayout xmlns:android="http://schemas.android.com/apk/res/android"
    xmlns:tools="http://schemas.android.com/tools"
    android:layout_width="match_parent"
    android:layout_height="match_parent"
    android:padding="5dp"
    tools:context=".MainActivity">

    <!--numColumns设置每行显示多少个-->
    <GridView
        android:id="@+id/grid_photo"
        android:layout_width="match_parent"
        android:layout_height="match_parent"
        android:numColumns="3" />

</RelativeLayout>
MainActivity.java:
public class MainActivity extends AppCompatActivity {

    private Context mContext;
    private GridView grid_photo;
    private BaseAdapter mAdapter = null;
    private ArrayList<Icon> mData = null;

    @Override
    protected void onCreate(Bundle savedInstanceState) {
        super.onCreate(savedInstanceState);
        setContentView(R.layout.activity_main);
        mContext = MainActivity.this;
        grid_photo = (GridView) findViewById(R.id.grid_photo);

        mData = new ArrayList<Icon>();
        mData.add(new Icon(R.mipmap.iv_icon_1, "图标1"));
        mData.add(new Icon(R.mipmap.iv_icon_2, "图标2"));
        mData.add(new Icon(R.mipmap.iv_icon_3, "图标3"));
        mData.add(new Icon(R.mipmap.iv_icon_4, "图标4"));
        mData.add(new Icon(R.mipmap.iv_icon_5, "图标5"));
        mData.add(new Icon(R.mipmap.iv_icon_6, "图标6"));
        mData.add(new Icon(R.mipmap.iv_icon_7, "图标7"));

        mAdapter = new MyAdapter<Icon>(mData, R.layout.item_grid_icon) {
            @Override
            public void bindView(ViewHolder holder, Icon obj) {
                holder.setImageResource(R.id.img_icon, obj.getiId());
                holder.setText(R.id.txt_icon, obj.getiName());
            }
        };

        grid_photo.setAdapter(mAdapter);

        grid_photo.setOnItemClickListener(new AdapterView.OnItemClickListener() {
            @Override
            public void onItemClick(AdapterView<?> parent, View view, int position, long id) {
                Toast.makeText(mContext, "你点击了~" + position + "~项", Toast.LENGTH_SHORT).show();
            }
        });

    }

}
Well, the code is very simple~
3. Download Sample Code:
GridViewDemo1.zip
Summary of This Section:
In this section, we introduced the second UI control that requires Adapter — GridView. Its usage is very simple~ You can extend it according to your own needs, for example, using GridView to display a phone album~ Well, that's all, thank you~