Introduction to This Section
FrameLayout (Frame Layout) can be said to be the simplest of the six major layouts. This layout directly opens up a blank area on the screen. When we add controls to it, they are placed by default in the upper-left corner of this area. However, this layout method does not have any positioning method, so its application scenarios are not many. The size of the frame layout is determined by the largest child control among the controls. If the controls are the same size, then only the topmost component can be seen at the same time! Controls added later will cover the previous one! Although controls are placed in the upper-left corner by default, we can also specify other positions through the layout_gravity attribute. In addition to demonstrating the simplest example, this section also brings two fun examples; if you are interested, you can take a look!
1. Common Attributes
FrameLayout has very few attributes, just two, but before we talk about them, let's first introduce one thing:
Foreground image: an image that is always at the top of the frame layout, directly facing the user, that is, an image that will not be covered.
Two attributes:
- android:foreground:*Set the foreground image of the frame layout container
- android:foregroundGravity:Set the position where the foreground image is displayed
2. Example Demonstrations
1) The Simplest Example
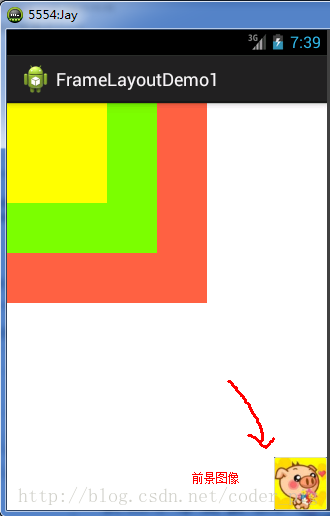
Running result screenshot:
The implementation code is as follows:
<FrameLayout xmlns:android="http://schemas.android.com/apk/res/android"
    xmlns:tools="http://schemas.android.com/tools"
    android:id="@+id/FrameLayout1"
    android:layout_width="match_parent"
    android:layout_height="match_parent"
    tools:context=".MainActivity"
    android:foreground="@drawable/logo"
    android:foregroundGravity="right|bottom">

    <TextView
        android:layout_width="200dp"
        android:layout_height="200dp"
        android:background="#FF6143" />
    <TextView
        android:layout_width="150dp"
        android:layout_height="150dp"
        android:background="#007FFE" />
     <TextView
        android:layout_width="100dp"
        android:layout_height="100dp"
        android:background="#FFFF00" />

</FrameLayout>
Code analysis:Very simple. Three TextViews are set with different sizes and background colors, covering each other in sequence. Then, in the lower-right corner is the foreground image. Use android:foreground="@drawable/logo" to set the foreground image, and android:foregroundGravity="right|bottom" to set the foreground image position to the lower-right corner.
2) Cute Girl Moving with Your Finger
The effect is as follows:

Implementation process analysis:
- Step 1: First set the main.xml layout as an empty FrameLayout, and set an image background for it.
- Step 2: Create a custom component class MeziView that inherits from the View class, and initialize the initial coordinates of the view in the constructor.
- Step 3: Override the onDraw() method and instantiate an empty Paint brush class.
- Step 4: Call BitmapFactory.decodeResource() to generate a bitmap object.
- Step 5: Call canvas.drawBitmap() to draw the bitmap object of the girl.
- Step 6: Check whether the image is recycled; if not, force recycle the image.
- Step 7: In the main Java code, obtain the frame layout object, and instantiate a MeziView class.
- Step 8: Add a touch event listener to the instantiated mezi object, override the onTouch method, change the X,Y coordinates of mezi, and call the invalidate() redraw method.
- Step 9: Add the mezi object to the frame layout.
Layout code:main_activity.xml
<FrameLayout xmlns:android="http://schemas.android.com/apk/res/android"
    xmlns:tools="http://schemas.android.com/tools"
    android:id="@+id/mylayout"
    android:layout_width="match_parent"
    android:layout_height="match_parent"
    tools:context=".MainActivity"
    android:background="@drawable/back" >
</FrameLayout>
CustomMeziView.java
package com.jay.example.framelayoutdemo2;

import android.content.Context;
import android.graphics.Bitmap;
import android.graphics.BitmapFactory;
import android.graphics.Canvas;
import android.graphics.Paint;
import android.view.View;

public class MeziView extends View {
    //定义相关变量,依次是妹子显示位置的X,Y坐标
    public float bitmapX;
    public float bitmapY;
    public MeziView(Context context) {
        super(context);
        //设置妹子的起始坐标
        bitmapX = 0;
        bitmapY = 200;
    }

    //重写View类的onDraw()方法
    @Override
    protected void onDraw(Canvas canvas) {
        super.onDraw(canvas);
        //创建,并且实例化Paint的对象
        Paint paint = new Paint();
        //根据图片生成位图对象
        Bitmap bitmap = BitmapFactory.decodeResource(this.getResources(), R.drawable.s_jump);
        //绘制萌妹子
        canvas.drawBitmap(bitmap, bitmapX, bitmapY,paint);
        //判断图片是否回收,木有回收的话强制收回图片
        if(bitmap.isRecycled())
        {
            bitmap.recycle();
        }
    }
}
MainActivity.java:
package com.jay.example.framelayoutdemo2;

import android.os.Bundle;
import android.view.MotionEvent;
import android.view.View;
import android.view.View.OnTouchListener;
import android.widget.FrameLayout;
import android.app.Activity;


public class MainActivity extends Activity {

    @Override
    protected void onCreate(Bundle savedInstanceState) {
        super.onCreate(savedInstanceState);
        setContentView(R.layout.activity_main);
        FrameLayout frame = (FrameLayout) findViewById(R.id.mylayout);
        final MeziView mezi = new MeziView(MainActivity.this);
        //为我们的萌妹子添加触摸事件监听器
        mezi.setOnTouchListener(new OnTouchListener() {
            @Override
            public boolean onTouch(View view, MotionEvent event) {
                //设置妹子显示的位置
                mezi.bitmapX = event.getX() - 150;
                mezi.bitmapY = event.getY() - 150;
                //调用重绘方法
                mezi.invalidate();
                return true;
            }
        });
        frame.addView(mezi);
    }
}
Code explanation:See the steps. It's very simple: define a custom View class, override the redraw method, then add a touch event to it in the Activity. In the touch event, override the onTouch method to get the click focus. In addition, you need to subtract 150, otherwise the coordinates are the upper-left corner of the custom View. Then call the invalidate() redraw method, and finally add it to the frame layout!
Code download:FrameLayoutDemo2.zip
3) Running Cute Girl
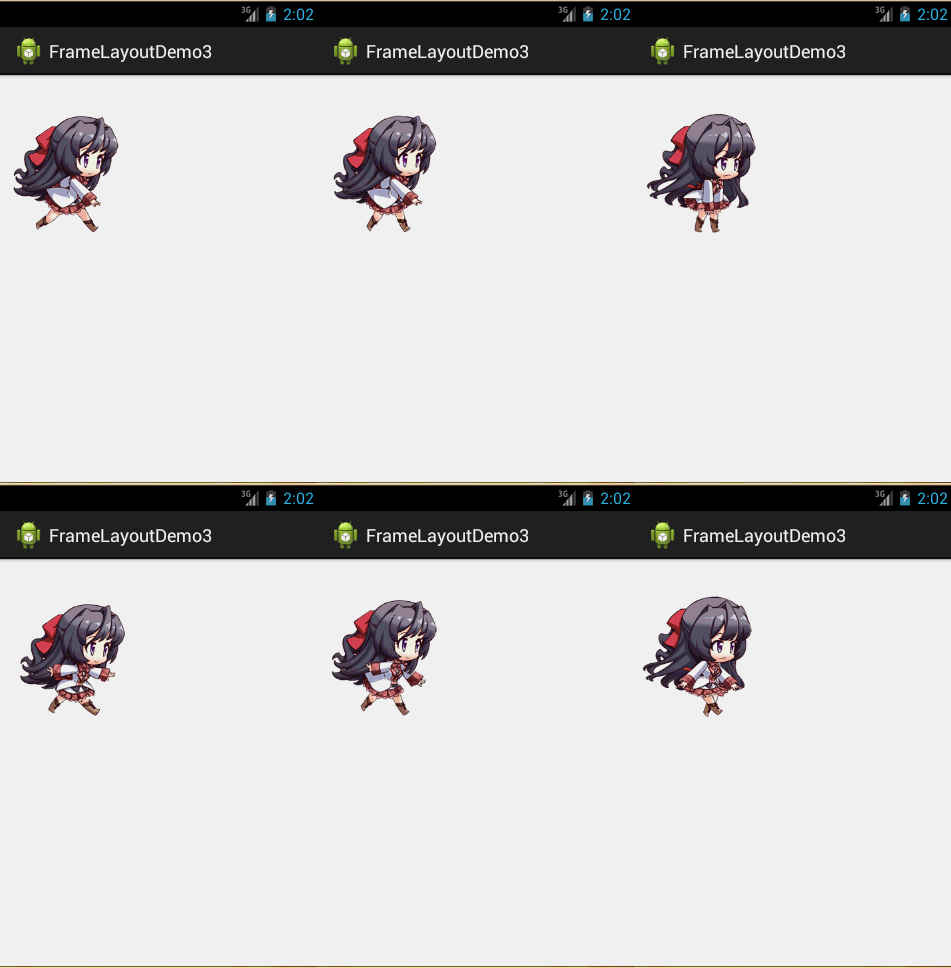
The effect is as follows:
Implementation flow:
- Step 1: Define an empty FrameLayout layout, and set the position of the foreground image to the center.
- Step 2: In the Activity, obtain the FrameLayout layout, create a new Handler object, override the handlerMessage() method, and call the image update method.
- Step 3: Define a custom move() method, and use switch to dynamically set the bitmap displayed by the foreground image.
- Step 4: In the onCreate() method, create a Timer object, override the run method, and send an empty message to the handler every 170 milliseconds.
The implementation code is as follows:
Layout file: main_activity.xml:
<FrameLayout xmlns:android="http://schemas.android.com/apk/res/android"
    xmlns:tools="http://schemas.android.com/tools"
    android:id="@+id/myframe"
    android:layout_width="wrap_content"
    android:layout_height="wrap_content"
    android:foregroundGravity="center">
</FrameLayout>
MainActivity.java:
package com.jay.example.framelayoutdemo3;

import java.util.Timer;
import java.util.TimerTask;
import android.os.Bundle;
import android.os.Handler;
import android.os.Message;
import android.view.View;
import android.view.View.OnClickListener;
import android.widget.FrameLayout;
import android.app.Activity;
import android.graphics.drawable.Drawable;

public class MainActivity extends Activity {
    //初始化变量,帧布局
    FrameLayout frame = null;
    //自定义一个用于定时更新UI界面的handler类对象
        Handler handler = new Handler()
        {
            int i = 0;
            @Override
            public void handleMessage(Message msg) {
            //判断信息是否为本应用发出的
                if(msg.what == 0x123)
                {
                    i++;
                    move(i % 8 );
                }
                super.handleMessage(msg);
             }
        };

    //定义走路时切换图片的方法
    void move(int i)
    {
        Drawable a = getResources().getDrawable(R.drawable.s_1);
        Drawable b = getResources().getDrawable(R.drawable.s_2);
        Drawable c = getResources().getDrawable(R.drawable.s_3);
        Drawable d = getResources().getDrawable(R.drawable.s_4);
        Drawable e = getResources().getDrawable(R.drawable.s_5);
        Drawable f = getResources().getDrawable(R.drawable.s_6);
        Drawable g = getResources().getDrawable(R.drawable.s_7);
        Drawable h = getResources().getDrawable(R.drawable.s_8);
        //通过setForeground来设置前景图像
        switch(i)
        {
            case 0:
                frame.setForeground(a);
                break;
            case 1:
                frame.setForeground(b);
                break;
            case 2:
                frame.setForeground(c);
                break;
            case 3:
                frame.setForeground(d);
                break;
            case 4:
                frame.setForeground(e);
                break;
            case 5:
                frame.setForeground(f);
                break;
            case 6:
                frame.setForeground(g);
                break;
            case 7:
                frame.setForeground(h);
                break;
        }
    }

    @Override
    protected void onCreate(Bundle savedInstanceState) {
        super.onCreate(savedInstanceState);
        setContentView(R.layout.activity_main);

        frame = (FrameLayout) findViewById(R.id.myframe);
        //定义一个定时器对象,定时发送信息给handler
        new Timer().schedule(new TimerTask() {

            @Override
            public void run() {
                //发送一条空信息来通知系统改变前景图片
                handler.sendEmptyMessage(0x123);
            }
        }, 0,170);
    }
}
Code analysis:The code is also very simple. It defines a handler object to refresh the foreground image of the frame layout, and defines a Timer that sends timing information every 170 milliseconds, i++; move(i%8); this is because we use 8 images as animation materials!
Code download:FrameLayoutDemo3.zip
Section Summary
This section introduces FrameLayout (Frame Layout). You mainly need to master the use of the foreground and foregroundGravity attributes. The frame layout is used a little more than the previous table layout! If you are interested, you can write some small examples like the author did and try it out!