Introduction to this section:
In Chapter 2, we learned about Android UI controls. We can use these controls to create a beautiful interface, but it is only an interface; the next step is to start learning logic and business implementation. This chapter explains Android's event handling mechanism! What is an event handling mechanism? Take a simple example: clicking a button sends a login request to the server! Of course, Android's event handling mechanism is not limited to this. For example, when the screen is selected, we click on some area of the screen... Simply put, the event handling mechanism is that when we interact with the UI, we add some small actions behind the scenes! In this section, we introduce the most frequently used one: the listener-based event handling mechanism!
1. Model of the listener-based event handling mechanism:
Flow model diagram:
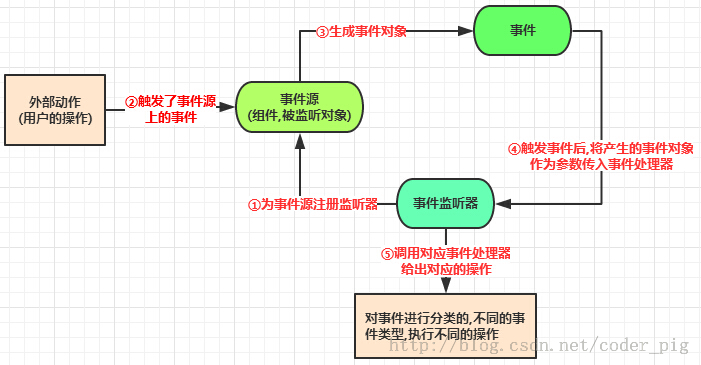
Text description:
The event listening mechanism consists ofevent source,event,event listenerthree types of objects. The processing flow is as follows:Step 1:Set a listener for an event source (component) to listen for user operationsStep 2:The user's operation triggers the listener of the event sourceStep 3:The corresponding event object is generatedStep 4:This event source object is passed as a parameter to the event listenerstep 5:The event listener judges the event object and executes the corresponding event handler (the processing method for the corresponding event)
Summary:
The event listening mechanism is a delegated event handling mechanism. The event source (component) delegates event handling to the event listener. When a specified event occurs on the event source, it notifies the designated event listener to perform the corresponding operation.
2. Five different usage forms:
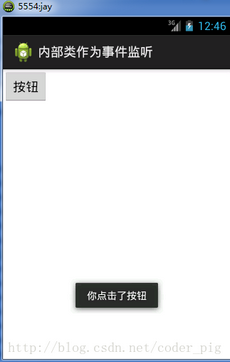
We use the following:A simple button click program that displays a Toast message;Implement it using five different forms!
Effect preview:
1) Directly use an anonymous inner class
The most commonly used one: directly call setXxxListener and override the methods inside; it is usually used temporarily once, and reusability is low!
The implementation code is as follows:MainAcivity.java:
package com.jay.example.innerlisten;

import android.os.Bundle;
import android.view.View;
import android.view.View.OnClickListener;
import android.widget.Button;
import android.widget.Toast;
import android.app.Activity;


public class MainActivity extends Activity {
    private Button btnshow;

    @Override
    protected void onCreate(Bundle savedInstanceState) {
        super.onCreate(savedInstanceState);
        setContentView(R.layout.activity_main);
        btnshow = (Button) findViewById(R.id.btnshow);
        btnshow.setOnClickListener(new OnClickListener() {
            //重写点击事件的处理方法onClick()
            @Override
            public void onClick(View v) {
                //显示Toast信息
                Toast.makeText(getApplicationContext(), "你点击了按钮", Toast.LENGTH_SHORT).show();
            }
        });
    }
}
2) Use an inner class
This is different from the anonymous inner class above! Advantage: it can be reused within the class, and can directly access all UI components of the outer class!
The implementation code is as follows:MainAcivity.java:
package com.jay.example.innerlisten;

import android.os.Bundle;
import android.view.View;
import android.view.View.OnClickListener;
import android.widget.Button;
import android.widget.Toast;
import android.app.Activity;


public class MainActivity extends Activity {
    private Button btnshow;
    @Override
    protected void onCreate(Bundle savedInstanceState) {
        super.onCreate(savedInstanceState);
        setContentView(R.layout.activity_main);
        btnshow = (Button) findViewById(R.id.btnshow);
        //直接new一个内部类对象作为参数
        btnshow.setOnClickListener(new BtnClickListener());
    }
    //定义一个内部类,实现View.OnClickListener接口,并重写onClick()方法
    class BtnClickListener implements View.OnClickListener
    {
        @Override
        public void onClick(View v) {
            Toast.makeText(getApplicationContext(), "按钮被点击了", Toast.LENGTH_SHORT).show();
        }
    }
}
3) Use an external class:
It means creating a separate Java file to handle events. This form is used less often! Because the external class cannot directly access the components in the user interface class, the components need to be passed in through the constructor; the result is that the code is not concise enough!
ps: To demonstrate parameter passing, a TextView is used here instead of a Toast message!
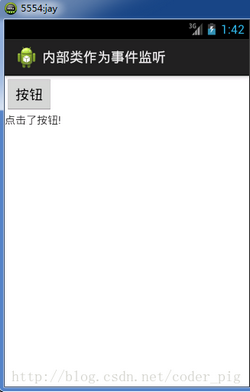
The implementation code is as follows:MyClick.java:
package com.jay.example.innerlisten;

import android.view.View;
import android.view.View.OnClickListener;
import android.widget.TextView;

public class MyClick implements OnClickListener {
    private TextView textshow;
    //把文本框作为参数传入
    public MyClick(TextView txt)
    {
        textshow = txt;
    }
    @Override
    public void onClick(View v) {
        //点击后设置文本框显示的文字
        textshow.setText("点击了按钮!");
    }
}
MainActivity.java
package com.jay.example.innerlisten;
import android.os.Bundle;
import android.widget.Button;
import android.widget.TextView;
import android.app.Activity;


public class MainActivity extends Activity {
    private Button btnshow;
    private TextView txtshow;
    @Override
    protected void onCreate(Bundle savedInstanceState) {
        super.onCreate(savedInstanceState);
        setContentView(R.layout.activity_main);
        btnshow = (Button) findViewById(R.id.btnshow);
        txtshow = (TextView) findViewById(R.id.textshow);
        //直接new一个外部类,并把TextView作为参数传入
        btnshow.setOnClickListener(new MyClick(txtshow));
    }
}
4) Directly use Activity as the event listener
Just make the Activity class implement the XxxListener event listener interface, and define/override the corresponding event handler methods in the Activity. For example: Activity implements the OnClickListener interface and overrides the onClick(View) method. When adding this event listener object to some components, simply call setXxxListener(this).
The implementation code is as follows:MainAcivity.java:
package com.jay.example.innerlisten;
import android.os.Bundle;
import android.view.View;
import android.view.View.OnClickListener;
import android.widget.Button;
import android.widget.Toast;
import android.app.Activity;

//让Activity方法实现OnClickListener接口
public class MainActivity extends Activity implements OnClickListener{
    private Button btnshow;
    @Override
    protected void onCreate(Bundle savedInstanceState) {
        super.onCreate(savedInstanceState);
        setContentView(R.layout.activity_main);

        btnshow = (Button) findViewById(R.id.btnshow);
        //直接写个this
        btnshow.setOnClickListener(this);
    }
    //重写接口中的抽象方法
    @Override
    public void onClick(View v) {
        Toast.makeText(getApplicationContext(), "点击了按钮", Toast.LENGTH_SHORT).show();
    }
}
5) Directly bind to the tag:
It means directly defining an event handling method in the corresponding Activity in the XML layout file. For example: public void myClick(View source) — source corresponds to the event source (component). Then, in the layout file, for the component that needs to trigger the event, set an attribute: onclick = "myclick".
The implementation code is as follows:MainAcivity.java:
package com.jay.example.caller;

import android.app.Activity;
import android.os.Bundle;
import android.view.View;
import android.widget.Toast;

public class MainActivity extends Activity {
    @Override
    protected void onCreate(Bundle savedInstanceState) {
        super.onCreate(savedInstanceState);
        setContentView(R.layout.activity_main);
    }
    //自定义一个方法,传入一个view组件作为参数
    public void myclick(View source)
    {
        Toast.makeText(getApplicationContext(), "按钮被点击了", Toast.LENGTH_SHORT).show();
    }
}
main.xml layout file:
<LinearLayout xmlns:android="http://schemas.android.com/apk/res/android"
    xmlns:tools="http://schemas.android.com/tools"
    android:id="@+id/LinearLayout1"
    android:layout_width="match_parent"
    android:layout_height="match_parent"
    android:orientation="vertical" >
    <Button
        android:layout_width="wrap_content"
        android:layout_height="wrap_content"
        android:text="按钮"
        android:onClick="myclick"/>
 </LinearLayout>
Section Summary
This section introduced the event handling mechanism in Android. The example uses the onClickListener click event. Of course, there are other events besides this, such as onItemClickListener. Anything that needs to go through setXxxListener is basically based on event listening. In addition, among the five methods, the more commonly used ones are 1, 2, 3, and 5, depending on the specific situation~