Introduction to this section:
Earlier we have learned LinearLayout and RelativeLayout, which are used more frequently in everyday practical development. Actually, after learning these two, it is basically enough for use. The author also uses these two more often in practical development. Of course, as a studious programmer, we all like to get to the bottom of things. So although they are not used much, it is still necessary to learn the basic usage. Who knows, maybe one day we will need them! Right? Learning more is no big deal, and you won't lose out! Okay, enough idle talk, let's start learning this section. In this section, we will learn the third layout in Android: TableLayout (Table Layout)!
1. Learning roadmap for this section
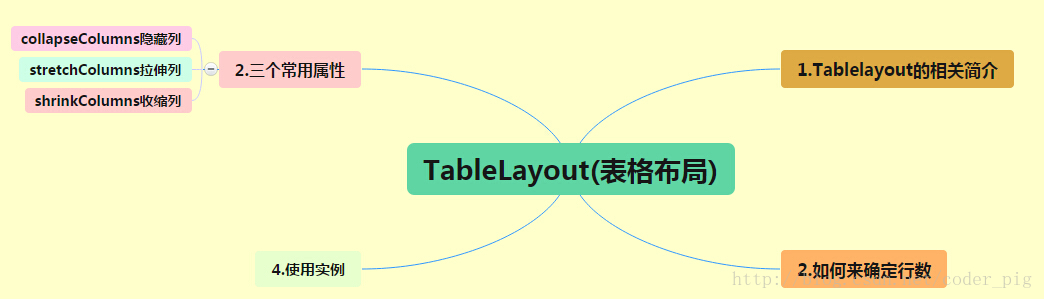
Roadmap analysis:From the roadmap above, we can see that the usage of TableLayout is quite simple. It is nothing more than determining the number of rows of the table, and using those three attributes to set the elements in a certain column of each row to be hidden, stretched, or shrunk!
2. Introduction to TableLayout
Those who have learned HTML know that we can generate an HTML table with <table><tr><td>, and Android also allows us to arrange components in a table manner, that is, in rows and columns, which is the TableLayout in this section! But unlike the GridLayout introduced after Android 4.0 that we will talk about later,GridLayout (Grid) layoutit is not like that; we cannot directly set the number of rows and columns!
3. How to determine the number of rows and columns
- ① If we directly add a component to TableLayout, then this component will occupy an entire row!!!
- ② If we want multiple components on one row, we need to add a TableRow container and put all the components into it!
- ③ The number of components in a TableRow determines how many columns that row has, and the width of a column is determined by the widest cell in that column.
- ④ The layout_width attribute of TableRow defaults to fill_parent, and setting it to other values by ourselves will not take effect!!! However, layout_height defaults to wrap_content, but we can set its size ourselves!
- ⑤ The width of the entire table layout depends on the width of the parent container (fills the parent container itself)
- ⑥ You have to count the number of rows yourself: one TableRow is one row, and a single component is also one row! The number of columns depends on the number of components in the TableRow; the one with the most components determines the number of columns of the TableLayout.
4. Three commonly used attributes
android:collapseColumns:Set the columns that needto be hiddencolumn numbers of
android:shrinkColumns:Set the allowedto be shrunkcolumn numbers of the columns
android:stretchColumns:Set the allowedto be stretchedcolumn numbers of the columnsThe column numbers for the above three attributes are allcounted from 0For example, shrinkColunmns = "2" corresponds to the third column!
You canset multipleusecomma separatedFor example, "0,2". If all columnsshould take effectthenuse "*"just that
Besides these three commonly used attributes, there are two more attributes, namely skipping cells and merging cells, which are similar to tables in HTML:android:layout_column="2": meansskipthe second one, and directly display at the third cell position, counting from 1!
android:layout_span="4": meansmerging4 cells, that is, this component occupies 4 cells
Attribute usage examples:
① collapseColumns (hide columns)
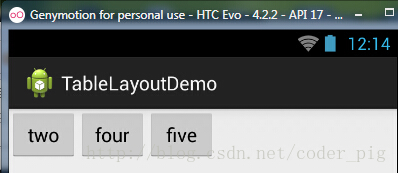
Procedure: After defining 5 buttons in TableRow, then add the following attribute to the outermost TableLayout: android:collapseColumns = "0,2", which hides the first and third columns. The code is as follows:
<TableLayout
    android:id="@+id/TableLayout2"
    android:layout_width="fill_parent"
    android:layout_height="wrap_content"
    android:collapseColumns="0,2" >

    <TableRow>

        <Button
            android:layout_width="wrap_content"
            android:layout_height="wrap_content"
            android:text="one" />

        <Button
            android:layout_width="wrap_content"
            android:layout_height="wrap_content"
            android:text="two" />

        <Button
            android:layout_width="wrap_content"
            android:layout_height="wrap_content"
            android:text="three" />

        <Button
            android:layout_width="wrap_content"
            android:layout_height="wrap_content"
            android:text="four" />

        <Button
            android:layout_width="wrap_content"
            android:layout_height="wrap_content"
            android:text="five" />
    </TableRow>
</TableLayout>
Running effect screenshot:
② stretchColumns (stretch columns)
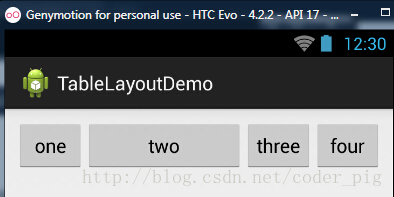
Procedure: Set four buttons in TableLayout, then add the following attribute to the outermost TableLayout: android:stretchColumns = "1"
Set the second column as a stretchable column, so that this column fills all the remaining space in the row. The code is as follows:
<TableLayout
    android:id="@+id/TableLayout2"
    android:layout_width="fill_parent"
    android:layout_height="wrap_content"
    android:stretchColumns="1" >

    <TableRow>

        <Button
            android:layout_width="wrap_content"
            android:layout_height="wrap_content"
            android:text="one" />

        <Button
            android:layout_width="wrap_content"
            android:layout_height="wrap_content"
            android:text="two" />

        <Button
            android:layout_width="wrap_content"
            android:layout_height="wrap_content"
            android:text="three" />

        <Button
            android:layout_width="wrap_content"
            android:layout_height="wrap_content"
            android:text="four" />
    </TableRow>
</TableLayout>
Running effect screenshot:
③ shrinkColumns (shrink columns)
Steps: Here, to demonstrate the effect, 5 buttons and a text box are set, and the following attribute is added to the outermost TableLayout: android:shrinkColumns = "1"
Set the second column as a shrinkable column. The code is as follows:
<TableLayout
    android:id="@+id/TableLayout2"
    android:layout_width="fill_parent"
    android:layout_height="wrap_content"
    android:shrinkColumns="1" >

    <TableRow>

        <Button
            android:layout_width="wrap_content"
            android:layout_height="wrap_content"
            android:text="one" />

        <Button
            android:layout_width="wrap_content"
            android:layout_height="wrap_content"
            android:text="two" />

        <Button
            android:layout_width="wrap_content"
            android:layout_height="wrap_content"
            android:text="three" />

        <Button
            android:layout_width="wrap_content"
            android:layout_height="wrap_content"
            android:text="four" />

        <Button
            android:layout_width="wrap_content"
            android:layout_height="wrap_content"
            android:text="five" />

        <TextView
            android:layout_width="wrap_content"
            android:layout_height="wrap_content"
            android:text="文本XX" />
    </TableRow>
</TableLayout>
Running screenshot:
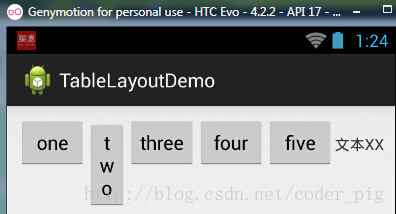
From the figure, we can see that the "two" button is squeezed into a strip shape; this is shrinking, in order to ensure that the table can adapt to the width of the parent container! As for the other two attributes, we will not explain them; their usage is the same as in HTML! If you are interested, you can study them!
5. Usage examples
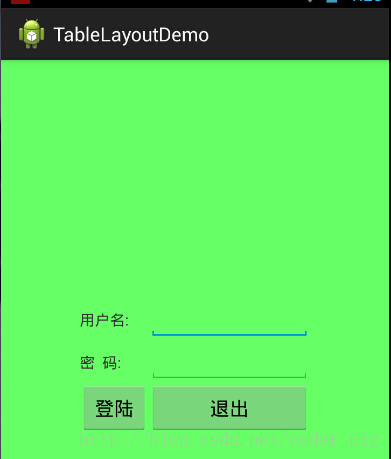
Use TableLayout to implement a simple login interface. The running effect is as follows:
Process analysis:
① Call the gravity attribute and set it to center_vertical, so that the components in the layout are centered vertically.
② Set the first and fourth columns in TableLayout to be stretchable.
③ Add two TextViews in each TableRow to stretch and fill the row, so that the table can be horizontally centered.
android:stretchColumns="0,3" is set to 0,3, so that both sides fill, and then the middle part can be centered.
The detailed code is as follows:
<TableLayout xmlns:android="http://schemas.android.com/apk/res/android"
    xmlns:tools="http://schemas.android.com/tools"
    android:id="@+id/TableLayout1"
    android:layout_width="match_parent"
    android:layout_height="match_parent"
    tools:context=".MainActivity"
    android:stretchColumns="0,3"
    android:gravity="center_vertical"
    android:background="#66B2FF"
    >

    <TableRow>
        <TextView />
        <TextView
            android:layout_width="wrap_content"
            android:layout_height="wrap_content"
            android:text="用户名:"/>
        <EditText
            android:layout_width="wrap_content"
            android:layout_height="wrap_content"
            android:minWidth="150dp"/>
        <TextView />
    </TableRow>

    <TableRow>
        <TextView />
        <TextView
            android:layout_width="wrap_content"
            android:layout_height="wrap_content"
            android:text="密  码:"
        />
        <EditText
            android:layout_width="wrap_content"
            android:layout_height="wrap_content"
            android:minWidth="150dp"
        />
        <TextView />
    </TableRow>

    <TableRow>
        <TextView />
        <Button
            android:layout_width="wrap_content"
            android:layout_height="wrap_content"
            android:text="登陆"/>
        <Button
            android:layout_width="wrap_content"
            android:layout_height="wrap_content"
            android:text="退出"/>
        <TextView />
    </TableRow>

</TableLayout>
6. Issues found
I believe everyone will encounter this warning when using the TableRow of this TableLayout:
Of course, the program can still run, but if you have obsessive-compulsive disorder and are annoyed by the yellow exclamation mark, there is a strange way to solve this warning: just make sure your TableLayout contains 2 or more TableRows!
Summary of this section:
Okay, that's it for Android's third layout: TableLayout~ It's nothing more than the use of five attributes. In actual development, we don't use table layout much, so just knowing the simple usage is enough!
