Introduction:
InAndroid Basic Tutorial — 8.3.1 Detailed Explanation of Three Drawing Tool ClassesThere is such a method in the Paint method:
setMaskFilter(MaskFilter maskfilter)setMaskFilter: Set MaskFilter, you can use different MaskFilters to achieve filter effects, such as blur, 3D, etc.! And we generally don't use this MaskFilter directly, but use its two subclasses:
BlurMaskFilterSpecifies a blur style and radius to process the edges of the Paint.
EmbossMaskFilterSpecifies the direction of the light source and the ambient light intensity to add an emboss effect.
Official API Documentation:
BlurMaskFilter;
EmbossMaskFilter;
1. BlurMaskFilter (Blur Effect)
Talk about filters and 3D, who knows what it's like? The example tells the truth:
Code Example:
Running Effect:
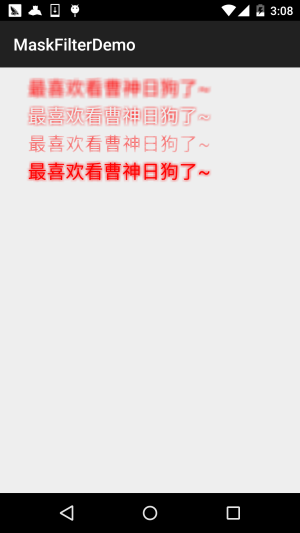
Implementation Code:
Here we create a custom View and complete the drawing inside it!
BlurMaskFilterView.java:
/**
 * Created by Jay on 2015/10/21 0021.
 */
public class BlurMaskFilterView extends View{

    public BlurMaskFilterView(Context context) {
        super(context);
    }

    public BlurMaskFilterView(Context context, AttributeSet attrs) {
        super(context, attrs);
    }

    public BlurMaskFilterView(Context context, AttributeSet attrs, int defStyleAttr) {
        super(context, attrs, defStyleAttr);
    }

    @Override
    protected void onDraw(Canvas canvas) {

        BlurMaskFilter bmf = null;
        Paint paint=new Paint();
        paint.setAntiAlias(true);          //抗锯齿
        paint.setColor(Color.RED);//画笔颜色
        paint.setStyle(Paint.Style.FILL);  //画笔风格
        paint.setTextSize(68);             //绘制文字大小,单位px
        paint.setStrokeWidth(5);           //画笔粗细

        bmf = new BlurMaskFilter(10f,BlurMaskFilter.Blur.NORMAL);
        paint.setMaskFilter(bmf);
        canvas.drawText("最喜欢看曹神日狗了~", 100, 100, paint);
        bmf = new BlurMaskFilter(10f,BlurMaskFilter.Blur.OUTER);
        paint.setMaskFilter(bmf);
        canvas.drawText("最喜欢看曹神日狗了~", 100, 200, paint);
        bmf = new BlurMaskFilter(10f,BlurMaskFilter.Blur.INNER);
        paint.setMaskFilter(bmf);
        canvas.drawText("最喜欢看曹神日狗了~", 100, 300, paint);
        bmf = new BlurMaskFilter(10f,BlurMaskFilter.Blur.SOLID);
        paint.setMaskFilter(bmf);
        canvas.drawText("最喜欢看曹神日狗了~", 100, 400, paint);

        setLayerType(View.LAYER_TYPE_SOFTWARE, null);     //关闭硬件加速
    }
}
Alright, from the code example above, we can see that using this BlurMaskFilter is nothing more than instantiating it in the constructor:
BlurMaskFilter(10f,BlurMaskFilter.Blur.NORMAL);
What we can control are these two parameters:
The first parameterSpecifies the radius of the blur edge;
The second parameterSpecifies the blur style, with optional values:
- BlurMaskFilter.Blur.NORMALBlur inside and outside
- BlurMaskFilter.Blur.OUTEROuter blur
- BlurMaskFilter.Blur.INNERInner blur
- BlurMaskFilter.Blur.SOLIDBold inside, blur outside
It may still be a bit unclear, let's try with an image:
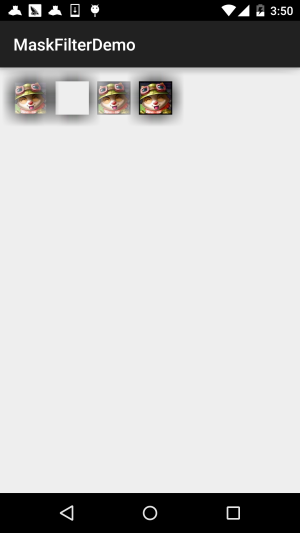
Here we changed the blur radius to 50, and it's even more obvious~
2. EmbossMaskFilter (Emboss Effect)
As the title says, add an emboss effect by specifying the direction of the ambient light source and the ambient light intensity. Similarly, let's write an example to see the effect:
Code Example:
Running Effect:
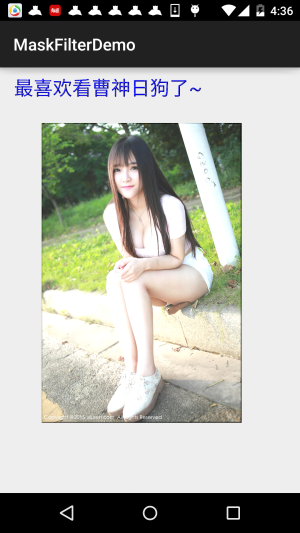
Implementation Code:
/**
 * Created by Jay on 2015/10/22 0022.
 */
public class EmbossMaskFilterView extends View{

    public EmbossMaskFilterView(Context context) {
        super(context);
    }

    public EmbossMaskFilterView(Context context, AttributeSet attrs) {
        super(context, attrs);
    }

    public EmbossMaskFilterView(Context context, AttributeSet attrs, int defStyleAttr) {
        super(context, attrs, defStyleAttr);
    }

    @Override
    protected void onDraw(Canvas canvas) {
        float[] direction = new float[]{ 1, 1, 3 };   // 设置光源的方向
        float light = 0.4f;     //设置环境光亮度
        float specular = 8;     // 定义镜面反射系数
        float blur = 3.0f;      //模糊半径
        EmbossMaskFilter emboss=new EmbossMaskFilter(direction,light,specular,blur);

        Paint paint = new Paint();
        paint.setAntiAlias(true);          //抗锯齿
        paint.setColor(Color.BLUE);//画笔颜色
        paint.setStyle(Paint.Style.FILL);  //画笔风格
        paint.setTextSize(70);             //绘制文字大小,单位px
        paint.setStrokeWidth(8);           //画笔粗细
        paint.setMaskFilter(emboss);

        paint.setMaskFilter(emboss);
        canvas.drawText("最喜欢看曹神日狗了~", 50, 100, paint);


        Bitmap bitmap = BitmapFactory.decodeResource(getResources(), R.mipmap.ic_bg_meizi1);
        canvas.drawBitmap(bitmap, 150, 200, paint);

        setLayerType(View.LAYER_TYPE_SOFTWARE, null);     //关闭硬件加速
    }
}
From the effect screenshot, we can see some of the EmbossMaskFilter effects. Modify the light to form an emboss effect~ The girl image is not obvious, but the text clearly shows the texture! Like BlurMaskFilter, the related settings are all done in the constructor!
EmbossMaskFilter(float[] direction, float ambient, float specular, float blurRadius)The parameters in order are:
directionA float array used to control the light source direction on the x, y, z axes
ambientSets the ambient light brightness, between 0 and 1
specularSpecular reflection coefficient
blurRadiusBlur radius
You can modify these values to try different effects. For example, if I modify the above one, it becomes another effect:
//To make it more obvious, changed to green

3. Precautions
When using MaskFilter, note that when our targetSdkVersion >= 14, MaskFilter will not take effect. This is because Android versions above API 14 have hardware acceleration enabled by default, which makes full use of GPU features to make drawing smoother, but consumes more memory! Alright, we just need to turn off hardware acceleration. You can enable or disable hardware acceleration at different levels; usually it's disabled~
- ApplicationAdd to the application node in the configuration file: android:hardwareAccelerated="true"
- ActivityAdd to the activity node in the configuration file: android:hardwareAccelerated="false"
- ViewYou can call it after obtaining the View object, or set it directly in the View's onDraw() method: view.setLayerType(View.LAYER_TYPE_HARDWARE, null);
Example Code Download:
MaskFilterDemo.zip
Section Summary:
This section demonstrated an API of Paint,setMaskFilter(MaskFilter maskfilter)We learned the basic usage of the two subclasses of MaskFilter: BlurMaskFilter (Blur Effect) and EmbossMaskFilter (Emboss Effect). It's relatively simple, and learning a bit more is no harm to our advanced custom controls. Alright, that's all, thanks~
By the way, I forgot to mention that there is a class in the SDK's example that demonstrates these two usages:
samples\android-xx\legacy\ApiDemos\src\com\example\android\apis\graphicsIn the directory:FingerPaint.javafile~
