Introduction to this section:
With the end of the previous section, it means we have finished learning all four major components of Android~, and in this section we will learn about the hub between the four major components—Intent, the bridge of Android communication. For example, we can use:
- startActivity(Intent)/startActivityForResult(Intent): to start an Activity
- startService(Intent)/bindService(Intent): to start a Service
- sendBroadcast: to send a broadcast to a specified BroadcastReceiver
- Also, don't forget that when we register the four major components, we write a lot ofIntent-Filter~
Alright, without further ado, let's start the content of this section! Also, we have already used Intent before, so we won't go over conceptual stuff again~ As usual, the official API:Intent
1. The difference between explicit Intent and implicit Intent
- Explicit Intent: Specify the target component to start by its component name, such as startActivity(new Intent(A.this,B.class)); Only one component is started each time~
- Implicit Intent: Instead of specifying the component name, it specifies the Intent's Action, Data, or Category. When we start a component, it will match the Intent-filter of the related components in AndroidManifest.xml, matching each component that satisfies the attributes one by one. When more than one matches, a dialog box will pop up for us to choose which one to start~
2. Seven attributes of Intent:
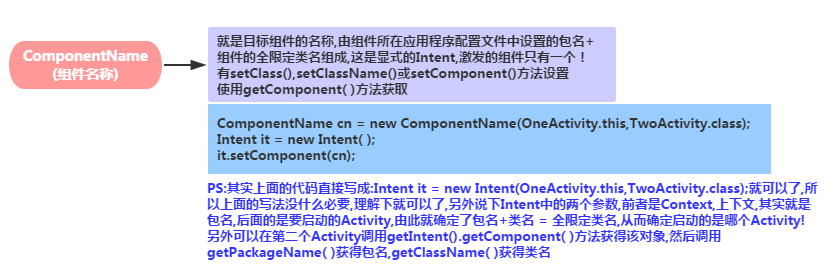
1) ComponentName
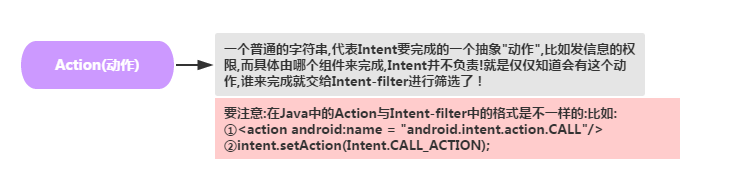
2) Action
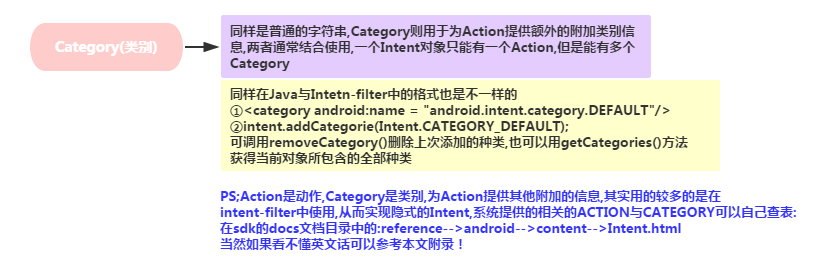
3) Category
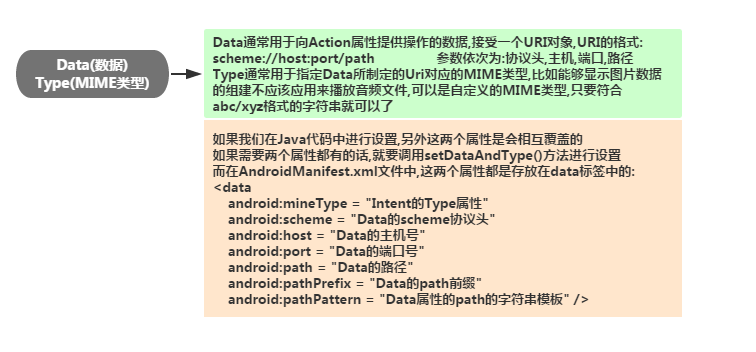
4) Data, Type (MIME type)
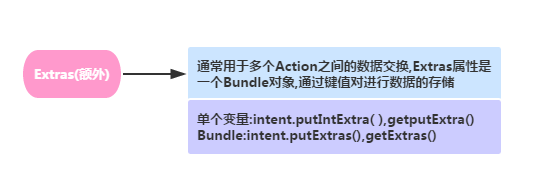
5) Extras
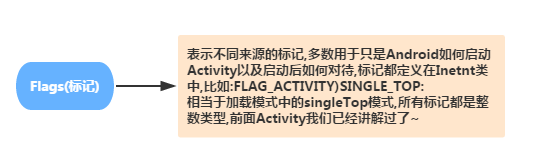
6) Flags
3. Example of using explicit Intent:
This is used a lot, so let's go straight to examples:
Example 1:Click the button to return to the Home screen:Screenshot of the running result:
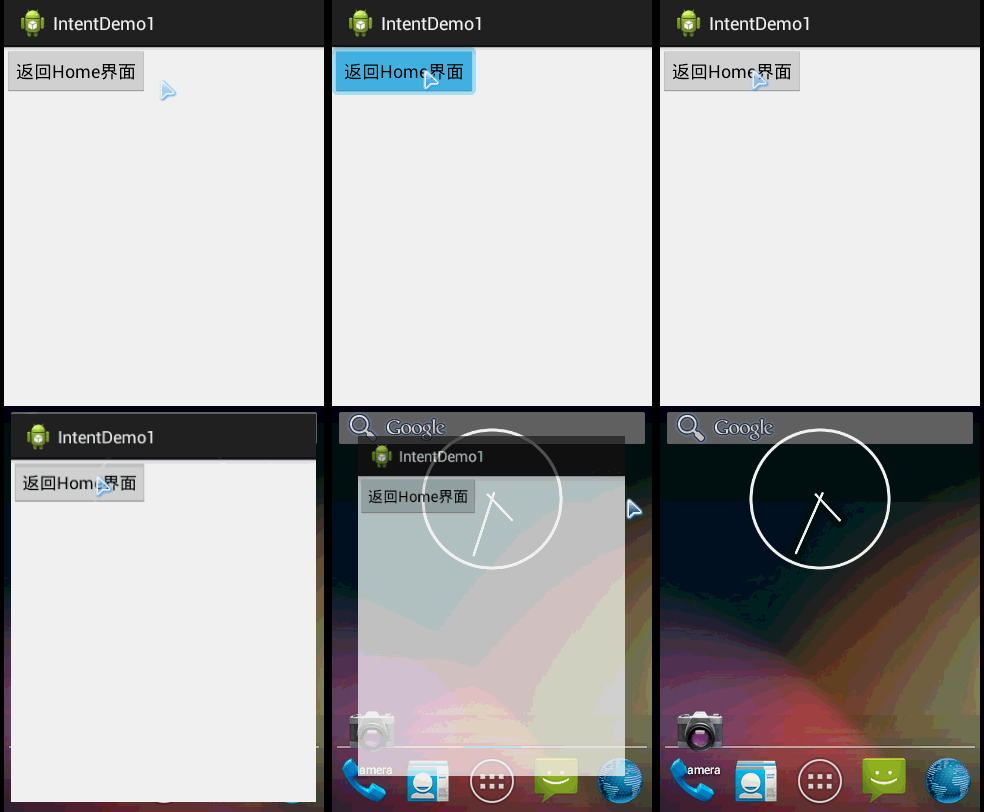
Core code:
Intent it = new Intent();
it.setAction(Intent.ACTION_MAIN);
it.addCategory(Intent.CATEGORY_HOME);
startActivity(it);
Example 2:Click the button to open the Baidu page:Screenshot of the running result:
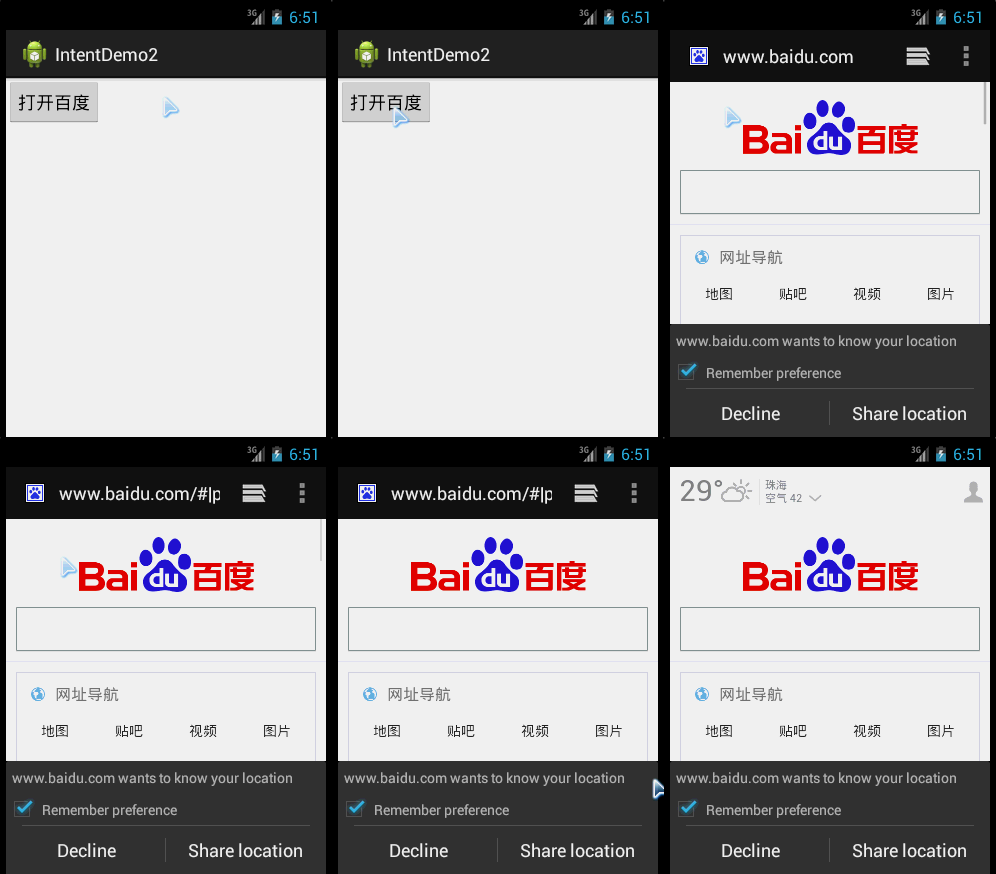
Core code:
Intent it = new Intent();
it.setAction(Intent.ACTION_VIEW);
it.setData(Uri.parse("http://www.baidu.com"));
startActivity(it);
4. Detailed explanation of implicit Intent
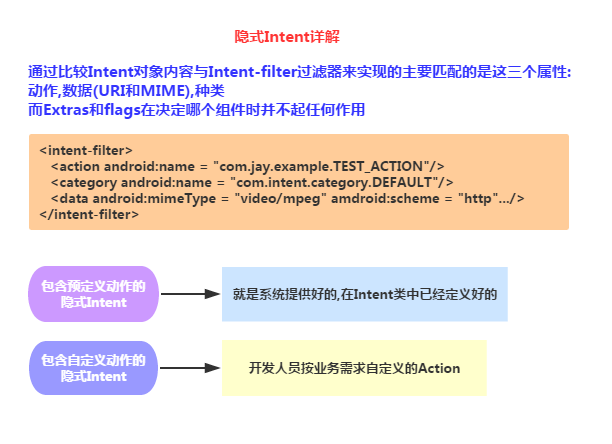
1) Example of implicit Intent with predefined actions:
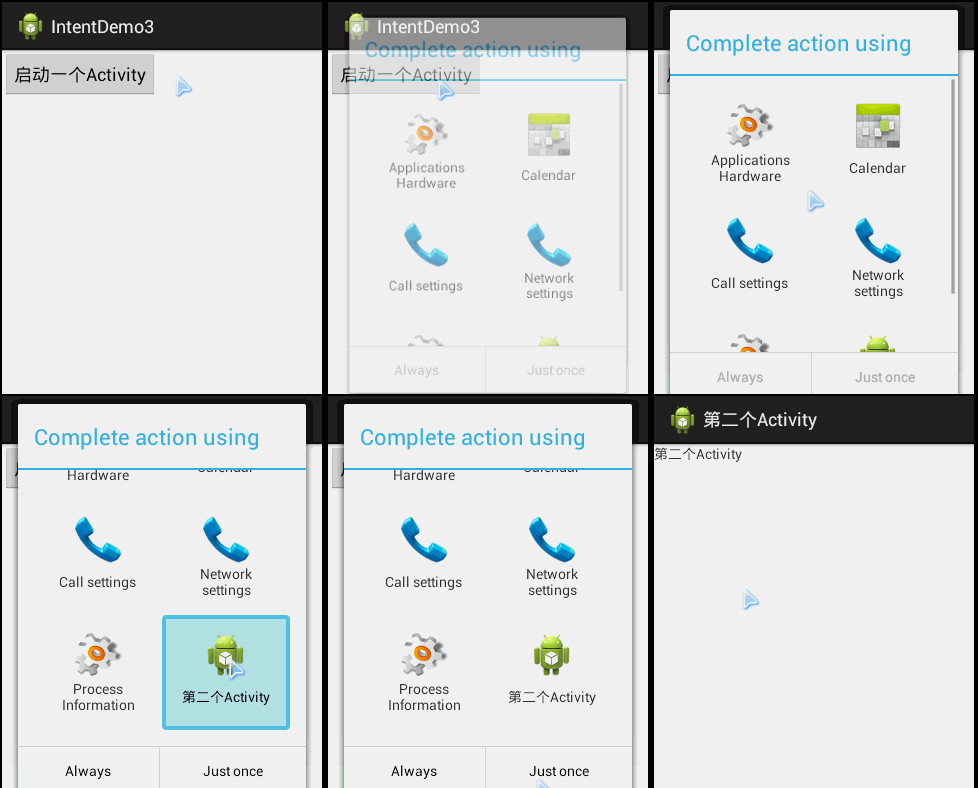
Code example:After clicking the button, all Activities with Action VIEW are filtered out, and the user can further choose:
Core code:
Create the layout of the second Activity, and the corresponding Activity. Add the following code to the button click event of the first Activity:
Intent it = new Intent();
it.setAction(Intent.ACTION_VIEW);
startActivity(it);
Finally, add the following code to the Intent of the second Activity:
<activity android:name=".SecondActivity"
            android:label="第二个Activity">
    <intent-filter>
        <action android:name="android.intent.action.VIEW"/>
        <category android:name="android.intent.category.DEFAULT"/>
    </intent-filter>
 </activity>
Screenshot of the running result:
2) Example of implicit Intent with custom actions:
Code example:Use a custom Action and category to activate another Activity
Core code:Create the layout of the second Activity, and the corresponding Activity. Add the following code to the button click event of the first Activity:
Intent it = new Intent();
it.setAction("my_action");
it.addCategory("my_category");
startActivity(it);
Finally, add the following code to the Intent of the second Activity:
<activity android:name=".SecondActivity"
        android:label="第二个Activity">
    <intent-filter>
        <action android:name="my_action"/>
        <category android:name="my_category"/>
        <category android:name="android.intent.category.DEFAULT"/>
    </intent-filter>
</activity>
Note that although we customized a category, we still need to add this default one, otherwise an error will be reported:
<category android:name="android.intent.category.DEFAULT"/>
5. Collection of common system Intents
Everyone, please post your collection of common system Intents. If any are missing above, feel free to suggest them~
//===============================================================
//1.拨打电话
// 给移动客服10086拨打电话
Uri uri = Uri.parse("tel:10086");
Intent intent = new Intent(Intent.ACTION_DIAL, uri);
startActivity(intent);

//===============================================================

//2.发送短信
// 给10086发送内容为“Hello”的短信
Uri uri = Uri.parse("smsto:10086");
Intent intent = new Intent(Intent.ACTION_SENDTO, uri);
intent.putExtra("sms_body", "Hello");
startActivity(intent);

//3.发送彩信(相当于发送带附件的短信)
Intent intent = new Intent(Intent.ACTION_SEND);
intent.putExtra("sms_body", "Hello");
Uri uri = Uri.parse("content://media/external/images/media/23");
intent.putExtra(Intent.EXTRA_STREAM, uri);
intent.setType("image/png");
startActivity(intent);

//===============================================================

//4.打开浏览器:
// 打开百度主页
Uri uri = Uri.parse("http://www.baidu.com");
Intent intent  = new Intent(Intent.ACTION_VIEW, uri);
startActivity(intent);

//===============================================================

//5.发送电子邮件:(阉割了Google服务的没戏!!!!)
// 给someone@domain.com发邮件
Uri uri = Uri.parse("mailto:someone@domain.com");
Intent intent = new Intent(Intent.ACTION_SENDTO, uri);
startActivity(intent);
// 给someone@domain.com发邮件发送内容为“Hello”的邮件
Intent intent = new Intent(Intent.ACTION_SEND);
intent.putExtra(Intent.EXTRA_EMAIL, "someone@domain.com");
intent.putExtra(Intent.EXTRA_SUBJECT, "Subject");
intent.putExtra(Intent.EXTRA_TEXT, "Hello");
intent.setType("text/plain");
startActivity(intent);
// 给多人发邮件
Intent intent=new Intent(Intent.ACTION_SEND);
String[] tos = {"1@abc.com", "2@abc.com"}; // 收件人
String[] ccs = {"3@abc.com", "4@abc.com"}; // 抄送
String[] bccs = {"5@abc.com", "6@abc.com"}; // 密送
intent.putExtra(Intent.EXTRA_EMAIL, tos);
intent.putExtra(Intent.EXTRA_CC, ccs);
intent.putExtra(Intent.EXTRA_BCC, bccs);
intent.putExtra(Intent.EXTRA_SUBJECT, "Subject");
intent.putExtra(Intent.EXTRA_TEXT, "Hello");
intent.setType("message/rfc822");
startActivity(intent);

//===============================================================

//6.显示地图:
// 打开Google地图中国北京位置(北纬39.9,东经116.3)
Uri uri = Uri.parse("geo:39.9,116.3");
Intent intent = new Intent(Intent.ACTION_VIEW, uri);
startActivity(intent);

//===============================================================

//7.路径规划
// 路径规划:从北京某地(北纬39.9,东经116.3)到上海某地(北纬31.2,东经121.4)
Uri uri = Uri.parse("http://maps.google.com/maps?f=d&saddr=39.9 116.3&daddr=31.2 121.4");
Intent intent = new Intent(Intent.ACTION_VIEW, uri);
startActivity(intent);

//===============================================================

//8.多媒体播放:
Intent intent = new Intent(Intent.ACTION_VIEW);
Uri uri = Uri.parse("file:///sdcard/foo.mp3");
intent.setDataAndType(uri, "audio/mp3");
startActivity(intent);

//获取SD卡下所有音频文件,然后播放第一首=-=
Uri uri = Uri.withAppendedPath(MediaStore.Audio.Media.INTERNAL_CONTENT_URI, "1");
Intent intent = new Intent(Intent.ACTION_VIEW, uri);
startActivity(intent);

//===============================================================

//9.打开摄像头拍照:
// 打开拍照程序
Intent intent = new Intent(MediaStore.ACTION_IMAGE_CAPTURE);
startActivityForResult(intent, 0);
// 取出照片数据
Bundle extras = intent.getExtras();
Bitmap bitmap = (Bitmap) extras.get("data");

//另一种:
//调用系统相机应用程序,并存储拍下来的照片
Intent intent = new Intent(MediaStore.ACTION_IMAGE_CAPTURE);
time = Calendar.getInstance().getTimeInMillis();
intent.putExtra(MediaStore.EXTRA_OUTPUT, Uri.fromFile(new File(Environment
.getExternalStorageDirectory().getAbsolutePath()+"/tucue", time + ".jpg")));
startActivityForResult(intent, ACTIVITY_GET_CAMERA_IMAGE);

//===============================================================

//10.获取并剪切图片
// 获取并剪切图片
Intent intent = new Intent(Intent.ACTION_GET_CONTENT);
intent.setType("image/*");
intent.putExtra("crop", "true"); // 开启剪切
intent.putExtra("aspectX", 1); // 剪切的宽高比为1:2
intent.putExtra("aspectY", 2);
intent.putExtra("outputX", 20); // 保存图片的宽和高
intent.putExtra("outputY", 40);
intent.putExtra("output", Uri.fromFile(new File("/mnt/sdcard/temp"))); // 保存路径
intent.putExtra("outputFormat", "JPEG");// 返回格式
startActivityForResult(intent, 0);
// 剪切特定图片
Intent intent = new Intent("com.android.camera.action.CROP");
intent.setClassName("com.android.camera", "com.android.camera.CropImage");
intent.setData(Uri.fromFile(new File("/mnt/sdcard/temp")));
intent.putExtra("outputX", 1); // 剪切的宽高比为1:2
intent.putExtra("outputY", 2);
intent.putExtra("aspectX", 20); // 保存图片的宽和高
intent.putExtra("aspectY", 40);
intent.putExtra("scale", true);
intent.putExtra("noFaceDetection", true);
intent.putExtra("output", Uri.parse("file:///mnt/sdcard/temp"));
startActivityForResult(intent, 0);

//===============================================================

//11.打开Google Market
// 打开Google Market直接进入该程序的详细页面
Uri uri = Uri.parse("market://details?id=" + "com.demo.app");
Intent intent = new Intent(Intent.ACTION_VIEW, uri);
startActivity(intent);

//===============================================================

//12.进入手机设置界面:
// 进入无线网络设置界面(其它可以举一反三)
Intent intent = new Intent(android.provider.Settings.ACTION_WIRELESS_SETTINGS);
startActivityForResult(intent, 0);

//===============================================================

//13.安装apk:
Uri installUri = Uri.fromParts("package", "xxx", null);
returnIt = new Intent(Intent.ACTION_PACKAGE_ADDED, installUri);

//===============================================================

//14.卸载apk:
Uri uri = Uri.fromParts("package", strPackageName, null);
Intent it = new Intent(Intent.ACTION_DELETE, uri);
startActivity(it);

//===============================================================

//15.发送附件:
Intent it = new Intent(Intent.ACTION_SEND);
it.putExtra(Intent.EXTRA_SUBJECT, "The email subject text");
it.putExtra(Intent.EXTRA_STREAM, "file:///sdcard/eoe.mp3");
sendIntent.setType("audio/mp3");
startActivity(Intent.createChooser(it, "Choose Email Client"));

//===============================================================

//16.进入联系人页面:
Intent intent = new Intent();
intent.setAction(Intent.ACTION_VIEW);
intent.setData(People.CONTENT_URI);
startActivity(intent);

//===============================================================


//17.查看指定联系人:
Uri personUri = ContentUris.withAppendedId(People.CONTENT_URI, info.id);//info.id联系人ID
Intent intent = new Intent();
intent.setAction(Intent.ACTION_VIEW);
intent.setData(personUri);
startActivity(intent);

//===============================================================

//18.调用系统编辑添加联系人(高版本SDK有效):
Intent it = newIntent(Intent.ACTION_INSERT_OR_EDIT);
it.setType("vnd.android.cursor.item/contact");
//it.setType(Contacts.CONTENT_ITEM_TYPE);
it.putExtra("name","myName");
it.putExtra(android.provider.Contacts.Intents.Insert.COMPANY, "organization");
it.putExtra(android.provider.Contacts.Intents.Insert.EMAIL,"email");
it.putExtra(android.provider.Contacts.Intents.Insert.PHONE,"homePhone");
it.putExtra(android.provider.Contacts.Intents.Insert.SECONDARY_PHONE,"mobilePhone");
it.putExtra( android.provider.Contacts.Intents.Insert.TERTIARY_PHONE,"workPhone");
it.putExtra(android.provider.Contacts.Intents.Insert.JOB_TITLE,"title");
startActivity(it);

//===============================================================

//19.调用系统编辑添加联系人(全有效):
Intent intent = newIntent(Intent.ACTION_INSERT_OR_EDIT);
intent.setType(People.CONTENT_ITEM_TYPE);
intent.putExtra(Contacts.Intents.Insert.NAME, "My Name");
intent.putExtra(Contacts.Intents.Insert.PHONE, "+1234567890");
intent.putExtra(Contacts.Intents.Insert.PHONE_TYPE,Contacts.PhonesColumns.TYPE_MOBILE);
intent.putExtra(Contacts.Intents.Insert.EMAIL, "com@com.com");
intent.putExtra(Contacts.Intents.Insert.EMAIL_TYPE, Contacts.ContactMethodsColumns.TYPE_WORK);
startActivity(intent);

//===============================================================

//20.打开另一程序
Intent i = new Intent();
ComponentName cn = new ComponentName("com.example.jay.test",
"com.example.jay.test.MainActivity");
i.setComponent(cn);
i.setAction("android.intent.action.MAIN");
startActivityForResult(i, RESULT_OK);

//===============================================================

//21.打开录音机
Intent mi = new Intent(Media.RECORD_SOUND_ACTION);
startActivity(mi);

//===============================================================

//22.从google搜索内容
Intent intent = new Intent();
intent.setAction(Intent.ACTION_WEB_SEARCH);
intent.putExtra(SearchManager.QUERY,"searchString")
startActivity(intent);

//===============================================================
6. Where to look up Action?
I originally wanted to directly post the Intent Actions I collected before, but then I thought better of it. Giving a man a fish is not as good as teaching him to fish. If you have downloaded the Android documentation, you can look in the following path:
sdk-->docs-->reference-->android--->content--->Intent.html
Find this thing, and then start from this Constants:
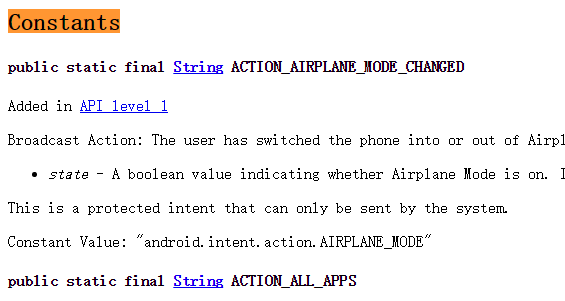
If you encounter something unfamiliar, you can just look it up here~
Summary of this section:
Alright, that's it for the basic usage of Intent. In the next section, we will continue to learn about some problems or requirements that may be encountered when using Intent in daily development. Stay tuned, thank you~