Introduction to this section:
The basic UI control introduced in this section is: ImageView (image view). As its name implies, it is a View or control used to display images! Official API:ImageViewThe content explained in this section is as follows:
- The difference between ImageView's src attribute and background;
- adjustViewBounds sets whether to follow the aspect ratio when scaling images
- scaleType sets the scaling type
- The simplest way to draw a circular ImageView
1. The difference between the src attribute and the background attribute:
In the API documentation, we find that ImageView has two attributes that can set images: src and background
General knowledge:
① background usually refers tothe background, while src refers tothe content!!
② When usingsrcto fill in an image, it is according to the image sizedirectly filled, andwill not be stretched
while using background to fill in an image, it will be based on the width given by the ImageView tostretch
1) Write code to verify the difference:
Write a simple layout to test:
<LinearLayout xmlns:android="http://schemas.android.com/apk/res/android"
    xmlns:tools="http://schemas.android.com/tools"
    android:id="@+id/LinearLayout1"
    android:layout_width="match_parent"
    android:layout_height="match_parent"
    android:orientation="vertical"
    tools:context="com.jay.example.imageviewdemo.MainActivity" >

    <ImageView
        android:layout_width="wrap_content"
        android:layout_height="wrap_content"
        android:background="@drawable/pen" />

    <ImageView
        android:layout_width="200dp"
        android:layout_height="wrap_content"
        android:background="@drawable/pen" />

    <ImageView
        android:layout_width="wrap_content"
        android:layout_height="wrap_content"
        android:src="@drawable/pen.html" />

    <ImageView
        android:layout_width="200dp"
        android:layout_height="wrap_content"
        android:src="@drawable/pen.html" />

</LinearLayout>
The effect image is as follows:
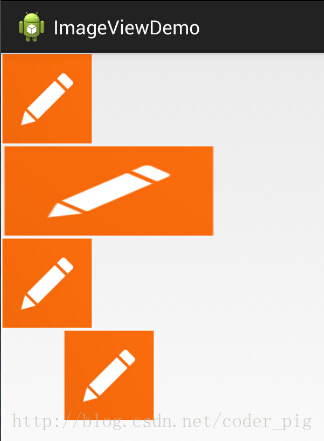
Result analysis:
If both width and height are wrap_content, then it's the same, the original image size. But when we fix the width or height, the difference becomes obvious: background completely fills the entire ImageView, while src remains that size, and it is centered. This involves another attribute of ImageView: scaleType! Also, note that we only set width or height here! If we set both width and height at the same time, background still fills, but the size of src may change! For example, let's test the following code:
<ImageView
        android:layout_width="100dp"
        android:layout_height="50dp"
        android:src="@drawable/pen.html" />
Run effect image:
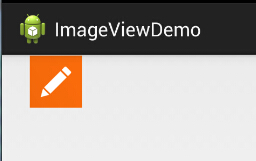
PS: scaleType will be introduced below~
2) Methods to solve image deformation caused by background stretching
In the second ImageView in the previous effect image, we can see that the image has been stretched and deformed; the square has become a rectangle. For people with slight obsessive-compulsive disorder like me, this is obviously unacceptable. Is there a way to set it? The answer is definitely yes. The author currently knows the following two methods:
This is suitable for dynamically loading ImageView, and the code is simple. Just hard-code the size when adding the View.
LinearLayout.LayoutParams layoutParam = new LinearLayout.LayoutParams(48, 48);
        layout.addView(ibtnPen, layoutParam);
Besides dynamically loading the view, more often we still introduce ImageView through XML layout. The solution is not difficult either: complete it through a Bitmap resource file in drawable, and then set the background attribute to that file! This XML file is created under the drawable folder, and you need to create this folder yourself! !
pen_bg.xml:
<bitmap
    xmlns:android="http://schemas.android.com/apk/res/android"
    android:id="@id/pen_bg"
    android:gravity="top"
    android:src="@drawable/pen.html"
    android:tileMode="disabled" >
</bitmap>
The above code is not difficult to understand. I guess everyone is most confused about the tileMode attribute? This attribute is tiling, which is the tiling we use when setting the background in Windows: multiple small icons fill the entire screen! Remember? If you don't, you can try it yourself! 'disabled' disables it!
That is the simple code above; the calling method is as follows:
Dynamic: ibtnPen.setBacklgroundResource(R.drawable.penbg);
Static: android:background = "@drawable/penbg"
3) The issue of setting transparency
After explaining the two differences above, let's talk about the setAlpha attribute! It's very simple. This attribute,It only takes effect when using src!!
4) The clever combination of the two:
An image from the internet:
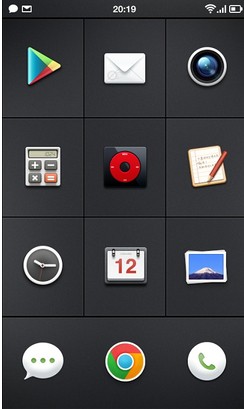
At first glance it is a simple GridView, each item is an ImageView, but careful you may have noticed that the ICONs above are not regular, but circular, rounded rectangles, etc. So here src + background is used! To achieve the above effect, you only need two operations:Find a transparent PNG image + set a black background(Of course you can also set the transparency of the PNG to achieve it, but the result may differ from what you expected!) Let's write a simple example:
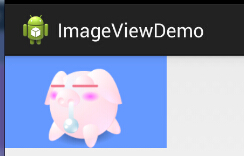
As shown in the figure, the cute little pig is displayed on the ImageView. Haha, the background is set to a blue background!
Implementation code:
<ImageView
    android:layout_width="150dp"
    android:layout_height="wrap_content"
    android:src="@drawable/pig.html"
    android:background="#6699FF" />
PS: Of course you can also use selector to implement click effects, setting different images for different states, to achieve click or touch effects!
5) Setting the background and src attributes in Java code:
Foreground (corresponding to the src attribute):setImageDrawable( );
Background (corresponding to the background attribute):setBackgroundDrawable( );
2. adjustViewBounds sets whether to preserve the original aspect ratio when scaling
ImageView provides us withadjustViewBoundsattribute, used to set whether to keep the original aspect ratio when scaling! Setting it alone has no effect; it needs to be used together withmaxWidthandmaxHeightattributes together! And these latter two attributes also only take effect when adjustViewBounds is true~
- android:maxHeight: sets the maximum height of the ImageView
- android:maxWidth: sets the maximum width of the ImageView
Code example:
<LinearLayout xmlns:android="http://schemas.android.com/apk/res/android"
    xmlns:tools="http://schemas.android.com/tools"
    android:layout_width="match_parent"
    android:layout_height="match_parent"
    android:orientation="vertical"
    tools:context=".MainActivity">

    <!-- 正常的图片 -->
    <ImageView
        android:id="@+id/imageView1"
        android:layout_width="wrap_content"
        android:layout_height="wrap_content"
        android:layout_margin="5px"
        android:src="@mipmap/meinv.html" />
    <!-- 限制了最大宽度与高度,并且设置了调整边界来保持所显示图像的长宽比-->
    <ImageView
        android:id="@+id/imageView2"
        android:layout_width="wrap_content"
        android:layout_height="wrap_content"
        android:layout_margin="5px"
        android:adjustViewBounds="true"
        android:maxHeight="200px"
        android:maxWidth="200px"
        android:src="@mipmap/meinv.html" />

</LinearLayout>
Run effect image:
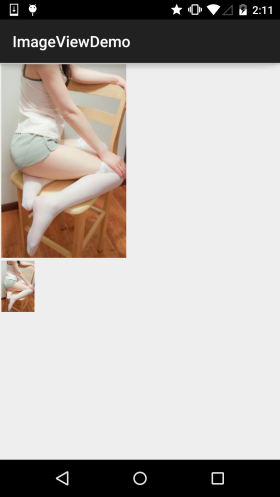
Result analysis:The larger image is the one without any processing; its dimensions are 541374; for the one below, we use maxWidth and maxHeight to limit the maximum width and height of the ImageView to 200px, meaning it can display at most 200200 image, and we also set aadjustViewBounds = "true"to adjust our bounds to keep the aspect ratio of the image; at this time the ImageView width and height are 128*200~
3. scaleType sets the scaling type
android:scaleType is used to set how the displayed image is scaled or moved to fit the size of the ImageView. In Java code, you can set it via imageView.setScaleType(ImageView.ScaleType.CENTER); The optional values are as follows:
- fitXY: scales the image independently horizontally and vertically, so that the image fully fits the ImageView, but the aspect ratio of the image may change
- fitStart: scales the image maintaining the aspect ratio until the longer side equals the corresponding side of the ImageView, and after scaling places the image at the top-left corner of the ImageView
- fitCenter: Same as above, placed in the center after scaling;
- fitEnd: Same as above, placed at the bottom-right corner after scaling;
- center: Keeps the original image size and displays it at the center of the ImageView. When the original image's size is larger than the ImageView's size, the overflowing part is cropped.
- centerCrop: Scales the image maintaining the aspect ratio until it completely covers the ImageView; the image may not be fully displayed.
- centerInside: Scales the image maintaining the aspect ratio until the ImageView can fully display the image.
- matrix: Default value. Does not change the original image size. Draws the original image starting from the top-left corner of the ImageView. The part of the original image that exceeds the ImageView is cropped.
Next, let's compare them group by group:
1)1.fitEnd,fitStart,fitCenter
Here we use fitEnd as an example; the other two are similar:
Example code:
<!-- 保持图片的横纵比缩放,知道该图片能够显示在ImageView组件上,并将缩放好的图片显示在imageView的右下角 -->
    <ImageView
        android:id="@+id/imageView3"
        android:layout_width="300px"
        android:layout_height="300px"
        android:layout_margin="5px"
        android:scaleType="fitEnd"
        android:src="@mipmap/meinv.html" />
Run effect image:
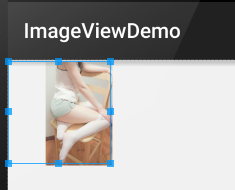
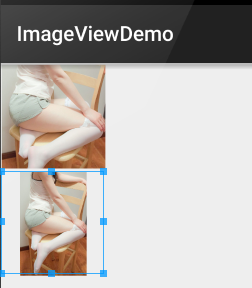
2) centerCrop and centerInside
- centerCrop: scales according to the aspect ratio, directly and completely covering the entire ImageView
- centerInside: scales according to the aspect ratio, so that the ImageView can fully display this image
Example code:
<ImageView
        android:layout_width="300px"
        android:layout_height="300px"
        android:layout_margin="5px"
        android:scaleType="centerCrop"
        android:src="@mipmap/meinv.html" />

    <ImageView
        android:layout_width="300px"
        android:layout_height="300px"
        android:layout_margin="5px"
        android:scaleType="centerInside"
        android:src="@mipmap/meinv.html" />
Run effect image:
3)fitXY
Do not scale the image proportionally; the goal is to fill the entire View with the image.
Sample code:
<ImageView
        android:layout_width="300px"
        android:layout_height="300px"
        android:layout_margin="5px"
        android:scaleType="fixXY"
        android:src="@mipmap/meinv.html" />
Runtime effect screenshot:
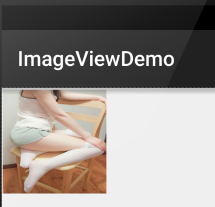
Well, it's obviously flattened =-=~
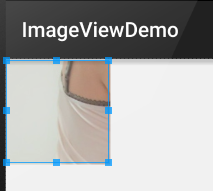
4)matrix
Start drawing the original image from the top-left corner of the ImageView; the parts exceeding the ImageView are cropped.
Sample code:
<ImageView
        android:layout_width="300px"
        android:layout_height="300px"
        android:layout_margin="5px"
        android:scaleType="matrix"
        android:src="@mipmap/meinv.html" />
Runtime effect screenshot:
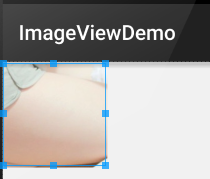
5)center
Keep the original image size and display it in the center of the ImageView. When the original image is larger than the ImageView, the excess is cropped.
Sample code:
<ImageView
        android:layout_width="300px"
        android:layout_height="300px"
        android:layout_margin="5px"
        android:scaleType="center"
        android:src="@mipmap/meinv.html" />
Runtime effect screenshot:
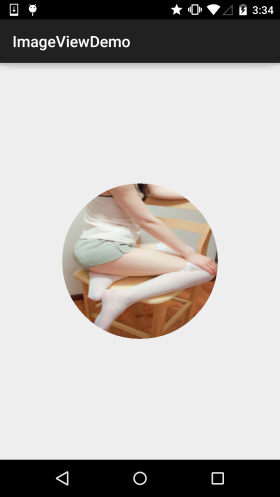
4. The simplest way to draw a circular ImageView
I believe everyone is familiar with circular or rounded ImageViews. Nowadays many apps love using circular avatars, right~
Here I'll simply write a circular ImageView. Of course, this is just an example, without considering performance and anti-aliasing!!!
It can be said to be written just for fun. For actual projects, you can consider using controls written by experts on Github, such as the following two:
I've already taught you how to use git earlier~ Just clone the project and copy the relevant files to your own project~
Code example:
Runtime effect screenshot:
Implementation code:
Custom ImageView: RoundImageView.java
package com.jay.demo.imageviewdemo;

import android.content.Context;
import android.graphics.Bitmap;
import android.graphics.Canvas;
import android.graphics.Paint;
import android.graphics.PaintFlagsDrawFilter;
import android.graphics.Path;
import android.graphics.Rect;
import android.graphics.Region;
import android.util.AttributeSet;
import android.widget.ImageView;

/**
 * Created by coder-pig on 2015/7/18 0018.
 */
public class RoundImageView extends ImageView {

    private Bitmap mBitmap;
    private Rect mRect = new Rect();
    private PaintFlagsDrawFilter pdf = new PaintFlagsDrawFilter(0, Paint.ANTI_ALIAS_FLAG);
    private Paint mPaint = new Paint();
    private Path mPath=new Path();
    public RoundImageView(Context context, AttributeSet attrs) {
        super(context, attrs);
        init();
    }


    //传入一个Bitmap对象
    public void setBitmap(Bitmap bitmap) {
        this.mBitmap = bitmap;
    }


    private void init() {
        mPaint.setStyle(Paint.Style.STROKE);
        mPaint.setFlags(Paint.ANTI_ALIAS_FLAG);
        mPaint.setAntiAlias(true);// 抗锯尺
    }


    @Override
    protected void onDraw(Canvas canvas) {
        super.onDraw(canvas);
        if(mBitmap == null)
        {
            return;
        }
        mRect.set(0,0,getWidth(),getHeight());
        canvas.save();
        canvas.setDrawFilter(pdf);
        mPath.addCircle(getWidth() / 2, getWidth() / 2, getHeight() / 2, Path.Direction.CCW);
        canvas.clipPath(mPath, Region.Op.REPLACE);
        canvas.drawBitmap(mBitmap, null, mRect, mPaint);
        canvas.restore();
    }
}
Layout code:activity_main.xml:
<com.jay.demo.imageviewdemo.RoundImageView
        android:id="@+id/img_round"
        android:layout_width="200dp"
        android:layout_height="200dp"
        android:layout_margin="5px"/>
MainActivity.java:
package com.jay.demo.imageviewdemo;

import android.graphics.Bitmap;
import android.graphics.BitmapFactory;
import android.os.Bundle;
import android.support.v7.app.AppCompatActivity;

public class MainActivity extends AppCompatActivity {

    private RoundImageView img_round;

    @Override
    protected void onCreate(Bundle savedInstanceState) {
        super.onCreate(savedInstanceState);
        setContentView(R.layout.activity_main);
        img_round = (RoundImageView) findViewById(R.id.img_round);
        Bitmap bitmap = BitmapFactory.decodeResource(getResources(),R.mipmap.meinv);
        img_round.setBitmap(bitmap);
    }
}
Summary of this section:
This section explained ImageView. The content looks like a lot, but it's all descriptive stuff, just knowing is enough~ The custom circular ImageView at the end is also just written for fun. In actual projects, it's recommended to use those two third-party custom controls~