Introduction to this section:
This section continues to cover sensors in Android. This section brings you the accelerometer sensor and the gyroscope sensor. Like the orientation sensor in the previous section, they have three axes: x, y, and z. One thing to note: the coordinates of the x and y axes should be distinguished from those in drawing! The sensor's origin is at the lower-left corner! x goes to the right, y goes up! Alright, let's learn about the sensors in this section with our usual approach!
Also, I'd like to mention that we are not specialized in this. We're just writing for fun and to get a glimpse of it. Don't take too many things too seriously!
PSNote: The orientation sensor actually uses the accelerometer sensor and the magnetic field sensor to obtain orientation. It has been deprecated since 2.2~
1. Accelerometer sensor
1) Concept:
- The accelerometer sensor'sunit:Acceleration (m/s^2)
- The acceleration obtained by the orientation sensor is:The combined acceleration of the phone's movement acceleration and gravitational acceleration (9.81m/s^2)
- Also, gravitational acceleration isvertically downward!
The calculation of the combined acceleration in different directions seems quite complicated, so we won't dwell on it here! Let's first take a look at the three values in the value array of the acceleration~ It's still the code from the previous section, just changing the sensor~
Placed horizontally: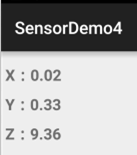 Placed vertically (upright):
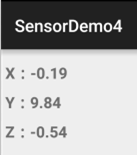 Placed vertically (landscape):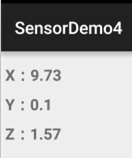
From the above, we know that the three values in the value array correspond to the acceleration on the X, Y, and Z axes respectively! Alright, now that we have a rough idea, let's write a simple pedometer to get familiar with the usage!
2) Implementation of a simple pedometer
Screenshot of the running result:
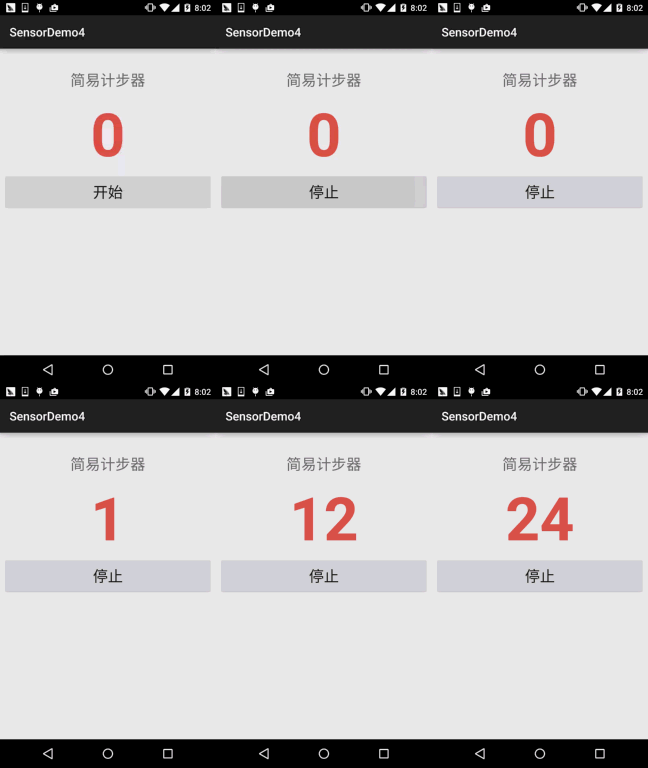
Code implementation:
Layout code:activity_main.xml:
<LinearLayout xmlns:android="http://schemas.android.com/apk/res/android"
    android:layout_width="match_parent"
    android:layout_height="match_parent"
    android:orientation="vertical"
    android:padding="5dp">

    <TextView
        android:layout_width="wrap_content"
        android:layout_height="wrap_content"
        android:layout_gravity="center_horizontal"
        android:layout_marginTop="30dp"
        android:text="简易计步器"
        android:textSize="25sp" />

    <TextView
        android:id="@+id/tv_step"
        android:layout_width="wrap_content"
        android:layout_height="wrap_content"
        android:layout_gravity="center_horizontal"
        android:layout_marginTop="5dp"
        android:text="0"
        android:textColor="#DE5347"
        android:textSize="100sp"
        android:textStyle="bold" />

    <Button
        android:id="@+id/btn_start"
        android:layout_width="match_parent"
        android:layout_height="64dp"
        android:text="开始"
        android:textSize="25sp" />

</LinearLayout>
MainActivity.java:
public class MainActivity extends AppCompatActivity implements View.OnClickListener, SensorEventListener {

    private SensorManager sManager;
    private Sensor mSensorAccelerometer;
    private TextView tv_step;
    private Button btn_start;
    private int step = 0;   //步数
    private double oriValue = 0;  //原始值
    private double lstValue = 0;  //上次的值
    private double curValue = 0;  //当前值
    private boolean motiveState = true;   //是否处于运动状态
    private boolean processState = false;   //标记当前是否已经在计步


    @Override
    protected void onCreate(Bundle savedInstanceState) {
        super.onCreate(savedInstanceState);
        setContentView(R.layout.activity_main);
        sManager = (SensorManager) getSystemService(SENSOR_SERVICE);
        mSensorAccelerometer = sManager.getDefaultSensor(Sensor.TYPE_ACCELEROMETER);
        sManager.registerListener(this, mSensorAccelerometer, SensorManager.SENSOR_DELAY_UI);
        bindViews();
    }

    private void bindViews() {

        tv_step = (TextView) findViewById(R.id.tv_step);
        btn_start = (Button) findViewById(R.id.btn_start);
        btn_start.setOnClickListener(this);
    }


    @Override
    public void onSensorChanged(SensorEvent event) {
        double range = 1;   //设定一个精度范围
        float[] value = event.values;
        curValue = magnitude(value[0], value[1], value[2]);   //计算当前的模
        //向上加速的状态
        if (motiveState == true) {
            if (curValue >= lstValue) lstValue = curValue;
            else {
                //检测到一次峰值
                if (Math.abs(curValue - lstValue) > range) {
                    oriValue = curValue;
                    motiveState = false;
                }
            }
        }
        //向下加速的状态
        if (motiveState == false) {
            if (curValue <= lstValue) lstValue = curValue;
            else {
                if (Math.abs(curValue - lstValue) > range) {
                    //检测到一次峰值
                    oriValue = curValue;
                    if (processState == true) {
                        step++;  //步数 + 1
                        if (processState == true) {
                            tv_step.setText(step + "");    //读数更新
                        }
                    }
                    motiveState = true;
                }
            }
        }
    }

    @Override
    public void onAccuracyChanged(Sensor sensor, int accuracy) {}

    @Override
    public void onClick(View v) {
        step = 0;
        tv_step.setText("0");
        if (processState == true) {
            btn_start.setText("开始");
            processState = false;
        } else {
            btn_start.setText("停止");
            processState = true;
        }
    }

    //向量求模
    public double magnitude(float x, float y, float z) {
        double magnitude = 0;
        magnitude = Math.sqrt(x * x + y * y + z * z);
        return magnitude;
    }

    @Override
    protected void onDestroy() {
        super.onDestroy();
        sManager.unregisterListener(this);
    }
}
Alright, it is indeed a very simple pedometer... The step count above was generated by me sitting and shaking it with my hand... , after all, it was written just for fun~
2. Gyroscope sensor
1) Concept:
The gyroscope is also called an angular velocity sensor. It is generally used to detect the phone's posture. It seems that gyroscope sensors in phones are generally three-axis! It is most used in motion-sensing games, phone camera stabilization, GPS inertial navigation, and adding some motion sensing to apps (such as gently shaking the phone to dismiss an incoming call ringtone), etc. For the specifics, you can search on Baidu yourself~
- The gyroscope sensor'sunit:Angular velocity (radians/second)
- The sensor is obtained using:Sensor.TYPE_GYROSCOPE
Its three values are, in order, the angular velocities of rotation along the X axis, Y axis, and Z axis. When the phone rotates counterclockwise, the angular velocity values are positive; when clockwise, they are negative! It is often used to calculate the angle the phone has rotated! Here is a piece of code from the internet~
private static final float NS2S = 1.0f / 1000000000.0f;
private float timestamp;

public void onSensorChanged(SensorEvent event)
{
    if (timestamp != 0)
    {
        // event.timesamp表示当前的时间,单位是纳秒(1百万分之一毫秒)
        final float dT = (event.timestamp - timestamp) * NS2S;
        angle[0] += event.values[0] * dT;
        angle[1] += event.values[1] * dT;
        angle[2] += event.values[2] * dT;
    }
    timestamp = event.timestamp;
}
Use the time difference (dT) between two adjacent data acquisitions by the gyroscope sensor to calculate the angles the phone rotated along the X, Y, and Z axes during that time period, and accumulate the values into different elements of the angle array respectively.
3. Download sample code for this section:
SensorDemo4.zip
Summary of this section:
Alright, in this section I briefly introduced the accelerometer sensor and the gyroscope to everyone, and wrote a simple pedometer. I feel like I haven't played much with sensors, so there isn't much to write. Forget it, in the next section I'll simply introduce the remaining sensors. Just treat it as popular science; if we need to use them in the future, we'll study them more deeply~
