Section Introduction
In the previous section, we learned about the lifecycle of Service and the two methods of starting a Service. In this section, we continue to gain a deeper understanding of IntentService in Service, and Service usage examples: implementation of foreground services and polling!
1. Use of IntentService
After the previous section, we already know how to define and start a Service. But if we directly put a time-consuming thread into the onStart() method of a Service, although it can be done, it is easy to cause an ANR exception (Application Not Responding). In the official Android introduction to Service, there is the following passage:

Direct translation:
1. A Service is not a separate process; it runs in the same process as its application.
2. A Service is not a thread, which means we should avoid time-consuming operations in a Service.
Therefore, Android provides us with an alternative to solve the above problem, which is what we are going to talk about nextIntentService; IntentService is a class that inherits from Service and handles asynchronous requests. In IntentService, there is a worker thread to handle time-consuming operations, and the requested Intent records are added to a queue.
Workflow:
The client starts IntentService via startService(Intent); we do not need to manually control IntentService. When the task is completed, IntentService will automatically stop. IntentService can be started multiple times, and each time-consuming operation will be executed in the onHandleIntent callback method of IntentService in a work queue manner, and only one worker thread will be executed at a time. After finishing the first, it goes to the second, and so on!
Next is the code demonstration. Most of the code online compares Service and IntentService, defining a sufficiently long sleep time to demonstrate the ANR exception of Service, and then showing how good IntentService is. We won't demonstrate Service here. Online examples define a custom Service and then use Thread.sleep(20000) in the onStart() method to cause an ANR exception. If you are interested, you can try writing the code yourself. Here, we only demonstrate the usage of IntentService!
TestService3.java
public class TestService3 extends IntentService {
    private final String TAG = "hehe";
    //必须实现父类的构造方法
    public TestService3()
    {
        super("TestService3");
    }

    //必须重写的核心方法
    @Override
    protected void onHandleIntent(Intent intent) {
        //Intent是从Activity发过来的,携带识别参数,根据参数不同执行不同的任务
        String action = intent.getExtras().getString("param");
        if(action.equals("s1"))Log.i(TAG,"启动service1");
        else if(action.equals("s2"))Log.i(TAG,"启动service2");
        else if(action.equals("s3"))Log.i(TAG,"启动service3");

        //让服务休眠2秒
        try{
            Thread.sleep(2000);
        }catch(InterruptedException e){e.printStackTrace();}
    }

    //重写其他方法,用于查看方法的调用顺序
    @Override
    public IBinder onBind(Intent intent) {
        Log.i(TAG,"onBind");
        return super.onBind(intent);
    }

    @Override
    public void onCreate() {
        Log.i(TAG,"onCreate");
        super.onCreate();
    }

    @Override
    public int onStartCommand(Intent intent, int flags, int startId) {
        Log.i(TAG,"onStartCommand");
        return super.onStartCommand(intent, flags, startId);
    }


    @Override
    public void setIntentRedelivery(boolean enabled) {
        super.setIntentRedelivery(enabled);
        Log.i(TAG,"setIntentRedelivery");
    }

    @Override
    public void onDestroy() {
        Log.i(TAG,"onDestroy");
        super.onDestroy();
    }

}
Register the Service in AndroidManifest.xml
<service android:name=".TestService3" android:exported="false">
    <intent-filter >
        <action android:name="com.test.intentservice"/>
    </intent-filter>
</service>
Start the service three times in MainActivity:
public class MainActivity extends Activity {

    @Override
    protected void onCreate(Bundle savedInstanceState) {
        super.onCreate(savedInstanceState);
        setContentView(R.layout.activity_main);

        Intent it1 = new Intent("com.test.intentservice");
        Bundle b1 = new Bundle();
        b1.putString("param", "s1");
        it1.putExtras(b1);

        Intent it2 = new Intent("com.test.intentservice");
        Bundle b2 = new Bundle();
        b2.putString("param", "s2");
        it2.putExtras(b2);

        Intent it3 = new Intent("com.test.intentservice");
        Bundle b3 = new Bundle();
        b3.putString("param", "s3");
        it3.putExtras(b3);

        //接着启动多次IntentService,每次启动,都会新建一个工作线程
        //但始终只有一个IntentService实例
        startService(it1);
        startService(it2);
        startService(it3);
    }
}
Screenshot of running:
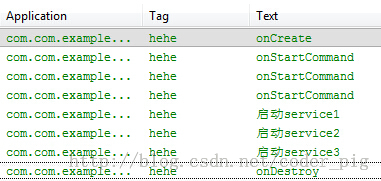
Summary:
When a background task needs to be divided into several subtasks and executed in sequence, the subtasks (simply put, asynchronous operations) - if we still define a normal Service and then create threads in the onStart method, and then have to control the threads, it becomes very cumbersome. At this point, we should define a custom IntentService and then complete the relevant tasks in the onHandleIntent() method!
2. Communication between Activity and Service
Our previous operations started and stopped the Service through the Activity. Suppose we start a background Service for downloading, and we want to know the progress of the download task in the Service! Then this certainly requires communication between the Service and the Activity, and the medium for their communication is the onBind() method in the Service! It returns a custom Binder object we define!
The basic process is as follows:
- 1. In a custom Service, define a custom Binder class, and write all the methods that need to be exposed into that class!
- 2. In the Service class, instantiate this custom Binder class, then override the onBind() method and return this Binder object!
- 3. In the Activity class, instantiate a ServiceConnection object, override the onServiceConnected() method, then obtain the Binder object and call the relevant methods!
3. Implementation of a Simple Foreground Service
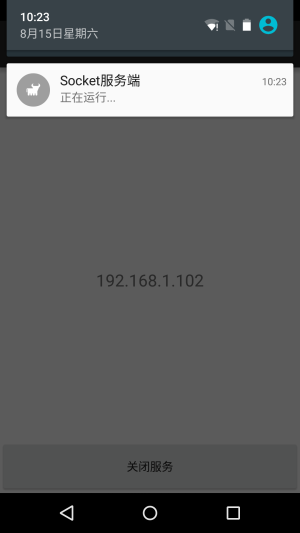
Up to now, we all know that Service usually runs in the background, but the system priority of Service is relatively low. When the system memory is insufficient, the Service running in the background may be recycled. For this situation, we can use a foreground service to make the Service slightly less likely to be killed by the system. Of course, it is still possible to be killed... The so-called foreground service is the Notification displayed in the status bar!
It is also very simple to implement. The project I recently worked on happened to use this foreground service, so I extracted the core code and shared it:
In the custom Service class, override onCreate(), and then customize the Notification according to your needs. After customization, call startForeground(1, notification object) and you are done!The core code is as follows:
public void onCreate()
{
    super.onCreate();
    Notification.Builder localBuilder = new Notification.Builder(this);
    localBuilder.setContentIntent(PendingIntent.getActivity(this, 0, new Intent(this, MainActivity.class), 0));
    localBuilder.setAutoCancel(false);
    localBuilder.setSmallIcon(R.mipmap.ic_cow_icon);
    localBuilder.setTicker("Foreground Service Start");
    localBuilder.setContentTitle("Socket服务端");
    localBuilder.setContentText("正在运行...");
    startForeground(1, localBuilder.getNotification());
}
Screenshot of running effect:
4. Implementation of a Simple Scheduled Background Thread
In addition to the above foreground service, Service has another common usage in actual development: executing scheduled tasks, such as polling, which requests the server at intervals to confirm client status or update information, etc.! Android provides us with two timing methods: using the Timer class and the Alarm mechanism!
The former is not suitable for scheduled tasks that need to run in the background for a long time. Once the CPU sleeps, the scheduled tasks in Timer cannot run; Alarm does not have this problem. It has the function of waking up the CPU. In addition, we also need to distinguish between CPU wake-up and screen wake-up!
Usage process:
- Step 1: Obtain the Service: AlarmManager manager = (AlarmManager) getSystemService(ALARM_SERVICE);
- Step 2: Set the scheduled task through the set method int anHour = 2 * 1000; long triggerAtTime = SystemClock.elapsedRealtime() + anHour; manager.set(AlarmManager.RTC_WAKEUP,triggerAtTime,pendingIntent);
- Step 3: Define a ServiceIn onStartCommand, start a worker thread to handle some timing logic.
- Step 4: Define a Broadcast to start the Service.Finally, don't forget to register the Service and Broadcast in AndroidManifest.xml!
Parameter explanation: set(int type,long startTime,PendingIntent pi)
①type:There are five optional values:
AlarmManager.ELAPSED_REALTIME:The alarm is unavailable when the phone is in sleep mode. In this state, the alarm uses relative time (relative to system startup), with state value 3;
AlarmManager.ELAPSED_REALTIME_WAKEUPThe alarm will wake up the system and execute the notification function when the system is sleeping. In this state, the alarm also uses relative time, with state value 2;
AlarmManager.RTCThe alarm is unavailable when the system is sleeping. In this state, the alarm uses absolute time, i.e., the current system time, with state value 1;
AlarmManager.RTC_WAKEUPIndicates that the alarm will wake up the system and execute the notification function when the system is sleeping. In this state, the alarm uses absolute time, with state value 0;
AlarmManager.POWER_OFF_WAKEUPIndicates that the alarm can also perform the notification function normally when the phone is powered off, so it is one of the most used states among the five states. In this state, the alarm also uses absolute time, with state value 4. However, this state seems to be affected by the SDK version, and some versions do not support it;
PS: The first parameter determines the type of the second parameter. If it is REALTIME, use: SystemClock.elapsedRealtime() method to get the number of milliseconds that have elapsed from system boot to the present. If it is RTC, use: System.currentTimeMillis() to get the number of milliseconds that have elapsed from 1970.1.1 0:00 to the present.
②startTime:The first execution time of the alarm, in milliseconds. You can customize the time, but generally the current time is used. It should be noted that this property is closely related to the first property (type). If the alarm corresponding to the first parameter uses relative time (ELAPSED_REALTIMEandELAPSED_REALTIME_WAKEUP), then this property must use relative time (relative to the system startup time). For example, the current time is expressed as: SystemClock.elapsedRealtime(); if the alarm corresponding to the first parameter uses absolute time (RTC, RTC_WAKEUP, POWER_OFF_WAKEUP), then this property must use absolute time. For example, the current time is expressed as: System.currentTimeMillis().
③PendingIntent:It binds the execution action of the alarm, such as sending a broadcast, giving a notification, etc. PendingIntent is a wrapper class for Intent.
It should be noted that if the alarm notification is implemented by starting a service, the PendingIntent object should be obtained using the Pending.getService(Context c, int i, Intent intent, int j) method;
If the alarm notification is implemented via broadcast, the PendingIntent object should be obtained using the PendingIntent.getBroadcast (Context c,int i,Intent intent,int j) method;
If the alarm notification is implemented using an Activity, the PendingIntent object should be obtained using the PendingIntent.getActivity(Context c,int i,Intent intent,int j) method.
If these three methods are used incorrectly, although no error will be reported, the alarm notification effect will not be seen.
Additionally:
Starting from version 4.4 (API 19), the trigger time of Alarm tasks may become inaccurate and may be delayed. This is the system's optimization for power consumption. If accuracy is required, you can call the setExtra() method~
Core code:
public class LongRunningService extends Service {
    @Override
    public IBinder onBind(Intent intent) {
        return null;
    }

    @Override
    public int onStartCommand(Intent intent, int flags, int startId) {
        //这里开辟一条线程,用来执行具体的逻辑操作:
        new Thread(new Runnable() {
            @Override
            public void run() {
                Log.d("BackService", new Date().toString());
            }
        }).start();
        AlarmManager manager = (AlarmManager) getSystemService(ALARM_SERVICE);
        //这里是定时的,这里设置的是每隔两秒打印一次时间=-=,自己改
        int anHour = 2 * 1000;
        long triggerAtTime = SystemClock.elapsedRealtime() + anHour;
        Intent i = new Intent(this,AlarmReceiver.class);
        PendingIntent pi = PendingIntent.getBroadcast(this, 0, i, 0);
        manager.set(AlarmManager.ELAPSED_REALTIME_WAKEUP, triggerAtTime, pi);
        return super.onStartCommand(intent, flags, startId);
    }
}
AlarmReceiver.java
public class AlarmReceiver extends BroadcastReceiver {

    @Override
    public void onReceive(Context context, Intent intent) {
        Intent i = new Intent(context,LongRunningService.class);
        context.startService(i);
    }
}
Section Summary:
In this section, we continue to study Service in greater depth, IntentService, and two common cases of Service in actual development: the implementation of foreground Service, and the implementation of background Service! In the next section, we will continue to study Service's AIDL and cross-process communication. Stay tuned~
References:"First Line of Code Android" — Guo Lin: A very good introductory book on Android!