Introduction to this section:
This section introduces the control used to display notification information in the status bar in Android: Notification. I believe most Android learners are very familiar with it. However, many online tutorials about using Notification are based on 2.x, while common Android devices today are basically above 4.x, and even many are above 5.0; their respective Notifications are all different! This section explains Notification based on 4.x and above, while Notification above 5.0 will be covered in the chapter on new features of Android 5.0 in the advanced tutorial~
Some introductions to Notification from the official documentation:
Design philosophy:Notifications in Android 4.4 and Lower
Translation:Notification
API documentation:Notification
To access the above websites, you may need a ladder (VPN)~
1. Interpretation of the design document section
1) Basic layout of Notification
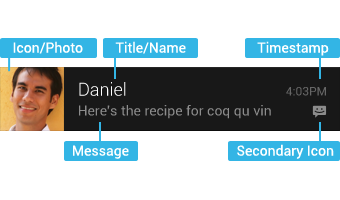
The constituent elements above are, in order:
- Icon/Photo: Large icon
- Title/Name: Title
- Message: Content information
- Timestamp: Notification time, by default the time when the system sent the notification, and it can also be set via setWhen()
- Secondary Icon: Small icon
- Content text, a text on the left side of the small icon
2) Expanded layout
In Jelly Bean, you can provide more details of events for notifications. You can use the expanded layout to display the first few lines of a message or a preview of an image. This way users can see more content - sometimes even the entire message. Users can open the expanded layout by pinch-zoom or two-finger swipe. Android provides two kinds of expanded layouts (text and image) for a single message for you to use when developing applications.
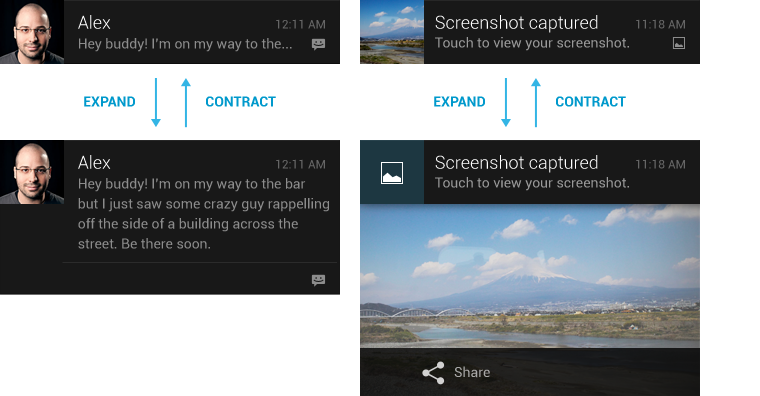
As for other design-related things, we will not mention them one by one. If you are interested, check the API documentation provided above yourself. Just know that Notification can be diverse in versions above 4.x! What we are more concerned about is how to write code to use this thing. Below, we will learn how to use Notification!
2. Basic usage flow of Notification
The status notification bar mainly involves two classes: Notification and NotificationManager
Notification: Notification information class, which contains the various properties of the notification bar
NotificationManager: It is the management class for status bar notifications, responsible for operations such as sending notifications and clearing notifications.
The basic usage process:
- Step 1.Obtain the NotificationManager object: NotificationManager mNManager = (NotificationManager) getSystemService(NOTIFICATION_SERVICE);
- Step 2.Create a Builder constructor class for the notification bar: Notification.Builder mBuilder = new Notification.Builder(this);
- Step 3.Perform relevant settings on the Builder, such as title, content, icon, actions, etc.!
- Step 4.Call the build() method of Builder to assign a value to notification
- Step 5.Call the notify() method of NotificationManager to send the notification!
- PS:In addition, we can also call the cancel() method of NotificationManager to cancel the notification.
3. Some related setting methods:
Notification.Builder mBuilder = new Notification.Builder(this);
Then call the relevant methods below for settings: (Official API documentation:Notification.Builder)
- setContentTitle(CharSequence): Set the title.
- setContentText(CharSequence): Set the content.
- setSubText(CharSequence): Set the small line of text below the content.
- setTicker(CharSequence): Set the text information displayed at the top when a notification is received.
- setWhen(long): Set the notification time. Generally, it is set to System.currentTimeMillis() when the notification is received.
- setSmallIcon(int): Set the small icon in the lower right corner. When a notification is received, this small icon is also displayed at the top.
- setLargeIcon(Bitmap): Set the large icon on the left.
- setAutoCancel(boolean): Whether to cancel the notification after the user clicks the Notification panel (not cancelled by default).
- setDefaults(int): The simplest way to add sound, blinking light, and vibration effects to a notification is to use the default (defaults) attribute; multiple attributes can be combined,
Notification.DEFAULT_VIBRATE(Add default vibration alert);
Notification.DEFAULT_SOUND(Add default sound alert);
Notification.DEFAULT_LIGHTS(Add default tri-color light alert)
Notification.DEFAULT_ALL(Add all of the above 3 default alerts)- setVibrate(long[]): Set the vibration pattern, for example:
setVibrate(new long[] {0,300,500,700}); Delay 0ms, then vibrate 300ms, then delay 500ms, then vibrate 700ms. More about the usage of Vibrate will be explained later!- setLights(int argb, int onMs, int offMs): Set the tri-color light. The parameters are, in order: light color, duration of being on, duration of being off. Not all colors are supported; this depends on the device, and some phones do not even have a tri-color light. In addition, you also need to set the flags for Notification as Notification.FLAG_SHOW_LIGHTS to support tri-color light alerts!
setSound(Uri): Set the ringtone when a notification is received. You can use the system ringtone, or you can set it yourself. Examples are as follows:
.setDefaults(Notification.DEFAULT_SOUND) // Get the default ringtone
.setSound(Uri.parse("file:///sdcard/xx/xx.mp3")) // Get a custom ringtone
.setSound(Uri.withAppendedPath(Audio.Media.INTERNAL_CONTENT_URI, "5")) // Get a ringtone from the Android multimedia librarysetOngoing(boolean): Setting it to true indicates that it is an ongoing notification. They are usually used to represent a background task that the user is actively participating in (such as playing music) or is waiting in some way, therefore occupying the device (such as a file download, sync operation, active network connection)
- setProgress(int,int,boolean): Set a notification with a progress bar. The parameters are, in order: the maximum value of the progress bar, the current progress, and whether the progress is indeterminate. If it is a determinate progress bar: call setProgress(max, progress, false) to set the notification. When updating progress, issue the notification again to update progress, and after the download is completed, remove the progress bar by calling setProgress(0, 0, false). If it is an indeterminate (continuous activity) progress bar, this is used when the processing progress cannot be accurately known to show that the activity is ongoing, so call setProgress(0, 0, true). When the operation ends, call setProgress(0, 0, false) and update the notification to remove the indicator bar
setContentIntent(PendingIntent): PendingIntent and Intent are slightly different; it can set the number of executions, and is mainly used in remote service communication, alarms, notifications, launchers, and SMS. It is rarely used in general situations. For example, here we start an Activity through PendingIntent: getActivity(Context, int, Intent, int). Of course, you can also start a Service or Broadcast. The bit identifiers of PendingIntent (the fourth parameter):
FLAG_ONE_SHOTIndicates that the returned PendingIntent can only be executed once, and is automatically cancelled after execution.
FLAG_NO_CREATEIndicates that if the described PendingIntent does not exist, the corresponding PendingIntent is not created, and NULL is returned instead.
FLAG_CANCEL_CURRENTIndicates that if the corresponding PendingIntent already exists, the former is cancelled, and then a new PendingIntent is created. This is helpful for keeping data up-to-date and can be used in instant messaging communication scenarios.
FLAG_UPDATE_CURRENTIndicates the updated PendingIntent.
Usage examples:
//点击后跳转Activity Intent intent = new Intent(context,XXX.class); PendingIntent pendingIntent = PendingIntent.getActivity(context, 0, intent, 0); mBuilder.setContentIntent(pendingIntent)setPriority(int): Set priority:
Corresponding attribute: Notification.PRIORITY_HIGH...
Priority User MAX Important and urgent notification, used to notify users that the event is time-sensitive or requires immediate handling. HIGH High priority is used for important communication content, such as short messages or chat, which are of relatively high interest to users. DEFAULT Default priority is used for notifications without any special priority classification. LOW Low priority is used for events that can notify users but are not very urgent. MIN Used for background messages (such as weather or location information). The lowest priority notification will only show an icon in the status bar; users can only see the content after pulling down the notification drawer.
4. Code example: The most common Notification:
Next, let's write a very simple example to experience the usage of Notification:
Running effect diagram:

Key code:
Directly paste the code hereMainActivity.javacode:
public class MainActivity extends AppCompatActivity implements View.OnClickListener {

    private Context mContext;
    private NotificationManager mNManager;
    private Notification notify1;
    Bitmap LargeBitmap = null;
    private static final int NOTIFYID_1 = 1;

    private Button btn_show_normal;
    private Button btn_close_normal;


    @Override
    protected void onCreate(Bundle savedInstanceState) {
        super.onCreate(savedInstanceState);
        setContentView(R.layout.activity_main);
        mContext = MainActivity.this;
        //创建大图标的Bitmap
        LargeBitmap = BitmapFactory.decodeResource(getResources(), R.mipmap.iv_lc_icon);
        mNManager = (NotificationManager) getSystemService(NOTIFICATION_SERVICE);
        bindView();

    }


    private void bindView() {
        btn_show_normal = (Button) findViewById(R.id.btn_show_normal);
        btn_close_normal = (Button) findViewById(R.id.btn_close_normal);
        btn_show_normal.setOnClickListener(this);
        btn_close_normal.setOnClickListener(this);
    }


    @Override
    public void onClick(View v) {
        switch (v.getId()) {
            case R.id.btn_show_normal:
                //定义一个PendingIntent点击Notification后启动一个Activity
                Intent it = new Intent(mContext, OtherActivity.class);
                PendingIntent pit = PendingIntent.getActivity(mContext, 0, it, 0);

                //设置图片,通知标题,发送时间,提示方式等属性
                Notification.Builder mBuilder = new Notification.Builder(this);
                mBuilder.setContentTitle("叶良辰")                        //标题
                        .setContentText("我有一百种方法让你呆不下去~")      //内容
                        .setSubText("——记住我叫叶良辰")                    //内容下面的一小段文字
                        .setTicker("收到叶良辰发送过来的信息~")             //收到信息后状态栏显示的文字信息
                        .setWhen(System.currentTimeMillis())           //设置通知时间
                        .setSmallIcon(R.mipmap.ic_lol_icon)            //设置小图标
                        .setLargeIcon(LargeBitmap)                     //设置大图标
                        .setDefaults(Notification.DEFAULT_LIGHTS | Notification.DEFAULT_VIBRATE)    //设置默认的三色灯与振动器
                        .setSound(Uri.parse("android.resource://" + getPackageName() + "/" + R.raw.biaobiao))  //设置自定义的提示音
                        .setAutoCancel(true)                           //设置点击后取消Notification
                        .setContentIntent(pit);                        //设置PendingIntent
                notify1 = mBuilder.build();
                mNManager.notify(NOTIFYID_1, notify1);
                break;

            case R.id.btn_close_normal:
                //除了可以根据ID来取消Notification外,还可以调用cancelAll();关闭该应用产生的所有通知
                mNManager.cancel(NOTIFYID_1);                          //取消Notification
                break;

        }
    }
}
The comments are very detailed, so I won't explain them one by one~
5. Code example download:
NotificationDemo.zip
Summary of this section:
Okay, in this section we introduced the basic usage of Notification in the 4.x version. It's very simple, right~
Of course, you can also customize Notification. If you're interested, you can search for relevant materials yourself. We won't study it slowly here~ By the way, part of this section references the following blog. I'll post the link, and you can also go take a look:Android Notification Bar Notification Integration Comprehensive Learning (A DEMO lets you fully understand it)It's quite detailed~ That's all for this section. Thanks~