Vite Tutorial
Vite is a modern frontend build tool that aims to provide a fast development experience by leveraging native ES module support in modern browsers.
Vite consists of two parts:
Development server:Based on native ES modules, provides ultra-fast hot updates.
Build command:Uses Rollup to bundle code and generate optimized static assets suitable for production.
Vite requires Node.js version 18+ or 20+. However, some templates require a higher Node version to run properly. When your package manager issues a warning, please upgrade your Node version.

Pain points of traditional build tools
Before Vite, frontend development typically used build tools like Webpack. Although these tools are powerful, they have some pain points:
Slow startup speed:The larger the project, the longer the startup time, affecting development efficiency.
Slow hot updates:Every time code is modified, the entire project needs to be rebuilt, resulting in slow hot updates.
Complex configuration:Tools like Webpack have complex configuration and a high learning cost.
The emergence of Vite solves the pain points of traditional build tools and has the following advantages:
Ultra-fast startup:Leveraging the browser's native ES module support, no bundling is required, and startup is extremely fast.
Fast hot updates:Only updates modified modules, preserves application state, and improves development efficiency.
Rich features:Supports TypeScript, JSX, CSS, etc., out of the box.
Highly extensible:Easily integrate other tools and frameworks through the plugin system.
How Vite works
How Vite works can be divided into development mode and production mode:
Development mode:
Vite starts a development server and directly loads source code by leveraging the browser's native support for ES modules.
When code changes, Vite only updates the modified modules and notifies the browser to perform hot updates, preserving application state.
Production mode:
Vite uses Rollup to bundle code and generates optimized static asset files.
These files can be deployed to any static file server.
Vite applicable scenarios
Vite is suitable for various projects, especially:
Single-page applications (SPA):Such as Vue, React projects.
Static websites:Quickly build blogs, documentation, etc.
Library development:Use Vite's build features to efficiently develop and bundle libraries.
Create a Vite project
Vite provides multiple ways to create a new project, the simplest being the command-line tool.
Open a terminal or command-line tool and run the following command to create a new Vite project:
npm create vite@latest
Follow the prompts to enter the project name and select a template.
Vite provides multiple templates, including:
vanilla:Plain JavaScript project
vue:Vue.js project
react:React project
preact:Preact project
lit:Lit project
svelte:Svelte project
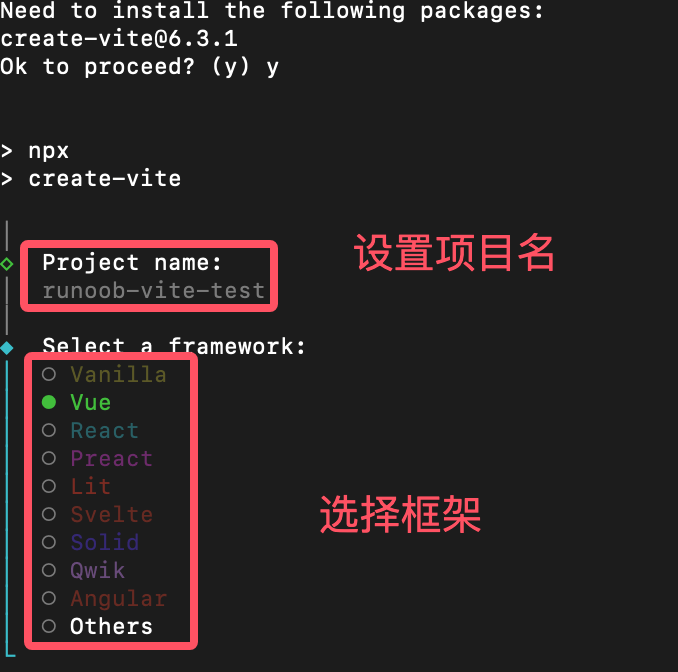
After selecting a template, Vite will automatically create the project directory and install dependencies. In this chapter, we chose the Vue framework.
If you don't know how to choose for now, just pressing Enter all the way also works. The information output in the window is similar to the following:
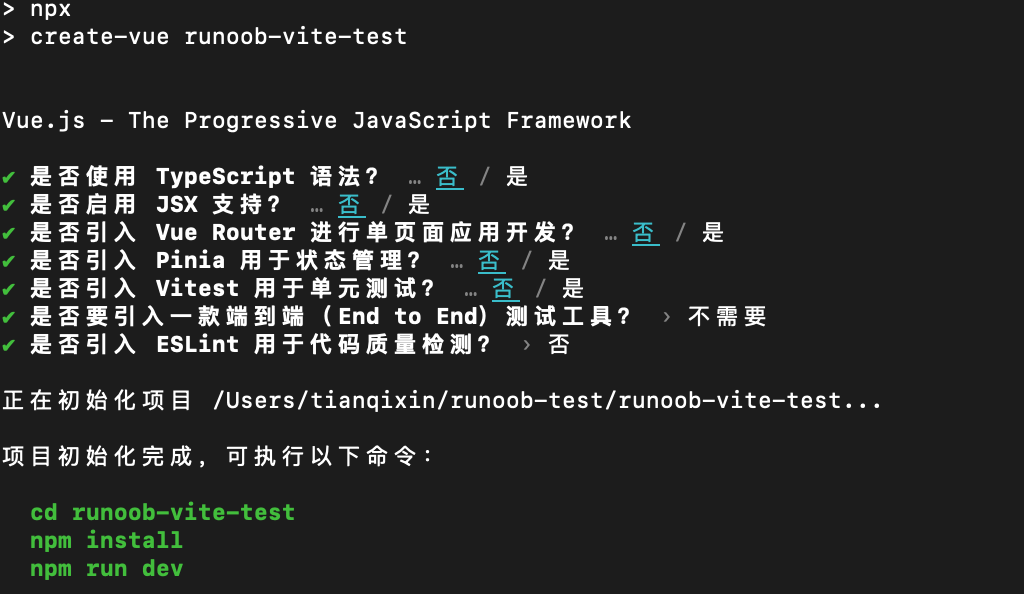
A project created with Vite typically contains the following files and folders:
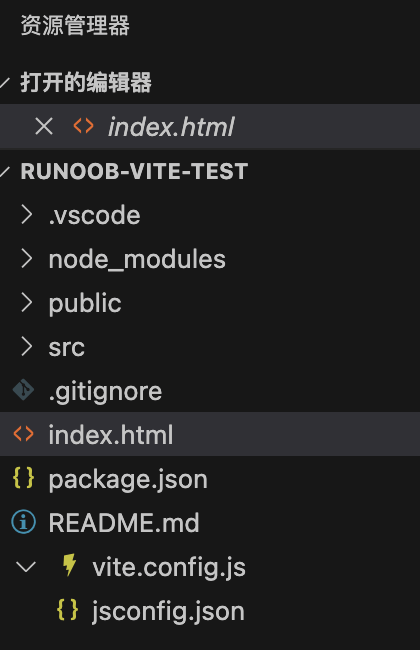
node_modules:Folder for storing project dependencies.
public:Folder for storing static assets, such as images, fonts, etc.
src:Folder for storing project source code.
main.js:Project entry file.
App.vue:Vue project root component.
index.html:Project homepage.
package.json:Project configuration file, containing project information, dependencies, and script commands.
vite.config.js:Vite configuration file, used to configure various Vite options.
Start the development server
Enter the project directory:
cd example-vite-test
Install dependencies:
npm installRun the following command to start the development server:
npm run dev
After execution, the following information appears:
VITE v6.2.0  ready in 684 ms

  ➜  Local:   http://localhost:5173/
  ➜  Network: use --host to expose
  ➜  Vue DevTools: Open http://localhost:5173/__devtools__/ as a separate window
  ➜  Vue DevTools: Press Option(⌥)+Shift(⇧)+D in App to toggle the Vue DevTools
  ➜  press h + enter to show help
Vite will start a local development server and print the access address, for examplehttp://localhost:5173, the port can be configured and modified in vite.config.js.
Open the browser and visit the address to see your Vite project.

Modify code and view the result
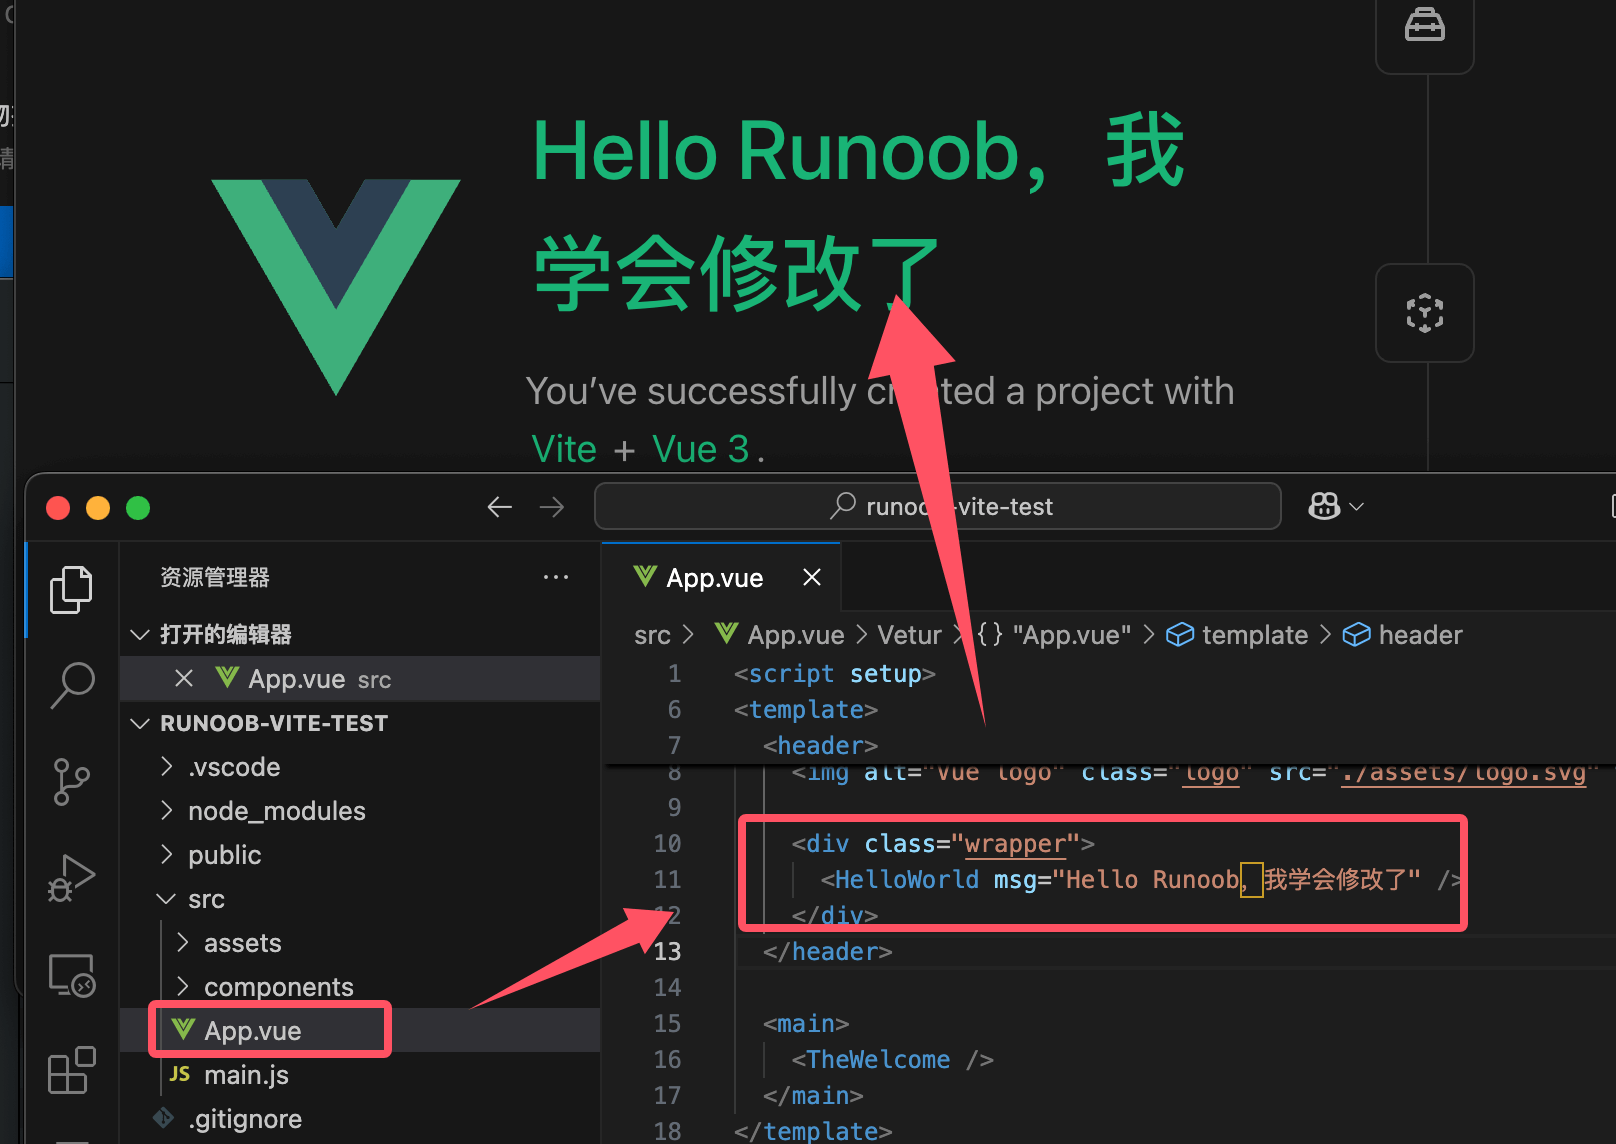
Open the src/App.vue file, modify the code, and save the file.
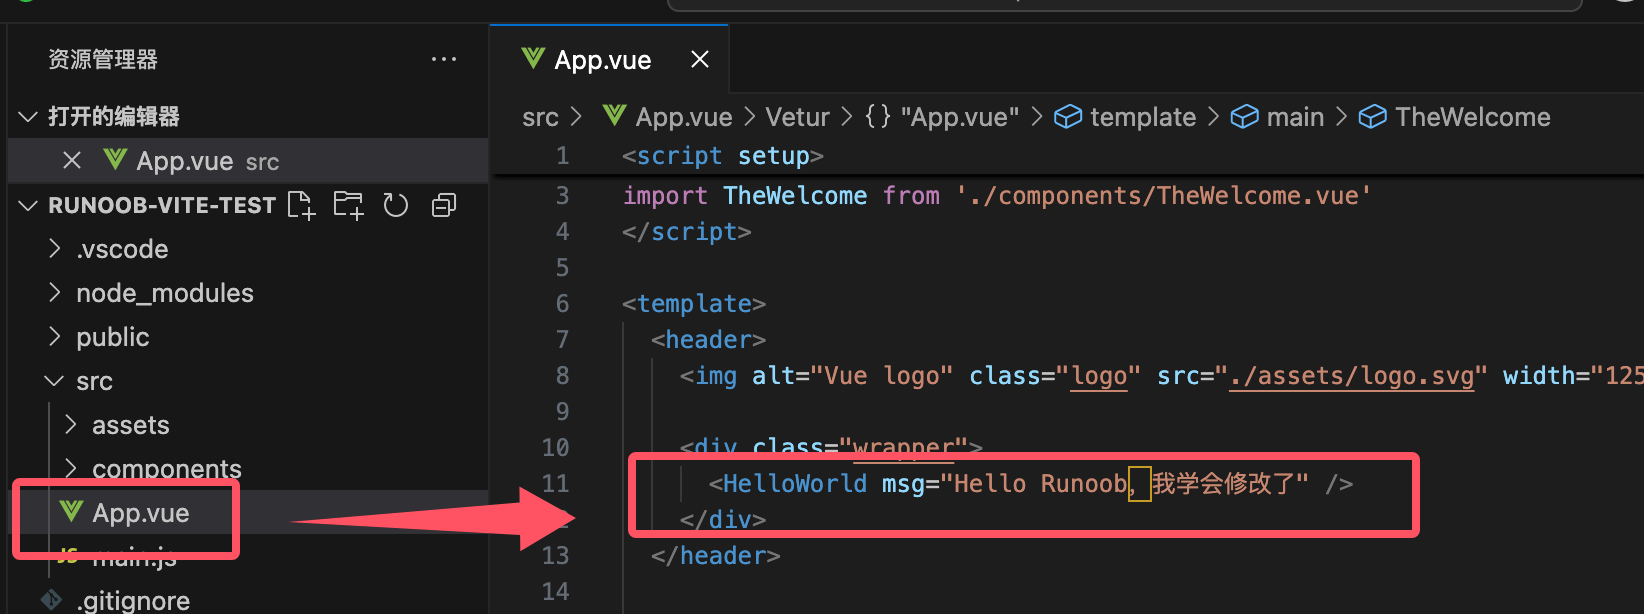
You will find that the browser automatically refreshes and displays the modified result.
Vite startup process
Defined in package.json:
"scripts": {
  "dev": "vite"
}
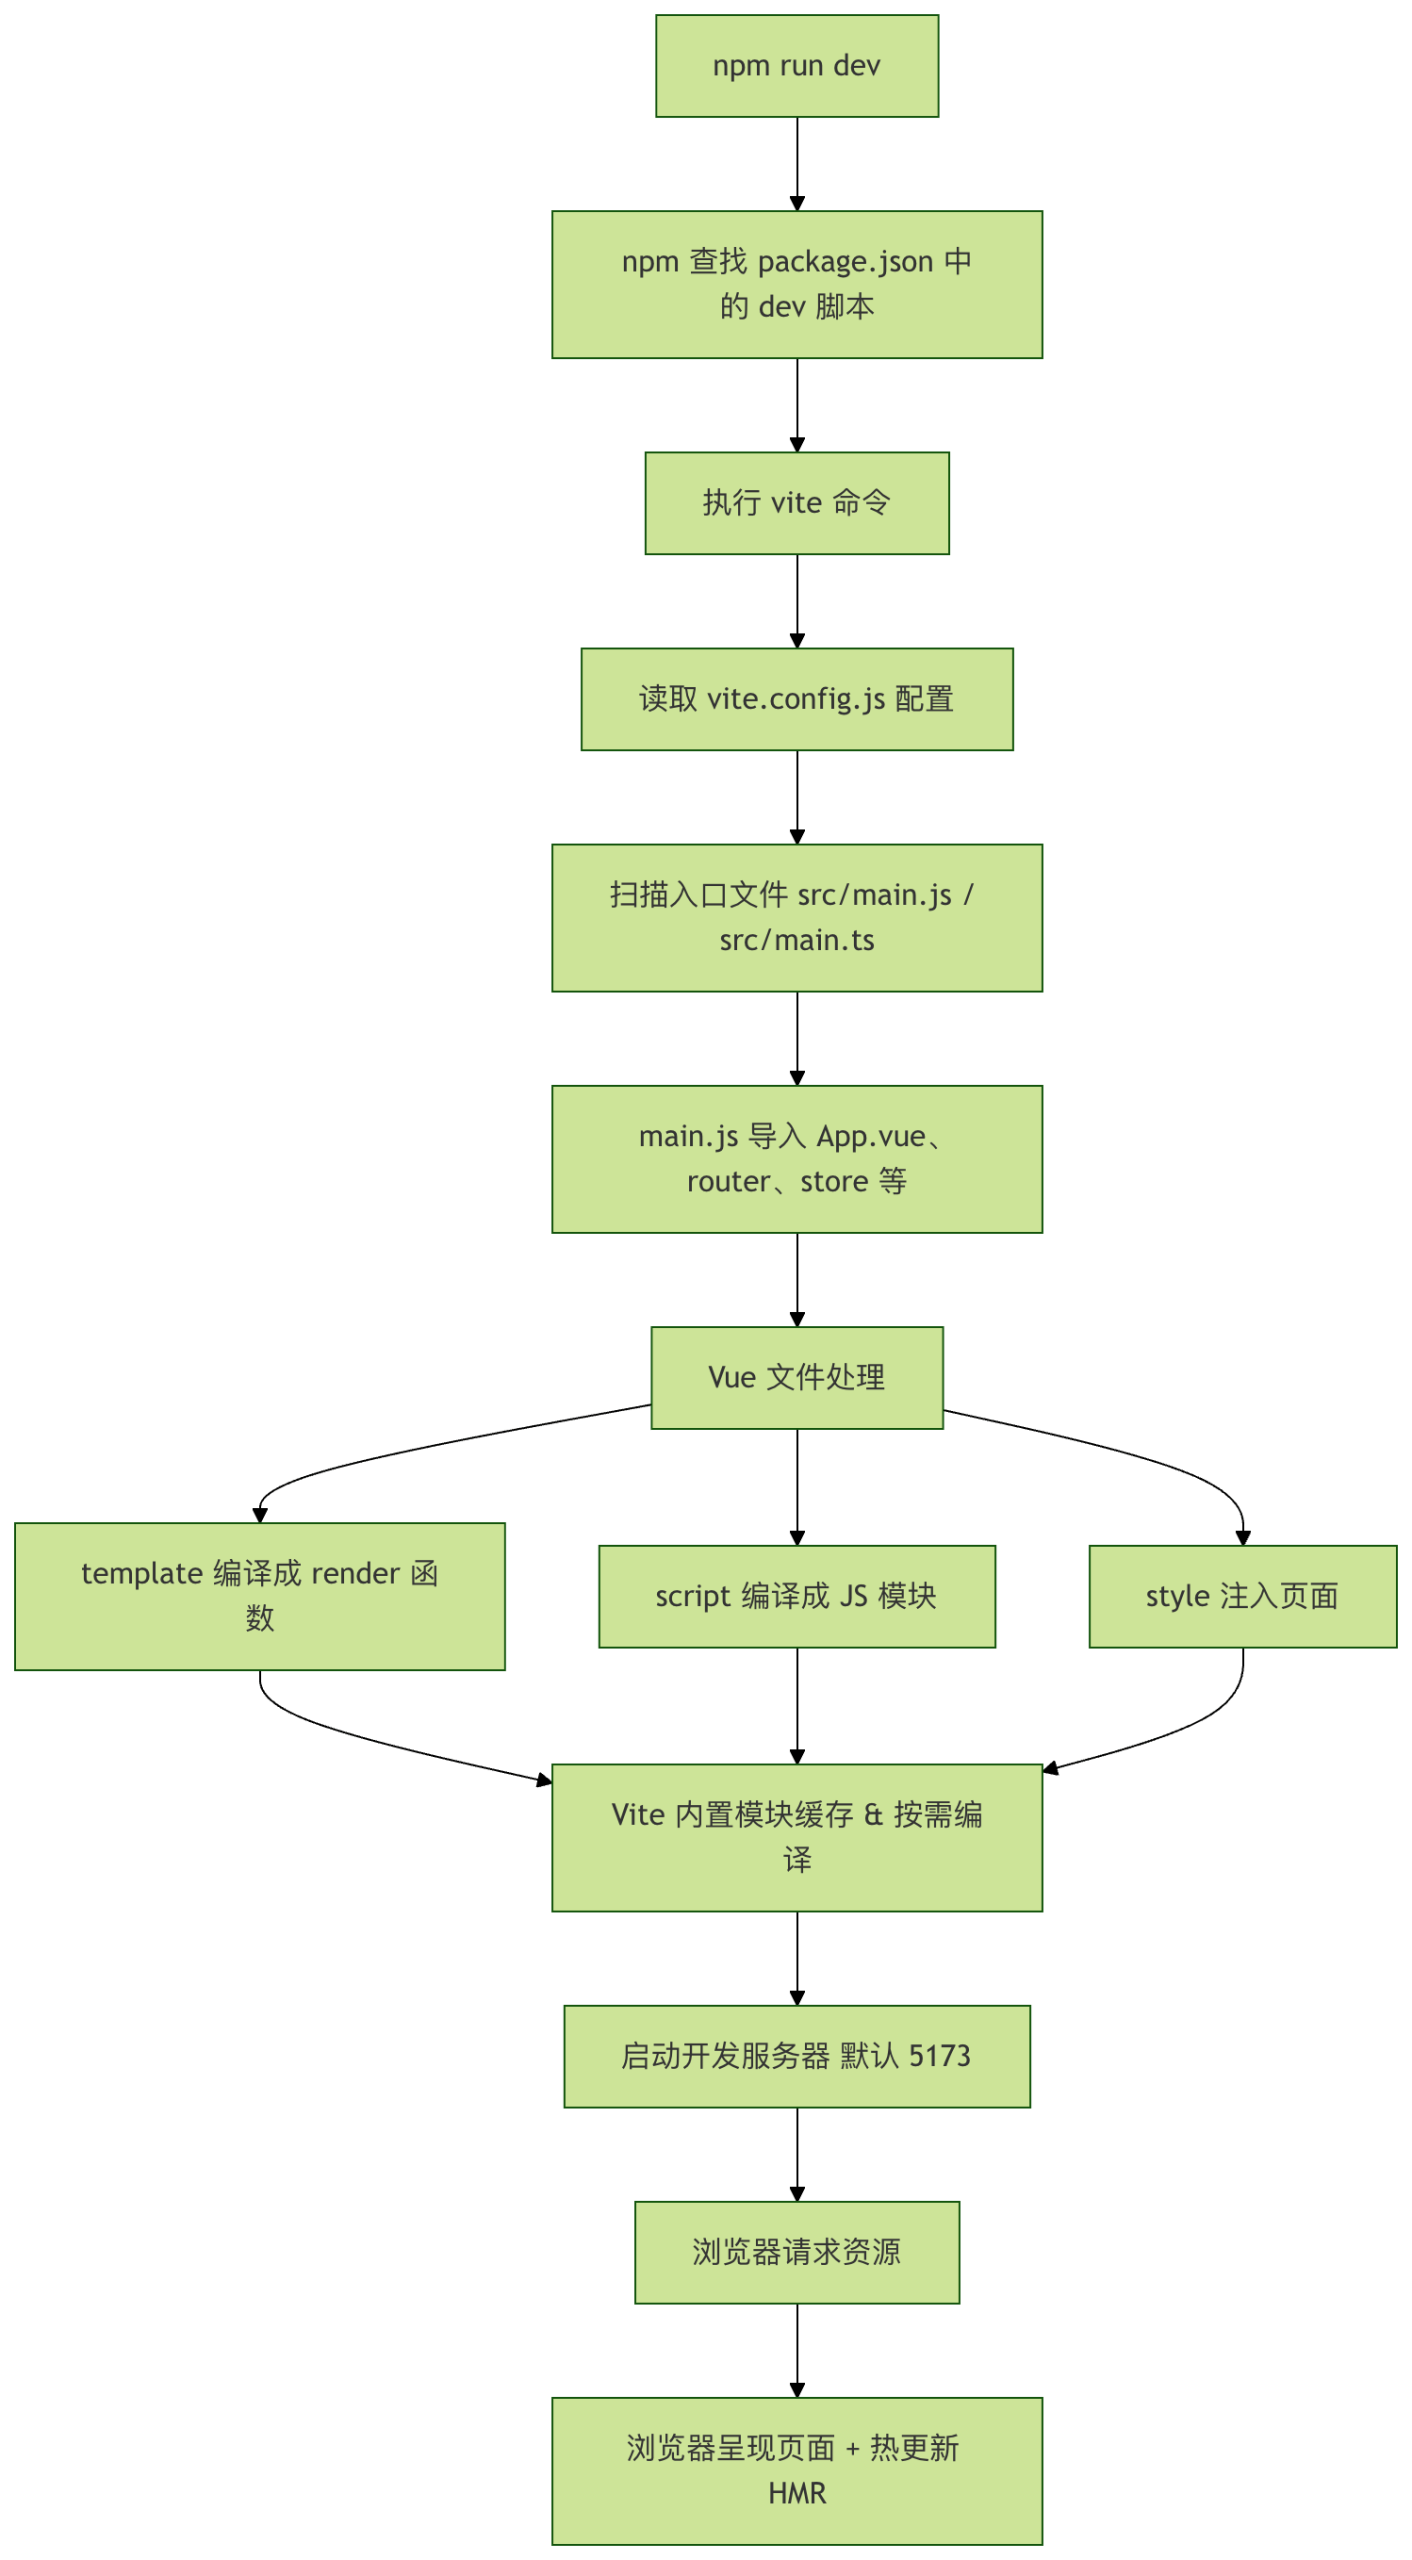
Executenpm run devAfter the command, npm will look up the local node_modules/.bin/vite executable, invoke this file, and start the development server.
Core steps of Vite's startup process:
-
Read configuration
- By default, read the root directory's
vite.config.jsorvite.config.ts。 - Configuration includes
root、aliasplugins, port, etc.
- By default, read the root directory's
-
Resolve dependencies
- Scan
src/main.js(orsrc/main.ts) as the entry file. - Perform dependency analysis on ES modules.
- For import paths (such as
@/components/Hello.vue) perform alias resolution.
- Scan
-
Start the development server
- Create an HTTP server, default port
5173。 - Provide hot module replacement (HMR) capability.
- Convert Vue files, JS/TS, CSS, etc. into browser-recognizable code through built-in Vite plugins.
- Create an HTTP server, default port
File invocation order (using a typical Vue 3 project as an example)
npm run dev
    ↓
vite 命令执行
    ↓
读取 vite.config.js
    ↓
扫描入口文件 src/main.js / src/main.ts
    ↓
main.js 导入 App.vue 和 router/store 等
    ↓
App.vue -> template + script + style 分别由 Vite Vue 插件处理
    ↓
浏览器请求资源时,Vite 进行按需编译和模块缓存
    ↓
页面呈现,支持 HMR 热更新
Key points
- Entry file:
main.jsormain.ts, the starting point of the Vue application. - Module resolution: Vite uses
esbuildto quickly handle JS/TS and process Vue single-file components. - Alias resolution:
@Corresponds tosrc/, invite.config.jsthroughresolve.aliasconfigured. - Hot updates: When modifying
.vuefiles or JS/TS files, Vite will locally update modules without refreshing the entire page.
Common features of Vite
Vite provides rich features that can help you develop frontend applications more efficiently.
1. Using CSS preprocessors
Vite supports CSS preprocessors such as Sass, Less, and Stylus.
To use these preprocessors, you need to install the corresponding dependencies first:
Sass:
npm install -D sass
Less:
npm install -D less
Stylus:
npm install -D stylus
Once installed, you can use the corresponding CSS preprocessor in your project.
For example, in a Vue project, you can use<style lang="scss">to write Sass code.
2. Using TypeScript
Vite supports writing code in TypeScript.
To use TypeScript, you need to install TypeScript first:
npm install -D typescript
Once installed, you can rename .js files to .ts files and write code using TypeScript syntax.
Vite will automatically compile TypeScript code.
3. Using static assets
Vite supports using static assets such as images, fonts, etc.
We can place these resources in the public directory, or use import statements to import resources.
How to use the public directory?
Put the image logo.png in the public directory, then reference the image using /logo.png in your code.
4. Using import statements
Example
const img = document.createElement('img')
img.src = logo
document.body.appendChild(img)
5. Using environment variables
Vite supports using environment variables to configure different environments.
You can use.enva file to define environment variables.
Create a .env file:
VITE_API_URL=https://api.example.com
Use environment variables in code:
const apiUrl = import.meta.env.VITE_API_URL
6. Using plugins
Vite has a rich plugin ecosystem that can help you extend Vite's functionality.
We can use Vite plugins to implement features such as code compression, image optimization, and code analysis.
Install the plugin:
npm install -D vite-plugin-xxx
Configure the plugin:
Configure the plugin in the vite.config.js file:
import xxx from 'vite-plugin-xxx'

export default {
  plugins: [
    xxx()
  ]
}
vite.config.js is the core configuration file for a Vite project. By configuring vite.config.js, you can customize various behaviors of Vite, such as the dev server, build options, plugins, etc.
The following is an example of a vite.config.js configuration:
vite.config.js configuration description
import { defineConfig } from 'vite';
// Import the Vue plugin to support Vue projects
import vue from '@vitejs/plugin-vue';
// Import the path module for handling paths
import path from 'path';
// Use defineConfig to define the Vite configuration
export default defineConfig({
// Project root directory, defaults to the current working directory
root: path.resolve(__dirname, './src'),
// Base path, used when deploying under a subpath
base: '/my-app/',
// Development server configuration
server: {
// Specify the development server port
port: 3000,
// Whether to automatically open the browser
open: true,
// Configure the proxy server to solve cross-origin issues
proxy: {
'/api': {
target: 'http://localhost:8080', // Target server address
changeOrigin: true, // Whether to change the request origin
rewrite: (path) => path.replace(/^\/api/, ''), // Rewrite the request path
},
},
},
// Build configuration
build: {
// Specify the output directory
outDir: path.resolve(__dirname, '../dist'),
// Specify the static assets directory
assetsDir: 'static',
// Whether to generate sourcemap files
sourcemap: true,
// Whether to minify code
minify: 'terser', // Use terser for code minification
// Configure Rollup options
rollupOptions: {
// Configure external dependencies
external: ['lodash'],
// Configure output format
output: {
manualChunks: {
// Bundle lodash separately
lodash: ['lodash'],
},
},
},
},
// Plugin configuration
plugins: [
// Use the Vue plugin
vue(),
],
// Module resolution configuration
resolve: {
// Configure path aliases
alias: {
'@': path.resolve(__dirname, './src'), // Map @ to the src directory
},
},
// CSS configuration
css: {
// Configure CSS preprocessor options
preprocessorOptions: {
scss: {
// Inject SCSS variables globally
additionalData: `@import "@/styles/variables.scss";`,
},
},
},
// Environment variable configuration
envPrefix: 'VITE_', // Environment variable prefix, defaults to VITE_
});
root
Specifies the project root directory, which defaults to the current working directory. Here it is set to./src, meaning the project source code is placed in thesrcdirectory.base
Specifies the base path of the project, suitable when the project is deployed under a subpath. For example, if the project is deployed athttps://example.com/my-app/, then set it to/my-app/。server
Development server configuration:port: Specify the port number of the development server.open: Whether to automatically open the browser when starting the development server.proxy: Configure the proxy server to solve cross-origin issues. For example, proxy requests starting with/apitohttp://localhost:8080。
build
Build configuration:outDir: Specify the directory for build output.assetsDir: Specify the storage directory for static assets (such as images, fonts).sourcemap: Whether to generate sourcemap files for debugging.minify: Whether to minify code,terseris the default minification tool.rollupOptions: Configure Rollup bundling options, such as external dependencies and code splitting.
plugins
Configure Vite plugins. Here the@vitejs/plugin-vueplugin is used to support Vue projects.resolve.alias
Configure path aliases. For example, map@tosrcthe directory for easy referencing in code.css.preprocessorOptions
Configure CSS preprocessor options. For example, globally inject SCSS variable files.envPrefix
Configure the environment variable prefix. By default, Vite only loads environment variables starting withVITE_the prefix.