Claude Code Hands-On
This chapter goes from opening a terminal to getting a complete Todo REST API running, driven entirely by Claude Code + DeepSeek V4.
Claude Code + DeepSeek V4 configuration reference:Claude Code DeepSeek configuration
First, let's look at the basic operation interface and everyday high-frequency commands of Claude Code.
Start your first Claude Code session
Open a terminal, enter any working directory (or create a new empty folder), then type:
$ mkdir example-todo-api
$ cd example-todo-api
$ claude
On first launch, you'll see the welcome screen, version information, and DeepSeek environment variable configuration.
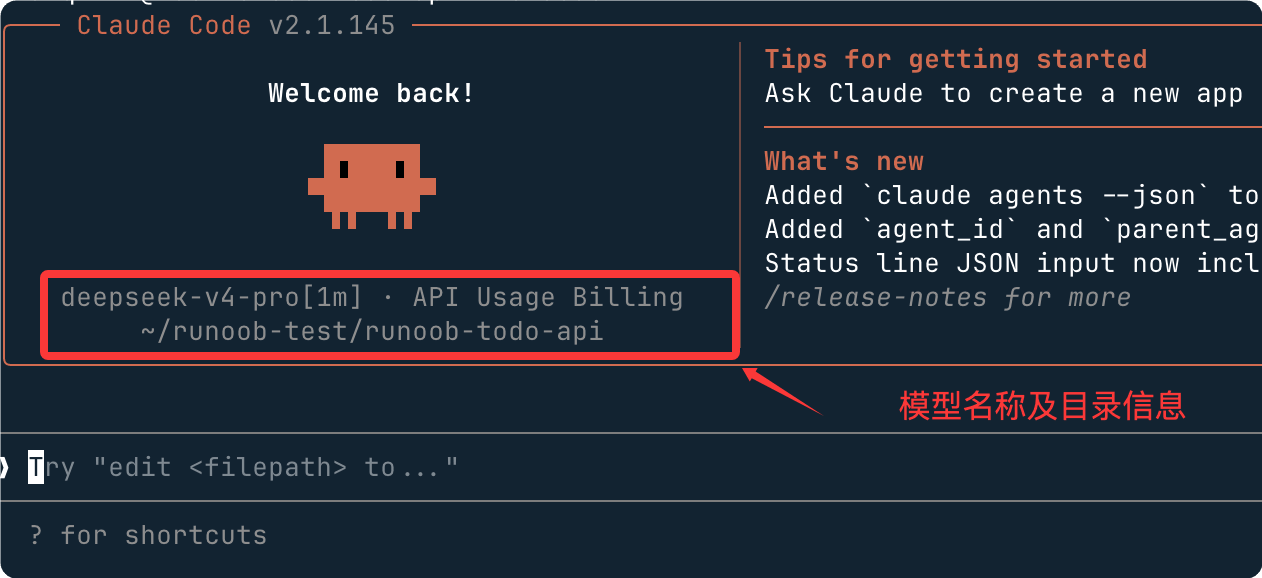
If you're not sure whether the configuration took effect, immediately type/status, and confirm that the Base URL points tohttps://api.deepseek.com/anthropic。
Common slash command quick reference
In the Claude Code dialog box, with/at the beginning are built-in commands, which will not be sent to the model.
| Command | Purpose |
|---|---|
| /status | View current model, Base URL, session statistics |
| /help | Show all available commands |
| /clear | Clear current conversation context (does not delete files) |
| /exit or Ctrl+C | Exit Claude Code |
| /undo | Undo the last file modification |
| /diff | View the git diff of the most recent modification |
Permission prompt mechanism
When Claude Code is about to write a file or execute a command, it pauses first, lists the operations it intends to perform, and waits for your confirmation.
This is Claude Code's most important safety mechanism; beginners don't need to worry about the AI losing control and making arbitrary changes.
You'll see a prompt like this:
┌─────────────────────────────────────────────────┐
│  Claude wants to create the following files:     │
│                                                  │
│  • src/index.js                                  │
│  • src/routes/todos.js                           │
│  • package.json                                  │
│                                                  │
│  Allow? [Y/n]                                    │
└─────────────────────────────────────────────────┘
Simply pressEnteror typeyto confirm, and typento skip.
Hands-on project: Build a Todo API from scratch with AI
This section guides you through using natural language to drive Claude Code and generate a runnable Node.js REST API from scratch.
Project goal
We're going to build a REST API with the following features:
| Endpoint | Function |
|---|---|
| GET /todos | Get all todo items |
| POST /todos | Create a new todo item |
| PUT /todos/:id | Update a todo item (mark complete / modify content) |
| DELETE /todos/:id | Delete a todo item |
Tech stack:Node.js + Express, with data temporarily stored in memory (no database required, lowering complexity).
Step 1: Describe requirements in natural language
Enter the following in the Claude Code dialog box (you can copy and paste directly):
请帮我从零创建一个 Node.js + Express 的 Todo REST API 项目。

要求:
- 支持 GET /todos、POST /todos、PUT /todos/:id、DELETE /todos/:id 四个接口
- 数据先存在内存数组里,不需要数据库
- 每个 todo 包含:id、title、completed(布尔值)、createdAt 字段
- 请求和响应都使用 JSON 格式
- 加上基础的错误处理(404、400 等)
- 生成一份 README.md,说明如何启动和测试接口

项目结构建议:
my-todo-api/
├── src/
│   ├── index.js       # 入口文件
│   └── routes/
│       └── todos.js   # Todo 路由
├── package.json
└── README.md

Three key elements for writing a good prompt:Context(tell the AI the tech stack and project background),Constraints(clarify what you don't want),Expected output(Provide specific file structure or format requirements).
Step 2: Claude Code generates the file structure
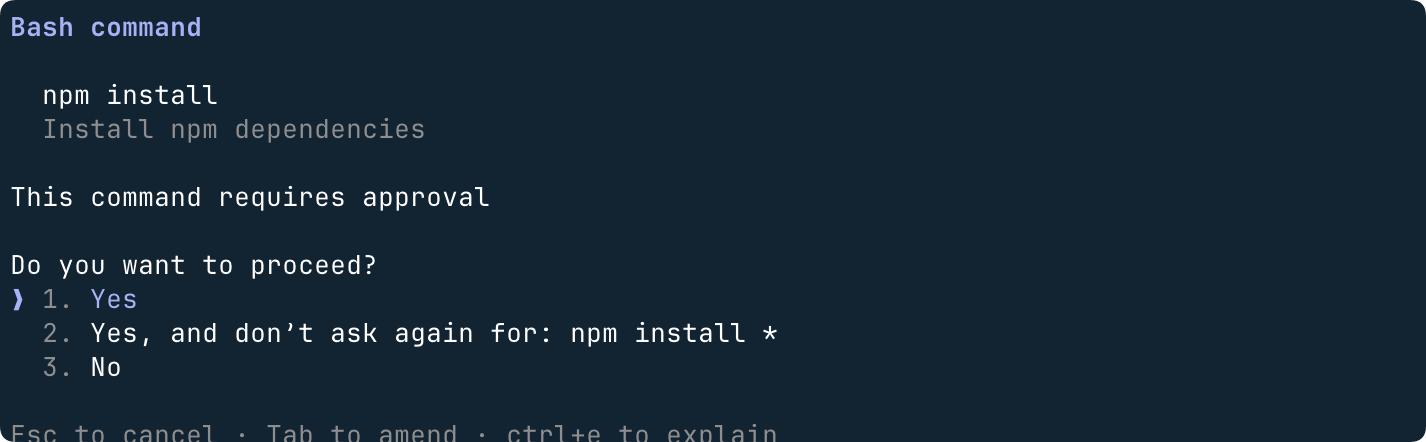
After confirming permissions, Claude Code will create the following files in order.
During generation, there are many permission prompts; generally just select Yes:

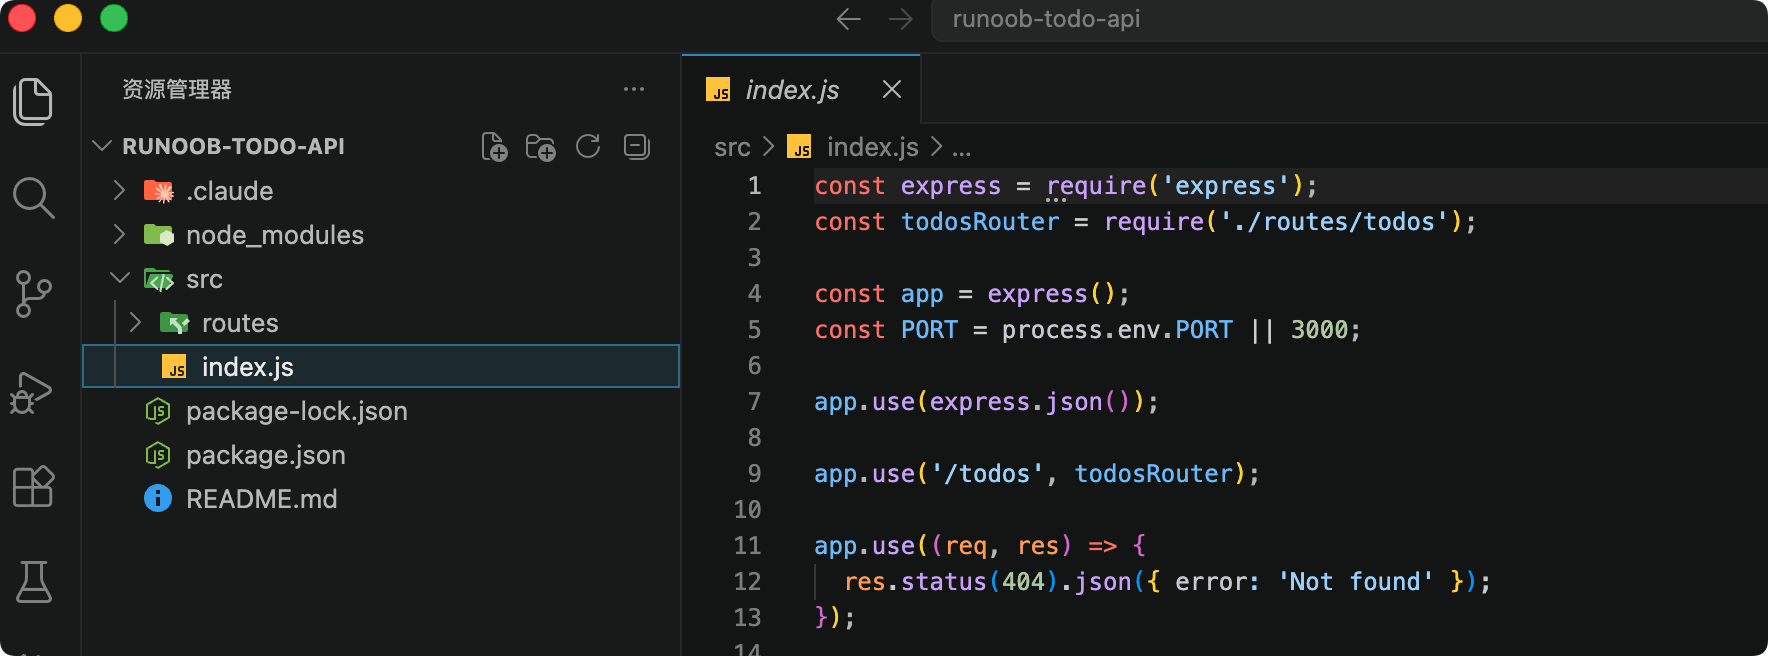
Take a look at the generated project structure:
package.json
Example
"name": "my-todo-api",
"version": "1.0.0",
"description": "A simple Todo REST API built with Express",
"main": "src/index.js",
"scripts": {
"start": "node src/index.js",
"dev": "nodemon src/index.js"
},
"dependencies": {
"express": "^4.18.2"
},
"devDependencies": {
"nodemon": "^3.0.1"
}
}
src/index.js (entry file)
Example
// Todo API entry file, responsible for Express app configuration and startup
const express = require('express');
const todosRouter = require('./routes/todos');
const app = express();
// Port: use environment variable PORT first, default is 3000
const PORT = process.env.PORT || 3000;
// Middleware: parse JSON request body (required, otherwise req.body is undefined)
app.use(express.json());
// Register Todo routes; all requests to /todos paths are handled by todosRouter
app.use('/todos', todosRouter);
// Root path: return welcome message and version number
app.get('/', (req, res) => {
res.json({ message: 'Todo API is running!', version: '1.0.0' });
});
// Global error-handling middleware (required, catches unhandled exceptions)
app.use((err, req, res, next) => {
console.error(err.stack);
res.status(500).json({ error: 'Internal Server Error' });
});
// Start the HTTP server
app.listen(PORT, () => {
console.log(`Server is running on http://localhost:${PORT}`);
});
src/routes/todos.js (core route file)
Example
// Todo route module, contains complete CRUD business logic
const express = require('express');
const router = express.Router();
// In-memory storage: use an array to simulate the database
// Data is lost after service restart; later can be replaced with SQLite or other persistence solutions
let todos = [];
// Auto-incrementing ID counter
let nextId = 1;
// GET /todos — get all todo items
router.get('/', (req, res) => {
res.json(todos);
});
// POST /todos — create a new todo item
router.post('/', (req, res) => {
const { title } = req.body;
// Parameter validation: title is a required field, its type must be a string and not empty
if (!title || typeof title !== 'string' || title.trim() === '') {
return res.status(400).json({ error: 'title field cannot be empty' });
}
// Build a new todo object
const newTodo = {
id: nextId++, // Auto-increment ID
title: title.trim(), // Remove leading and trailing spaces
completed: false, // Newly created todo defaults to not completed
createdAt: new Date().toISOString(), // ISO 8601 format timestamp
};
todos.push(newTodo);
// 201 Created indicates resource created successfully
res.status(201).json(newTodo);
});
// PUT /todos/:id — update a todo item
router.put('/:id', (req, res) => {
// Convert path parameter from string to number
const id = parseInt(req.params.id);
const todo = todos.find(t => t.id === id);
// 404: Resource not found
if (!todo) {
return res.status(404).json({ error:`Todo with id ${id}not found`});
}
const { title, completed } = req.body;
// Only update passed-in fields; fields not passed in retain their original values
if (title !== undefined) todo.title = title.trim();
// Boolean() ensures completed is always a boolean type
if (completed !== undefined) todo.completed = Boolean(completed);
res.json(todo);
});
// DELETE /todos/:id — delete a todo item
router.delete('/:id', (req, res) => {
const id = parseInt(req.params.id);
const index = todos.findIndex(t => t.id === id);
if (index === -1) {
return res.status(404).json({ error:`Todo with id ${id}not found`});
}
// Remove the element at the specified position from the array
todos.splice(index, 1);
// 204 No Content means deletion succeeded, response body is empty
res.status(204).send();
});
module.exports = router;
Step 3: Review and confirm changes
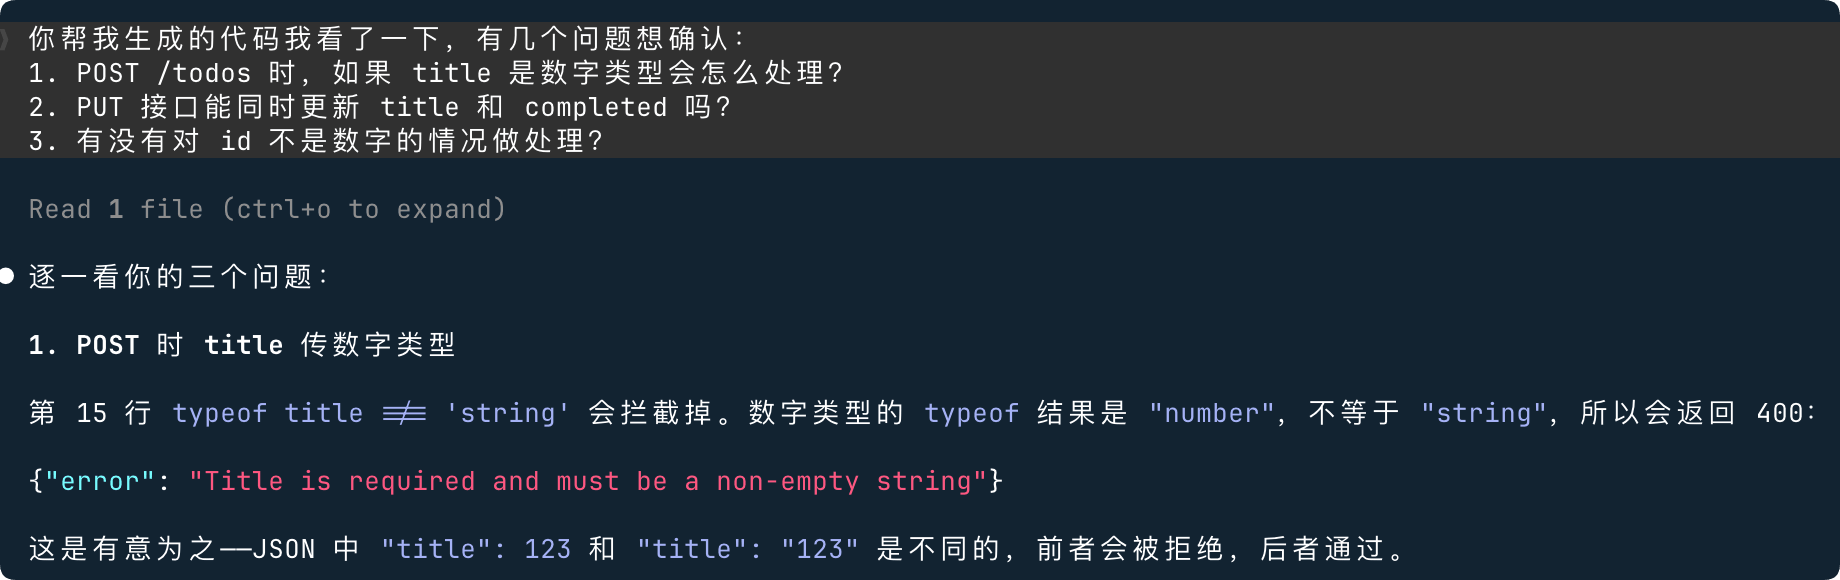
After Claude Code generates the code, don't rush to run it directly; develop a habit of reviewing.
You can keep asking follow-up questions in the conversation:
你帮我生成的代码我看了一下,有几个问题想确认:
1. POST /todos 时,如果 title 是数字类型会怎么处理?
2. PUT 接口能同时更新 title 和 completed 吗?
3. 有没有对 id 不是数字的情况做处理?
Claude Code will answer each one and can fix the code on the spot.
This cycle of "generate → question → fix" is the core rhythm of collaborating with AI.
Step 4: Install dependencies and start the service
Enter the following in the Claude Code dialog:
请帮我安装依赖并启动项目,然后告诉我怎么用 curl 测试每个接口
Claude Code will perform the following operations (it will ask for your confirmation at each step).
Install dependencies
$ npm install
Example output:
added 64 packages in 2.3s
Start the service
$ npm start
Output:
Server is running on http://localhost:3000
Test commands
Open a new terminal window and run the following curl commands in sequence:
# 创建第一条 Todo
$ curl -X POST http://localhost:3000/todos \
  -H "Content-Type: application/json" \
  -d '{"title": "学习 Claude Code"}'

# 创建第二条 Todo
$ curl -X POST http://localhost:3000/todos \
  -H "Content-Type: application/json" \
  -d '{"title": "完成 DeepSeek 配置"}'

# 获取所有 Todos
$ curl http://localhost:3000/todos

# 把第一条标记为完成
$ curl -X PUT http://localhost:3000/todos/1 \
  -H "Content-Type: application/json" \
  -d '{"completed": true}'

# 删除第二条
$ curl -X DELETE http://localhost:3000/todos/2

# 再次查看列表,确认删除成功
$ curl http://localhost:3000/todos
Expected output (final result of GET /todos)
[
  {
    "id": 1,
    "title": "学习 Claude Code",
    "completed": true,
    "createdAt": "2026-05-20T10:30:00.000Z"
  }
]
Congratulations, your first AI-assisted API is up and running.
Advanced challenge: Have Claude Code add new features for you
Once the API is running, try using natural language to have Claude Code extend its functionality:
请给 Todo API 加上以下功能:
1. GET /todos 支持 ?completed=true/false 的查询参数过滤
2. GET /todos 支持 ?sort=createdAt&order=desc 的排序参数
3. 同时更新 README.md 里的接口文档
Observe how Claude Code understands existing code structure and accurately inserts new logic in the right place, rather than rewriting the entire file.
This is precisely where it surpasses ordinary code generation tools.
CLAUDE.md: Project memory file
CLAUDE.md is Claude Code's project-level memory file, allowing the AI to automatically understand project conventions at every startup.
Why do you need it?
Claude Code starts fresh every time — it doesn't remember what was said in previous sessions.
But if the project root contains aCLAUDE.mdfile, Claude Code will automatically read it at every startup, effectively serving as a "project manual" for the AI.
Pain points without CLAUDE.md:
- Having to re-explain every time, "We use Express, not Koa"
- The AI forgets your naming conventions and generates camelCase files again
- Team members each tell the AI different conventions, leading to chaotic code style
CLAUDE.md template
Create in the project root directoryCLAUDE.md, and refer to the following template for its content:
# 项目说明(CLAUDE.md)

## 项目概述
这是一个 Node.js + Express 的 Todo REST API 项目。
当前阶段:数据存在内存中,下一步会迁移到 SQLite。

## 技术栈
- 运行时:Node.js 18+
- 框架:Express 4.x
- 测试:(暂无,后续加 Jest)
- 代码风格:ESLint + Prettier(配置见 .eslintrc)

## 目录结构
src/
├── index.js        # 入口,只做 app 配置和监听
└── routes/
    └── todos.js    # Todo 业务逻辑全在这里

## 命名规范
- 文件名:kebab-case(如 todo-service.js)
- 变量/函数:camelCase
- 常量:UPPER_SNAKE_CASE
- 路由文件按资源名命名(如 users.js、products.js)

## 重要约定
- 所有接口返回 JSON,错误统一格式:{ "error": "错误描述" }
- HTTP 状态码语义要准确:创建成功用 201,删除成功用 204
- 禁止在路由文件里直接操作数据库(现在是内存数组,将来是 DB)
- 每个路由文件只处理一种资源

## 禁止事项
- 不要用 var,只用 const/let
- 不要用回调风格,统一用 async/await
- 不要在代码里写中文注释(英文注释即可)
- 不要安装 lodash,原生 JS 方法够用

## 启动方式
npm start          # 生产模式
npm run dev        # 开发模式(nodemon 热重载)

## 测试接口
见 README.md 的 curl 示例
Let Claude Code auto-generate CLAUDE.md
Don't want to write it by hand? Just let the AI generate it for you:
请根据当前项目的代码结构和我们的对话记录,
帮我生成一份 CLAUDE.md 文件,
内容包括项目概述、技术栈、目录结构、命名规范和重要约定。
Claude Code will analyze all generated files and automatically compile a CLAUDE.md suitable for this project.
Maintenance cadence for CLAUDE.md
| When | What to do |
|---|---|
| Introducing new dependencies | Update the "Tech Stack" section |
| Modifying the file structure | Update the "Directory Structure" section |
| Establishing new coding conventions | Append to "Important Conventions" |
| Noticing the AI repeatedly making the same mistake | Add to "Prohibited Items" |
Commit CLAUDE.md to Git, so all team members and the AI share the same set of conventions.
This is the infrastructure for AI-assisted team collaboration.
Chapter summary
| What you learned | Corresponding content |
|---|---|
| Launch Claude Code and confirm the DeepSeek configuration | Starting a session and /status |
| Describing requirements with the three-element prompt | Step 1: Natural language description |
| Reviewing AI-generated code | Step 3: Review and question |
| Installing dependencies, starting the server, and testing the API with curl | Step 4: Run and test |
| Managing project memory with CLAUDE.md | CLAUDE.md configuration |