Node.js Connect to MySQL
In this chapter, we will introduce how to use Node.js to connect to MySQL and perform database operations.
If you don't have basic knowledge of MySQL yet, you can refer to our tutorial:MySQL Tutorial。
The SQL file for the Websites table used in this tutorial:websites.sql。
Install Driver
This tutorial uses theTaobao-customized cnpm commandto install:
$ cnpm install mysql
Connect to Database
In the following examples, modify the database username, password, and database name according to your actual configuration:
test.js file code:
Execute the following command; the output result is:
The solution is: 2
Database connection parameter description:
| Parameter | Description |
|---|---|
| host | Host address (default: localhost) |
| user | Username |
| password | Password |
| port | Port number (default: 3306) |
| database | Database name |
| charset | Connection charset (default: 'UTF8_GENERAL_CI', note that the letters of the charset must be uppercase) |
| localAddress | This IP is used for TCP connections (optional) |
| socketPath | Connect to a Unix domain socket path; ignored when using host and port |
| timezone | Timezone (default: 'local') |
| connectTimeout | Connection timeout (default: unlimited; unit: milliseconds) |
| stringifyObjects | Whether to serialize objects |
| typeCast | Whether to convert column values to local JavaScript type values (default: true) |
| queryFormat | Custom query statement formatting method |
| supportBigNumbers | When the database supports bigint or decimal type columns, this option needs to be set to true (default: false) |
| bigNumberStrings | When supportBigNumbers and bigNumberStrings are enabled, force bigint or decimal columns to be returned as JavaScript string types (default: false) |
| dateStrings | Force timestamp, datetime, and date types to be returned as string types instead of JavaScript Date types (default: false) |
| debug | Enable debugging (default: false) |
| multipleStatements | Allow multiple MySQL statements in a single query (default: false) |
| flags | Used to modify connection flags |
| ssl | Use SSL parameters (same format as crypto.createCredenitals parameters) or a string containing an SSL configuration file name. Currently only Amazon RDS configuration files are bundled. |
For more details, see:https://github.com/mysqljs/mysql
Database Operations (CURD)
Before performing database operations, you need to import the Websites table SQL file provided on this sitewebsites.sqlinto your MySQL database.
The MySQL username tested in this tutorial is root, the password is 123456, and the database is test. You need to modify them according to your own configuration.
Query Data
After importing the SQL file we provided above into the database, execute the following code to query the data:
Query Data
Execute the following command; the output result is:
$ node test.js
--------------------------SELECT----------------------------
[ RowDataPacket {
    id: 1,
    name: 'Google',
    url: 'https://www.google.cm/',
    alexa: 1,
    country: 'USA' },
  RowDataPacket {
    id: 2,
    name: '淘宝',
    url: 'https://www.taobao.com/',
    alexa: 13,
    country: 'CN' },
  RowDataPacket {
    id: 3,
    name: 'Example',
    url: 'http://www.example.com/',
    alexa: 4689,
    country: 'CN' },
  RowDataPacket {
    id: 4,
    name: '微博',
    url: 'http://weibo.com/',
    alexa: 20,
    country: 'CN' },
  RowDataPacket {
    id: 5,
    name: 'Facebook',
    url: 'https://www.facebook.com/',
    alexa: 3,
    country: 'USA' } ]
------------------------------------------------------------
Insert Data
We can insert data into the data table websties:
Insert Data
Execute the following command; the output result is:
$ node test.js
--------------------------INSERT----------------------------
INSERT ID: OkPacket {
  fieldCount: 0,
  affectedRows: 1,
  insertId: 6,
  serverStatus: 2,
  warningCount: 0,
  message: '',
  protocol41: true,
  changedRows: 0 }
-----------------------------------------------------------------
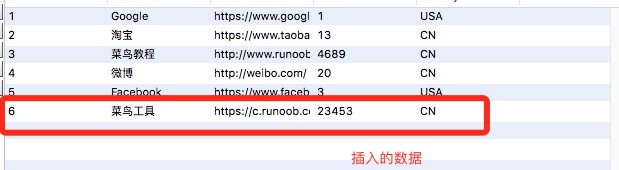
After successful execution, view the data table and you can see the added data:
Update Data
We can also modify the data in the database:
Update Data
Execute the following command; the output result is:
--------------------------UPDATE----------------------------
UPDATE affectedRows 1
-----------------------------------------------------------------
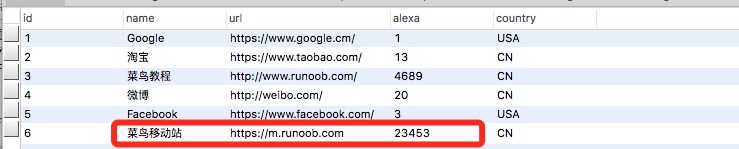
After successful execution, view the data table and you can see the updated data:
Delete Data
We can use the following code to delete the data with id 6:
Delete Data
Execute the following command; the output result is:
--------------------------DELETE----------------------------
DELETE affectedRows 1
-----------------------------------------------------------------
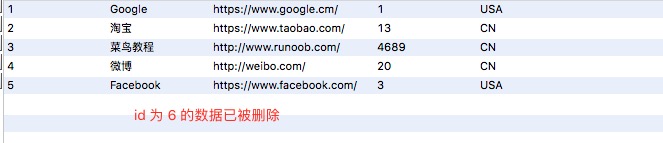
After successful execution, view the data table and you can see that the data with id=6 has been deleted: