Servlet Database Access
This tutorial assumes you already understand how JDBC applications work. Before you start learning Servlet database access, please visitJava MySQL Connectionto set up the relevant drivers and configuration.
Note:
You can download the jar package provided by this site:mysql-connector-java-5.1.39-bin.jar
In a Java project, you only need to import mysql-connector-java-5.1.39-bin.jar in Eclipse to run the Java project.
However, in an Eclipse web project, when executing Class.forName("com.mysql.jdbc.Driver");, the driver will not be looked up. So in this example, we need to copy mysql-connector-java-5.1.39-bin.jar to the lib directory under tomcat.
Starting from the basic concepts, let's create a simple table and create a few records in it.
Create Test Data
Next, we create the EXAMPLE database in MySQL, and create the websites data table. The table structure is as follows:
CREATE TABLE `websites` (
  `id` int(11) NOT NULL AUTO_INCREMENT,
  `name` char(20) NOT NULL DEFAULT '' COMMENT '站点名称',
  `url` varchar(255) NOT NULL DEFAULT '',
  `alexa` int(11) NOT NULL DEFAULT '0' COMMENT 'Alexa 排名',
  `country` char(10) NOT NULL DEFAULT '' COMMENT '国家',
  PRIMARY KEY (`id`)
) ENGINE=InnoDB AUTO_INCREMENT=10 DEFAULT CHARSET=utf8;
Insert some data:
INSERT INTO `websites` VALUES ('1', 'Google', 'https://www.google.cm/', '1', 'USA'), ('2', '淘宝', 'https://www.taobao.com/', '13', 'CN'), ('3', 'Example', 'http://www.example.com', '5892', ''), ('4', '微博', 'http://weibo.com/', '20', 'CN'), ('5', 'Facebook', 'https://www.facebook.com/', '3', 'USA');
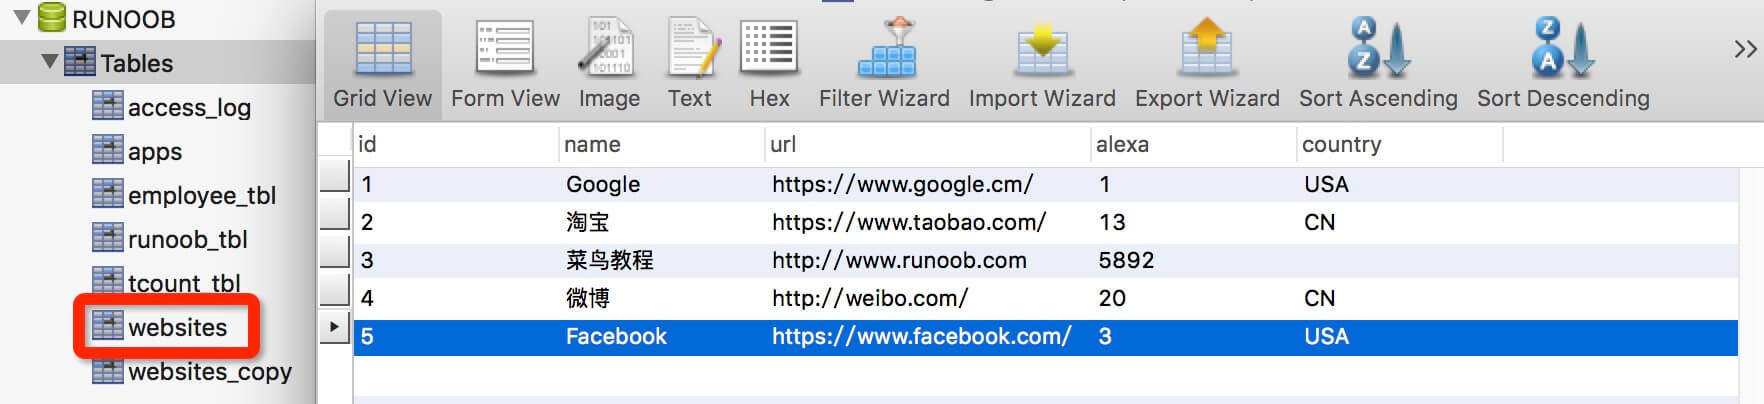
The data table is displayed as follows:
Access Database
The following example demonstrates how to use a Servlet to access the EXAMPLE database.
package com.example.test;

import java.io.IOException;
import java.io.PrintWriter;
import java.sql.*;

import javax.servlet.ServletException;
import javax.servlet.annotation.WebServlet;
import javax.servlet.http.HttpServlet;
import javax.servlet.http.HttpServletRequest;
import javax.servlet.http.HttpServletResponse;

/**
 * Servlet implementation class DatabaseAccess
 */
@WebServlet("/DatabaseAccess")
public class DatabaseAccess extends HttpServlet {
    private static final long serialVersionUID = 1L;
    // JDBC 驱动名及数据库 URL
    static final String JDBC_DRIVER = "com.mysql.jdbc.Driver";
    static final String DB_URL = "jdbc:mysql://localhost:3306/EXAMPLE";

    // 数据库的用户名与密码,需要根据自己的设置
    static final String USER = "root";
    static final String PASS = "123456";
    /**
     * @see HttpServlet#HttpServlet()
     */
    public DatabaseAccess() {
        super();
        // TODO Auto-generated constructor stub
    }

    /**
     * @see HttpServlet#doGet(HttpServletRequest request, HttpServletResponse response)
     */
    protected void doGet(HttpServletRequest request, HttpServletResponse response) throws ServletException, IOException {
        Connection conn = null;
        Statement stmt = null;
        // 设置响应内容类型
        response.setContentType("text/html;charset=UTF-8");
        PrintWriter out = response.getWriter();
        String title = "Servlet Mysql 测试 - Example";
        String docType = "<!DOCTYPE html>\n";
        out.println(docType +
        "<html>\n" +
        "<head><title>" + title + "</title></head>\n" +
        "<body bgcolor=\"#F0F0F0\">\n" +
        "<h1 align=\"center\">" + title + "</h1>\n");
        try{
            // 注册 JDBC 驱动器
            Class.forName("com.mysql.jdbc.Driver");

            // 打开一个连接
            conn = DriverManager.getConnection(DB_URL,USER,PASS);

            // 执行 SQL 查询
            stmt = conn.createStatement();
            String sql;
            sql = "SELECT id, name, url FROM websites";
            ResultSet rs = stmt.executeQuery(sql);

            // 展开结果集数据库
            while(rs.next()){
                // 通过字段检索
                int id  = rs.getInt("id");
                String name = rs.getString("name");
                String url = rs.getString("url");

                // 输出数据
                out.println("ID: " + id);
                out.println(", 站点名称: " + name);
                out.println(", 站点 URL: " + url);
                out.println("<br />");
            }
            out.println("</body></html>");

            // 完成后关闭
            rs.close();
            stmt.close();
            conn.close();
        } catch(SQLException se) {
            // 处理 JDBC 错误
            se.printStackTrace();
        } catch(Exception e) {
            // 处理 Class.forName 错误
            e.printStackTrace();
        }finally{
            // 最后是用于关闭资源的块
            try{
                if(stmt!=null)
                stmt.close();
            }catch(SQLException se2){
            }
            try{
                if(conn!=null)
                conn.close();
            }catch(SQLException se){
                se.printStackTrace();
            }
        }

    }

    /**
     * @see HttpServlet#doPost(HttpServletRequest request, HttpServletResponse response)
     */
    protected void doPost(HttpServletRequest request, HttpServletResponse response) throws ServletException, IOException {
        // TODO Auto-generated method stub
        doGet(request, response);
    }
}
Now let's compile the above Servlet and create the following entry in the web.xml file:
....
    <servlet>
        <servlet-name>DatabaseAccess</servlet-name>
        <servlet-class>com.example.test.DatabaseAccess</servlet-class>
    </servlet>
    <servlet-mapping>
        <servlet-name>DatabaseAccess</servlet-name>
        <url-pattern>/TomcatTest/DatabaseAccess</url-pattern>
    </servlet-mapping>
....
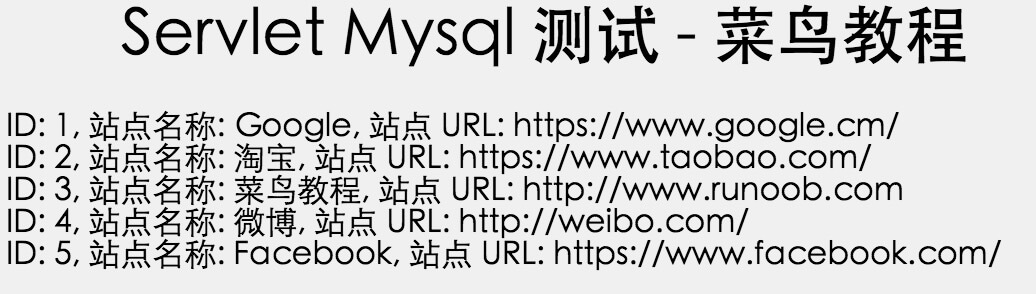
Now call this Servlet by entering the link: http://localhost:8080/TomcatTest/DatabaseAccess, and the following response will be displayed: