HTML5 WebSocket
WebSocket is a protocol that HTML5 began providing for full-duplex communication over a single TCP connection.
WebSocket makes data exchange between the client and server simpler, allowing the server to actively push data to the client. In the WebSocket API, the browser and server only need to complete one handshake, after which they can directly create a persistent connection and perform two-way data transmission.
In the WebSocket API, the browser and server only need to perform a handshake action, and then a fast channel is formed between the browser and server. The two can then directly transmit data to each other.
Nowadays, many websites use Ajax polling to implement push technology. Polling is when the browser sends HTTP requests to the server at specific time intervals (e.g., every 1 second), and the server then returns the latest data to the client's browser. This traditional model has obvious drawbacks: the browser needs to continuously send requests to the server. However, HTTP requests may contain long headers, and the truly valid data may only be a very small part, which clearly wastes a lot of bandwidth and other resources.
The WebSocket protocol defined by HTML5 can better save server resources and bandwidth, and can communicate more in real time.
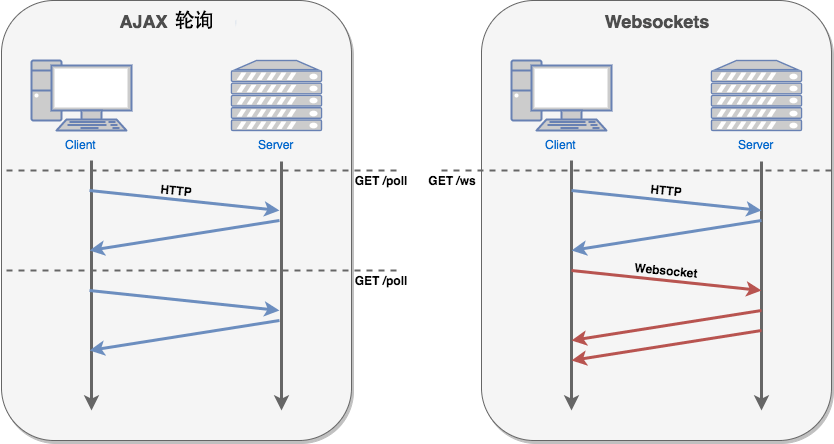
The browser sends a request to establish a WebSocket connection to the server via JavaScript. After the connection is established, the client and server can directly exchange data through the TCP connection.
When you obtain a WebSocket connection, you can use thesend()method to send data to the server, and use theonmessageevent to receive data returned by the server.
The following API is used to create a WebSocket object.
var Socket = new WebSocket(url, [protocol] );
In the above code, the first parameter url specifies the URL of the connection. The second parameter protocol is optional and specifies the acceptable sub-protocols.
WebSocket Properties
The following are the properties of the WebSocket object. Assume we created the Socket object using the above code:
| Property | Description |
|---|---|
| Socket.readyState | Read-only attributereadyStateIndicates the connection state, which can be the following values:
|
| Socket.bufferedAmount | Read-only attributebufferedAmountThe number of UTF-8 text bytes that have been placed in the queue waiting for transmission by send() but have not yet been sent. |
WebSocket Events
The following are the related events of the WebSocket object. Assume we created the Socket object using the above code:
| Event | Event handler | Description |
|---|---|---|
| open | Socket.onopen | Triggered when the connection is established |
| message | Socket.onmessage | Triggered when the client receives data from the server |
| error | Socket.onerror | Triggered when a communication error occurs |
| close | Socket.onclose | Triggered when the connection is closed |
WebSocket Methods
The following are the related methods of the WebSocket object. Assume we created the Socket object using the above code:
| Method | Description |
|---|---|
| Socket.send() | Send data using the connection |
| Socket.close() | Close the connection |
WebSocket Examples
The WebSocket protocol is essentially a TCP-based protocol.
To establish a WebSocket connection, the client browser first needs to initiate an HTTP request to the server. This request is different from a regular HTTP request and contains some additional header information. The additional header "Upgrade: WebSocket" indicates that this is an HTTP request applying for a protocol upgrade. The server parses this additional header information and generates a response message to return to the client. The WebSocket connection between the client and server is then established, and both parties can freely pass information through this connection channel. This connection will persist until either the client or the server actively closes the connection.
Client-side HTML and JavaScript
Currently, most browsers support the WebSocket() interface. You can try the example in the following browsers: Chrome, Mozilla, Opera, and Safari.
Contents of the example_websocket.html file
<!DOCTYPE HTML>
<html>
   <head>
   <meta charset="utf-8">
   <title>Example(example.com)</title>

      <script type="text/javascript">
         function WebSocketTest()
         {
            if ("WebSocket" in window)
            {
               alert("您的浏览器支持 WebSocket!");

               // 打开一个 web socket
               var ws = new WebSocket("ws://localhost:9998/echo");

               ws.onopen = function()
               {
                  // Web Socket 已连接上,使用 send() 方法发送数据
                  ws.send("发送数据");
                  alert("数据发送中...");
               };

               ws.onmessage = function (evt)
               {
                  var received_msg = evt.data;
                  alert("数据已接收...");
               };

               ws.onclose = function()
               {
                  // 关闭 websocket
                  alert("连接已关闭...");
               };
            }

            else
            {
               // 浏览器不支持 WebSocket
               alert("您的浏览器不支持 WebSocket!");
            }
         }
      </script>

   </head>
   <body>

      <div id="sse">
         <a href="WebSocketTest().html">运行 WebSocket</a>
      </div>

   </body>
</html>
Install pywebsocket
Before running the above program, we need to create a service that supports WebSocket. FrompywebsocketDownload mod_pywebsocket, or use the git command to download:
git clone https://github.com/googlearchive/pywebsocket
<p>
mod_pywebsocket  需要 python 环境支持</p>
mod_pywebsocket 是一个 Apache HTTP 的 Web Socket扩展,安装步骤如下:</p>

<ul>
<li><p>解压下载的文件。</p></li>
<li><p>进入 <b>pywebsocket</b> 目录。</p></li>
<li><p>执行命令:</p>
<pre>$ python setup.py build
$ sudo python setup.py install
View the documentation:
$ pydoc mod_pywebsocket
Start the service
Inpywebsocket/mod_pywebsocketExecute the following command in the directory:
$ sudo python standalone.py -p 9998 -w ../example/
The above command will start a service with port number 9998, using -w to set the directory where the handler echo_wsh.py is located.
Now we can open the previously created example_websocket.html file in the Chrome browser. If your browser supports WebSocket(), click "Run WebSocket" and you will see pop-up windows for each step of the entire process. Gif demonstration of the process:
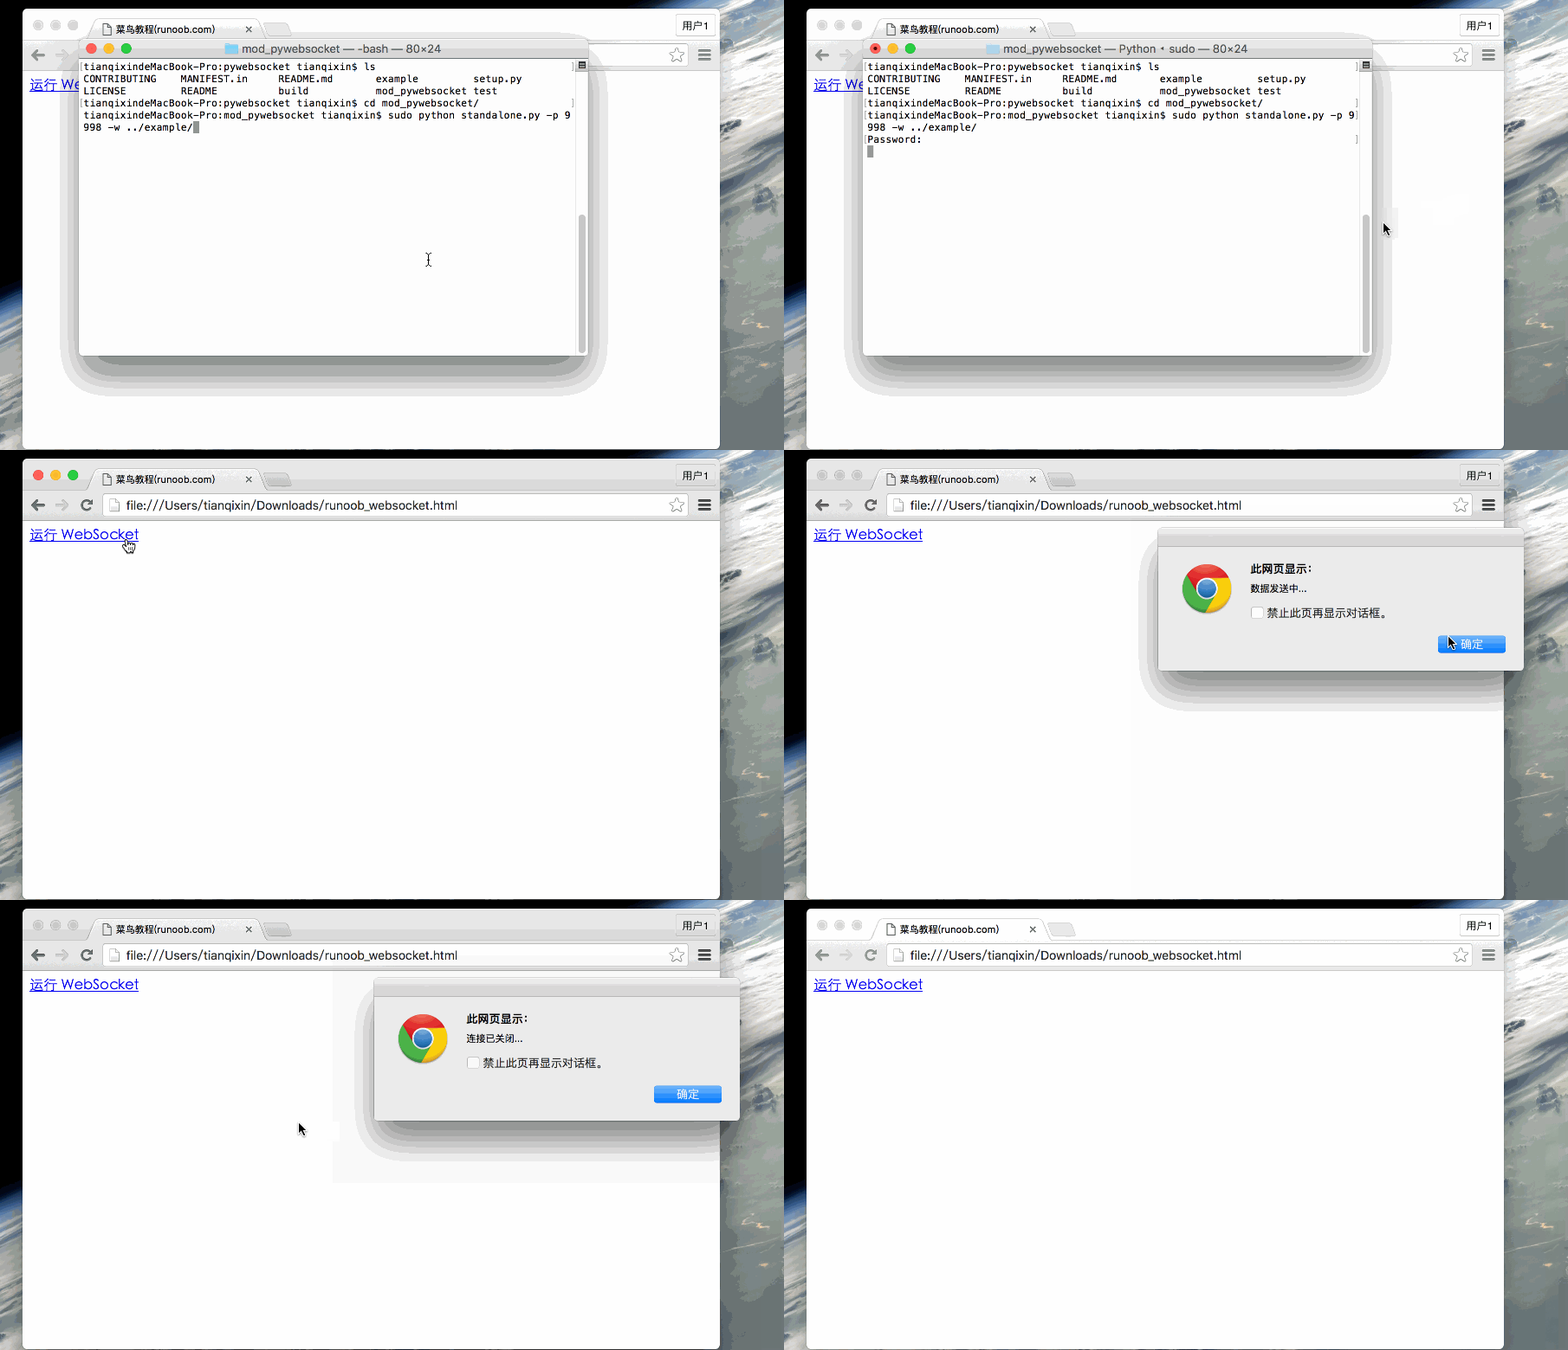
After we stop the service, "Connection closed..." will pop up.
Other extensions