MongoDB Sharding
Sharding
In MongoDB, there exists another type of cluster, namely sharding technology, which can meet the demands of massive growth in MongoDB data volume.
When MongoDB stores massive amounts of data, a single machine may be insufficient to store the data, and it may also be insufficient to provide acceptable read and write throughput. At this point, we can partition data across multiple machines so that the database system can store and process more data.
Why Use Sharding
- All write operations are copied to the primary node
- Latency-sensitive data will be queried on the primary node
- A single replica set is limited to 12 nodes
- Insufficient memory may occur when the request volume is huge.
- Insufficient local disk space
- Vertical scaling is expensive
MongoDB Sharding
The following diagram shows the structure distribution of a sharded cluster in MongoDB:
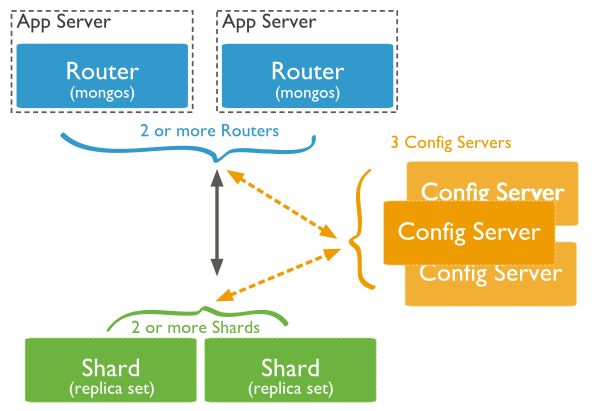
The diagram above mainly includes the following three main components:
-
Shard:
Used to store actual data blocks. In a real production environment, the role of a shard server can be undertaken by a replica set consisting of several machines to prevent single point of failure of the host.
-
Config Server:
A mongod instance that stores the entire ClusterMetadata, including chunk information.
-
Query Routers:
A front-end router through which clients connect, making the entire cluster look like a single database. Front-end applications can use it transparently.
Sharding Example
The port distribution of the sharding structure is as follows:
Shard Server 1:27020
Shard Server 2:27021
Shard Server 3:27022
Shard Server 4:27023
Config Server :27100
Route Process:40000
Step 1: Start the Shard Server
[root@100 /]# mkdir -p /www/mongoDB/shard/s0
[root@100 /]# mkdir -p /www/mongoDB/shard/s1
[root@100 /]# mkdir -p /www/mongoDB/shard/s2
[root@100 /]# mkdir -p /www/mongoDB/shard/s3
[root@100 /]# mkdir -p /www/mongoDB/shard/log
[root@100 /]# /usr/local/mongoDB/bin/mongod --port 27020 --dbpath=/www/mongoDB/shard/s0 --logpath=/www/mongoDB/shard/log/s0.log --logappend --fork
....
[root@100 /]# /usr/local/mongoDB/bin/mongod --port 27023 --dbpath=/www/mongoDB/shard/s3 --logpath=/www/mongoDB/shard/log/s3.log --logappend --fork
Step 2: Start the Config Server
[root@100 /]# mkdir -p /www/mongoDB/shard/config
[root@100 /]# /usr/local/mongoDB/bin/mongod --port 27100 --dbpath=/www/mongoDB/shard/config --logpath=/www/mongoDB/shard/log/config.log --logappend --fork
Note:Here we can start it just like starting a normal mongodb service, without adding the --shardsvr and --configsvr parameters. Since the function of these two parameters is to change the startup port, we can simply specify the port ourselves.
Step 3: Start the Route Process
/usr/local/mongoDB/bin/mongos --port 40000 --configdb localhost:27100 --fork --logpath=/www/mongoDB/shard/log/route.log --chunkSize 500
Among the mongos startup parameters, the chunkSize item is used to specify the size of chunks, in MB, with a default size of 200MB.
Step 4: Configure Sharding
Next, we use MongoDB Shell to log in to mongos and add Shard nodes.
[root@100 shard]# /usr/local/mongoDB/bin/mongo admin --port 40000
MongoDB shell version: 2.0.7
connecting to: 127.0.0.1:40000/admin
mongos> db.runCommand({ addshard:"localhost:27020" })
{ "shardAdded" : "shard0000", "ok" : 1 }
......
mongos> db.runCommand({ addshard:"localhost:27029" })
{ "shardAdded" : "shard0009", "ok" : 1 }
mongos> db.runCommand({ enablesharding:"test" }) #设置分片存储的数据库
{ "ok" : 1 }
mongos> db.runCommand({ shardcollection: "test.log", key: { id:1,time:1}})
{ "collectionsharded" : "test.log", "ok" : 1 }
Step 5: No major changes are required in the program code. Just connect the database to port 40000 in the same way you would connect to an ordinary mongo database.
Other Extensions