Keywords: defparam, parameter, instantiation, ram
When a module is instantiated by another module, the higher-level module can override the parameter values of the lower-level module. This allows different parameters to be passed to multiple modules with the same name at compile time, without having to create new files for modules that differ only in parameters.
There are 2 ways to override parameters: 1) using the keyword defparam, 2) module instantiation with parameter values.
defparam Statement
The keyword defparam can be used to override the parameter values of lower-level modules through hierarchical module references.
For example, override the MASK parameter of a single-port RAM module whose address and data lines are both 4 bits wide:
Example
defparam u_ram_4x4.MASK = 7 ;
ram_4x4 u_ram_4x4
(
.CLK (clk),
.A (a[4-1:0]),
.D (d),
.EN (en),
.WR (wr), //1 for write and 0 for read
.Q (q) );
The ram_4x4 model is as follows:
Example
(
input CLK ,
input [4-1:0] A ,
input [4-1:0] D ,
input EN ,
input WR , //1 for write and 0 for read
output reg [4-1:0] Q );
parameter MASK = 3 ;
reg [4-1:0] mem [0:(1<<4)-1] ;
always @(posedge CLK) begin
if (EN && WR) begin
mem[A] <= D & MASK;
end
else if (EN && !WR) begin
Q <= mem[A] & MASK;
end
end
endmodule
Perform a simple simulation on this, and the testbench is written as follows:
Example
module test ;
parameter AW = 4 ;
parameter DW = 4 ;
reg clk ;
reg [AW:0] a ;
reg [DW-1:0] d ;
reg en ;
reg wr ;
wire [DW-1:0] q ;
//clock generating
always begin
#15 ; clk = 0 ;
#15 ; clk = 1 ;
end
initial begin
a = 10 ;
d = 2 ;
en = 'b0 ;
wr = 'b0 ;
repeat(10) begin
@(negedge clk) ;
en = 1'b1;
a = a + 1 ;
wr = 1'b1 ; //write command
d = d + 1 ;
end
a = 10 ;
repeat(10) begin
@(negedge clk) ;
a = a + 1 ;
wr = 1'b0 ; //read command
end
end // initial begin
//instantiation
defparam u_ram_4x4.MASK = 7 ;
ram_4x4 u_ram_4x4
(
.CLK (clk),
.A (a[AW-1:0]),
.D (d),
.EN (en),
.WR (wr), //1 for write and 0 for read
.Q (q)
);
//stop simulation
initial begin
forever begin
#100;
if ($time >= 1000) $finish ;
end
end
endmodule // test
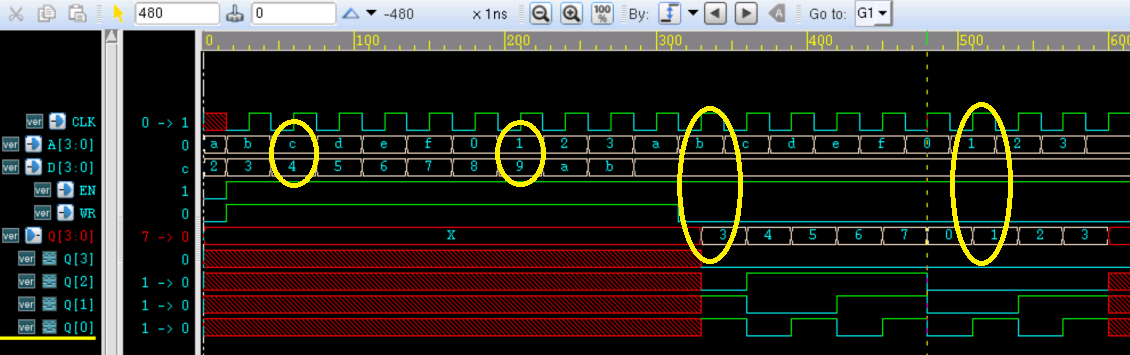
The simulation results are as follows:
In the yellow part of the figure, when the address is c for the first time, data 4 is written; when the address is c for the second time, data 4 is read out. It can be seen that the RAM behaves correctly at this time, and MASK is not 3, because bit2 of the RAM's Q output is not masked.
When the address is 1 for the first time, data 9 is written; when the address is 1 for the second time, the read data is 1, because at this time MASK is 7, and bit3 of the RAM's Q output signal is masked. From this, it can be seen that the MASK parameter has been correctly overridden.
Parameterized Module Instantiation
The second method is to write the new parameter values into the module instantiation statement when instantiating the module, thereby overriding the original module's parameter values.
For example, perform parameterized module instantiation on a RAM module with variable address and data widths:
Example
u_ram
(
.CLK (clk),
.A (a[AW-1:0]),
.D (d),
.EN (en),
.WR (wr), //1 for write and 0 for read
.Q (q)
);
The RAM model is as follows:
Example
#( parameter AW = 2 ,
parameter DW = 3 )
(
input CLK ,
input [AW-1:0] A ,
input [DW-1:0] D ,
input EN ,
input WR , //1 for write and 0 for read
output reg [DW-1:0] Q
);
reg [DW-1:0] mem [0:(1<<AW)-1] ;
always @(posedge CLK) begin
if (EN && WR) begin
mem[A] <= D ;
end
else if (EN && !WR) begin
Q <= mem[A] ;
end
end
endmodule
In simulation, simply replace the instantiated module u_ram_4x4 with this instantiated module u_ram in the previous testbench, or add it again.
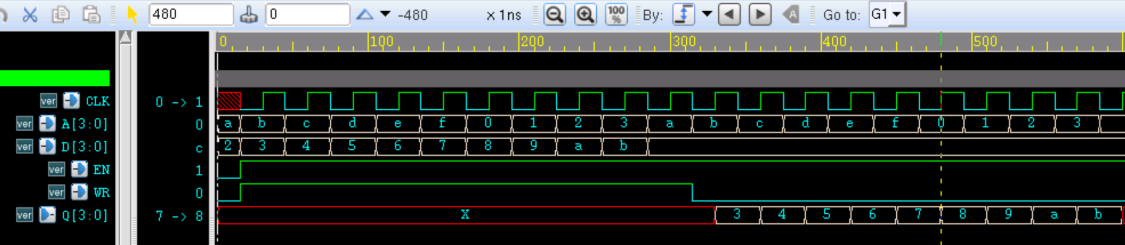
The simulation results are as follows. As can be seen from the figure, the parameters AW and DW of the RAM module have both been overridden to 4, and the RAM behaves correctly.
Differences and Suggestions
(1) Just like module port instantiation, when doing parameterized instantiation, you can also perform parameter instantiation in order without specifying the original parameter names. For example, the instantiation of u_ram can be described as:
ram #(4, 4) u_ram (......) ;
(2) Of course, defparam can also be used to override parameters declared in the module port declaration, and parameterized instantiation can also override parameters declared in the module body. For example, the instantiations of u_ram and u_ram_4x4 can be described as:
Example
defparam u_ram.DW = 4 ;
ram u_ram(......);
ram_4x4 #(.MASK(7)) u_ram_4x4(......);
(3) Can these two module parameter override methods be mixed? Of course! The premise is that all parameters must either be declared in the module port declaration or in the module body. For example, the declaration of u_ram can also be expressed as (the parameters in the module body can be verified by your own experiments):
Example
ram #(.DW(4)) u_ram (......); // Only someone as bored as me would experiment with this writing style
(4) What if a module has both parameters declared in the module port declaration and parameters declared in the module body? Can these two types of parameters be overridden at the same time? For example, add the MASK parameter to the RAM module, and the model is as follows:
Example
#( parameter AW = 2 ,
parameter DW = 3 )
(
input CLK ,
input [AW-1:0] A ,
input [DW-1:0] D ,
input EN ,
input WR , //1 for write and 0 for read
output reg [DW-1:0] Q );
parameter MASK = 3 ;
reg [DW-1:0] mem [0:(1<<AW)-1] ;
always @(posedge CLK) begin
if (EN && WR) begin
mem[A] <= D ;
end
else if (EN && !WR) begin
Q <= mem[A] ;
end
end
endmodule
At this point, using defparam to override the MASK parameter value causes a compilation Error:
Example
defparam u_ram.AW = 4 ;
defparam u_ram.DW = 4 ;
defparam u_ram.MASK = 7 ;
ram u_ram (......);
// Overriding a parameter in the module body with defparam will also report an Error
defparam u_ram.MASK = 7 ;
ram #(.AW(4), .DW(4)) u_ram (......);
Here comes the key point!!! If you use the parameterized module instantiation method to override the value of parameter MASK, compilation will not report an error, and MASK will be successfully overridden!
ram #(.AW(4), .DW(4), .MASK(7)) u_ram (......);
A possible explanation is that, from the compiler's perspective, if there are parameters in the module port declaration, the parameters in the body are treated as localparam type, and using defparam cannot override the parameters declared in the module body.
It may also be related to the compiler; you can experiment on other compilers as well.
(5) It is recommended not to use the defparam method when instantiating an existing module and overriding its related parameters. In addition to the above disadvantages, defparam is generally not synthesizable.
(6) Also, it is recommended that when writing a module, if you know in advance that it will be instantiated and there are parameters to be overridden, write these parameters before the module port declaration (using the keyword hash#to indicate).
Source Code Download
Download
Stage Summary
Actually, after this introduction, you can fully use the Verilog language knowledge learned earlier to build a small thatched hut of hardware circuits. Yes, a small thatched hut. Because of the special nature of hardware description languages corresponding to actual hardware circuits, when building various models with Verilog, you must consider what the actually generated circuit looks like and whether it meets practical requirements. Sometimes RTL simulation can pass, but the actual circuit generated in the end may work abnormally.
Therefore, to add bricks and tiles to your small thatched hut, you still need to learn the advanced part. Of course, the advanced part can only turn your small thatched hut into a sturdy brick house that can withstand wind and snow, but it may still collapse if an earthquake strikes.
If you want to strengthen your brick house and build a villa, then you need to learn more Verilog advanced topics, such as PLI (Programming Language Interface), UDP (User Defined Primitives), timing constraints and timing analysis, etc. You also need to participate in more project engineering to accumulate experience, and pay special attention to some design techniques such as low-power design, asynchronous design, etc. Of course, learning to use SystemVerilog for comprehensive verification will add another layer of protection to your building.
But if you want to finish learning all knowledge of digital circuits and Verilog to build a shellproof presidential palace, that is really beyond our ability to help. Because the sea of learning has no end, and there is no shore to turn back to.
Due to space limitations, only the advanced part is introduced here. If there is a chance, the advanced topics and technique topics will also be added.