Pi Agent Authentication and Model Configuration
Pi Agent supports two authentication methods: subscription login and API Key. This chapter details how to configure Pi Agent to connect to AI models.
Authentication Methods Overview
| Authentication Method | How to Use | Applicable Scenario |
|---|---|---|
| Subscription Login (OAuth) | Run /login after starting pi | Already have Claude Pro/Max, ChatGPT Plus/Pro, GitHub Copilot, etc. subscriptions |
| API Key Environment Variable | Set environment variable then start pi | Have an API Key and want to persist it in shell configuration |
| API Key Credential File | Select API Key provider for storage via /login | Have an API Key and want Pi Agent to manage it centrally |
Method 1: Subscription Login (Recommended)
If you already subscribe to Claude Pro/Max, ChatGPT Plus/Pro, or GitHub Copilot, this is the most convenient method.
After starting Pi Agent, enter the following command:
/login
Then select your subscription provider from the menu that appears:
| Provider | Requirement | Description |
|---|---|---|
| Claude Pro/Max | Anthropic subscription account | Billed for extra usage, does not count against plan quota |
| ChatGPT Plus/Pro (Codex) | OpenAI Plus or Pro subscription | OpenAI officially recognized Codex for OSS |
| GitHub Copilot | GitHub Copilot subscription | Supports github.com and enterprise servers |
| xAI (Grok) | X Premium subscription | Uses Grok model |
| OpenRouter | OpenRouter account | OAuth creates API Key, deducted from balance |
In Claude Pro/Max subscription authentication mode, Pi Agent uses extra usage, billed per token, and does not count against your Claude plan quota. You can check it inClaude usage settings.
After completing login, credentials are stored in~/.pi/agent/auth.json, and Pi Agent will automatically use them on subsequent startups.
To log out, use:
/logout
Method 2: API Key Environment Variable
If you have an API Key, you can set the environment variable before starting Pi Agent:
# 设置 Anthropic API Key
export ANTHROPIC_API_KEY=sk-ant-api03-your-key-here

# 启动 Pi Agent
pi
Pi Agent supports API Key environment variables for the following major providers:
| Provider | Environment Variable | auth.json Key Name |
|---|---|---|
| Anthropic | ANTHROPIC_API_KEY | anthropic |
| OpenAI | OPENAI_API_KEY | openai |
| Google Gemini | GEMINI_API_KEY | |
| DeepSeek | DEEPSEEK_API_KEY | deepseek |
| Groq | GROQ_API_KEY | groq |
| Mistral | MISTRAL_API_KEY | mistral |
| xAI | XAI_API_KEY | xai |
| OpenRouter | OPENROUTER_API_KEY | openrouter |
Configure DeepSeek Provider
Pi supports custom providers through models.json. The configuration file location:
- Linux / macOS:~/.pi/agent/models.json
- Windows:%USERPROFILE%\.pi\agent\models.json
First, get an API Key from the DeepSeek Open Platform:https://platform.deepseek.com/api_keys。
{
  "providers": {
    "deepseek": {
      "baseUrl": "https://api.deepseek.com",
      "api": "openai-completions",
      "apiKey": "$DEEPSEEK_API_KEY",
      "models": [
        {
          "id": "deepseek-v4-pro",
          "name": "DeepSeek V4 Pro",
          "contextWindow": 1000000,
          "maxTokens": 384000,
          "input": ["text"],
          "reasoning": true,
          "cost": {
            "input": 1.74,
            "output": 3.48,
            "cacheRead": 0.145,
            "cacheWrite": 0
          },
          "compat": {
            "requiresReasoningContentOnAssistantMessages": true,
            "thinkingFormat": "deepseek",
            "reasoningEffortMap": {
              "minimal": "high",
              "low": "high",
              "medium": "high",
              "high": "high",
              "xhigh": "max"
            }
          }
        },
        {
          "id": "deepseek-v4-flash",
          "name": "DeepSeek V4 Flash",
          "contextWindow": 1000000,
          "maxTokens": 384000,
          "input": ["text"],
          "reasoning": true,
          "cost": {
            "input": 0.14,
            "output": 0.28,
            "cacheRead": 0.028,
            "cacheWrite": 0
          },
          "compat": {
            "requiresReasoningContentOnAssistantMessages": true,
            "thinkingFormat": "deepseek",
            "reasoningEffortMap": {
              "minimal": "high",
              "low": "high",
              "medium": "high",
              "high": "high",
              "xhigh": "max"
            }
          }
        }
      ]
    }
  }
}
Set the environment variable:
Linux / Mac users:
export DEEPSEEK_API_KEY="<你的 DeepSeek API Key>"
Windows users:
$env:DEEPSEEK_API_KEY="<你的 DeepSeek API Key>"
Enter the project directory and run the pi command:
cd /path/to/my-project
pi
If you don't want to manually set the environment variable each time, you can write the export command into your shell configuration file (such as ~/.zshrc or ~/.bashrc) to make it permanent.
Method 3: API Key Credential File
You can also use the /login command to select an API Key provider to store credentials.
The storage location is~/.pi/agent/auth.json, with the following format:
{
  "anthropic": { "type": "api_key", "key": "sk-ant-api03-your-key" },
  "openai": { "type": "api_key", "key": "sk-your-openai-key" },
  "deepseek": { "type": "api_key", "key": "sk-your-deepseek-key" }
}
The credential file is automatically set to0600permissions (readable and writable only by the user), providing a basic level of security.
Credential Resolution Order
When Pi Agent needs to obtain an API Key, it searches in the following priority order:
- CLI parameter --api-key (highest priority)
- Credentials in the auth.json file
- Environment variables
- Key from custom provider in models.json
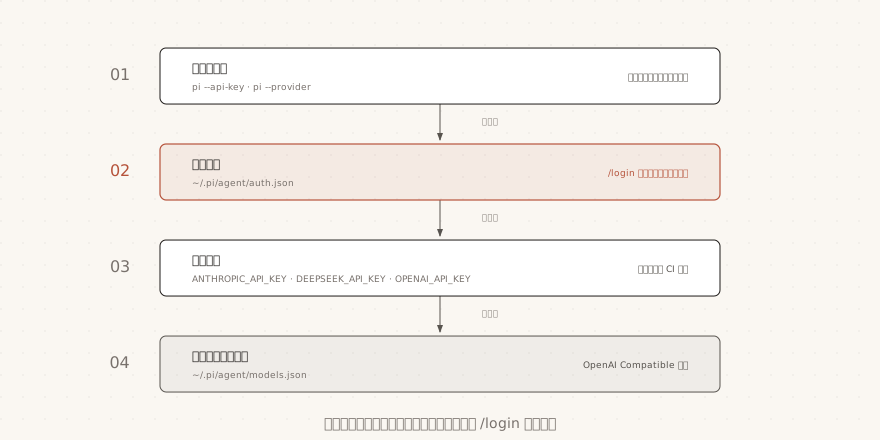
In other words, if you set both an environment variable and auth.json, the value in auth.json takes precedence.
auth.json Advanced Features
auth.json not only supports storing plaintext keys, but also supports the following advanced usage:
Get Key from Command Line
Use the!prefix to execute a command to get the Key, suitable for reading from a password manager:
{
  "anthropic": {
    "type": "api_key",
    "key": "!security find-generic-password -ws 'anthropic-api-key'"
  },
  "openai": {
    "type": "api_key",
    "key": "!op read 'op://vault/item/credential'"
  }
}
The example above shows how to get the Key from macOS Keychain and 1Password CLI.
Environment Variable Interpolation
Use the$prefix to reference environment variables:
{
  "anthropic": {
    "type": "api_key",
    "key": "$MY_ANTHROPIC_KEY"
  }
}
Switching Models
After configuring authentication, you can switch the AI model being used at any time:
In interactive mode, use the/modelcommand or pressCtrl+Lto open the model selector.
UseCtrl+P / Shift+Ctrl+Pto cycle through configured models.
Specify the model from the command line:
# 指定提供商和模型
$ pi --provider anthropic --model claude-sonnet-4-20250514

# 使用 provider/model 格式
$ pi --model openai/gpt-4o "帮我重构这段代码"

# 指定推理等级(thinking level)
$ pi --model sonnet:high "解决这个复杂问题"
Thinking Level controls how deeply the model thinks before answering. Levels range from off to max. Deeper thinking may produce higher quality answers, but consumes more tokens.
| Thinking Level | Description | Applicable Scenario |
|---|---|---|
| off | Does not show reasoning process | Simple Q&A, code formatting |
| minimal | Minimal reasoning | Basic coding tasks |
| low | Low reasoning | General programming problems |
| medium | Medium reasoning (default recommended) | Daily development tasks |
| high | High reasoning | Complex architecture design, debugging |
| xhigh | Extra high reasoning | Difficult algorithm problems |
| max | Maximum reasoning | Extremely complex logic analysis |
The editor border color changes with the thinking level, allowing you to intuitively see the current reasoning depth.
Other Extensions