Eclipse JSP/Servlet Environment Setup
This article assumes you already have the JDK environment installed. If not, please refer toJava Development Environment Configuration。
We can use Eclipse to set up a JSP development environment. First, let's download the software packages separately:
- Eclipse J2EE:http://www.eclipse.org/downloads/
- Tomcat:http://tomcat.apache.org/download-70.cgi
Download and Install Tomcat
You can download the corresponding package according to your system (Windows system is used as an example below):
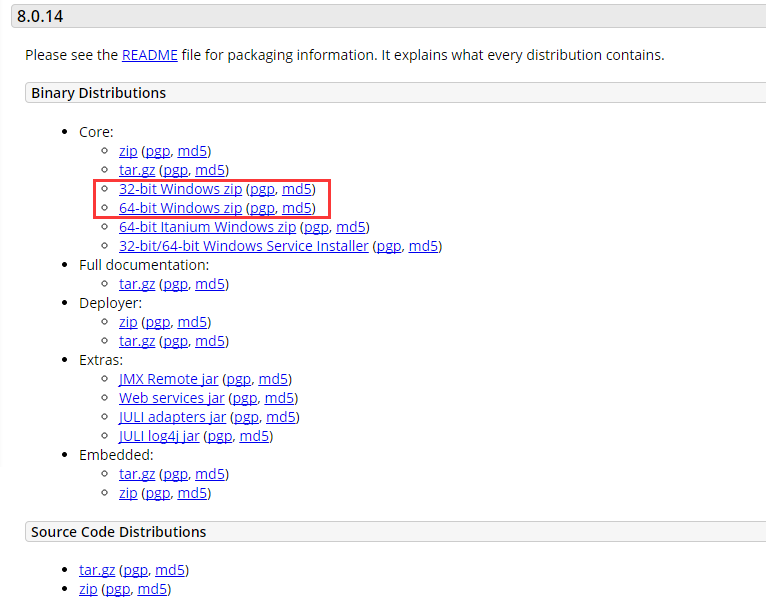
After downloading, extract the compressed package to the D drive (you can choose for yourself):
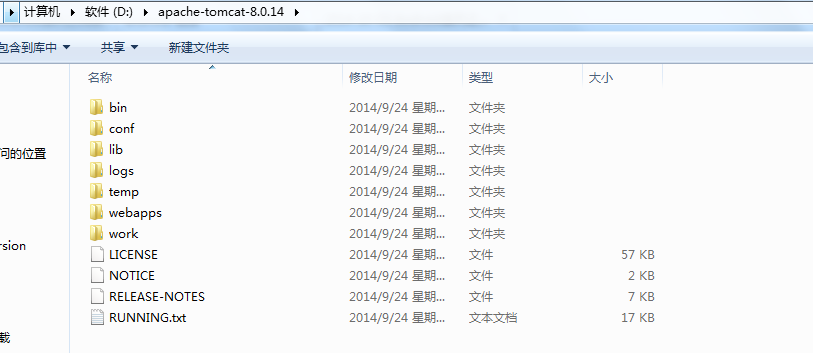
Note that the directory name cannot contain Chinese characters or spaces. The directory introduction is as follows:
- bin: Binary executable files. The most commonly used file inside isstartup.bat, and if it is a Linux or Mac system, the startup file isstartup.sh。
- conf: Configuration directory. The most core file inside isserver.xml. You can change the port number etc. inside. The default port number is 8080, that is, this port number cannot be occupied by other applications.
- lib: Library files. The directory where the jar packages required by Tomcat at runtime are located
- logs: Logs
- temp: Temporarily generated files, i.e., cache
- webapps: Web applications.Web applications placed in this directory can be directly accessed by the browser
- work: Compiled class files.
Then we can double-click startup.bat to start Tomcat, and the following interface will pop up:
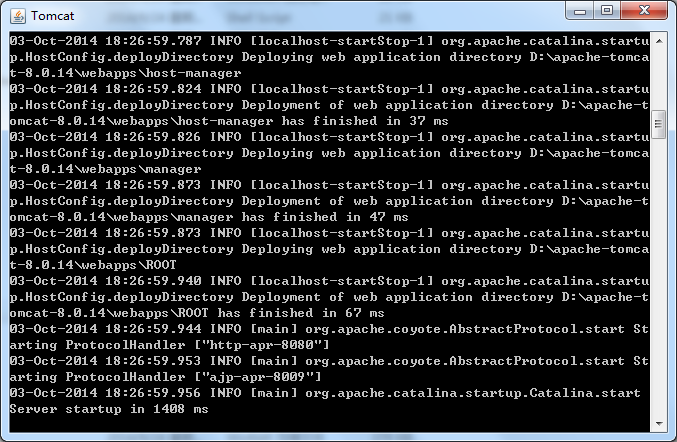
At this point, the local server has been set up. If you want to close the server, you can directly close the above window, or enter Ctrl+C inside it to stop the service.
Then we enter in the browserhttp://localhost:8080/, if the following interface pops up, it means Tomcat was installed successfully and started:
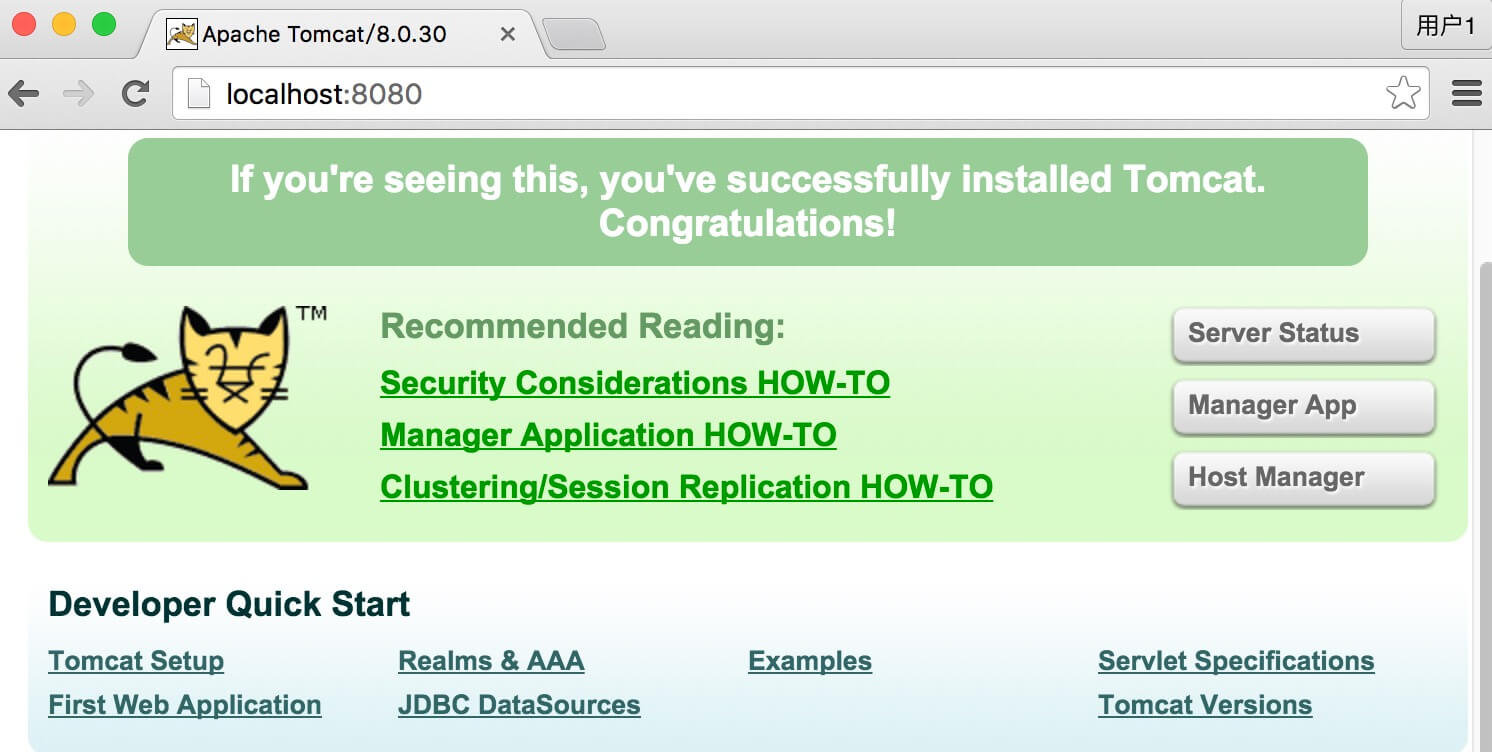
Let's test it in the browser now:
First, create a JSP file in the D:\apache-tomcat-8.0.14\webapps\ROOT directory:
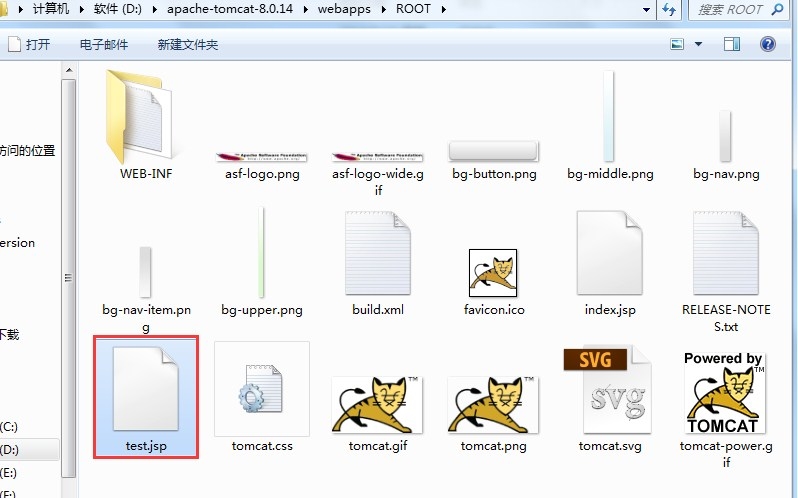
The code of test.jsp file is as follows:
<%@ page contentType="text/html;charset=UTF-8" %>
<%
out.print("Example : http://www.example.com");
%>
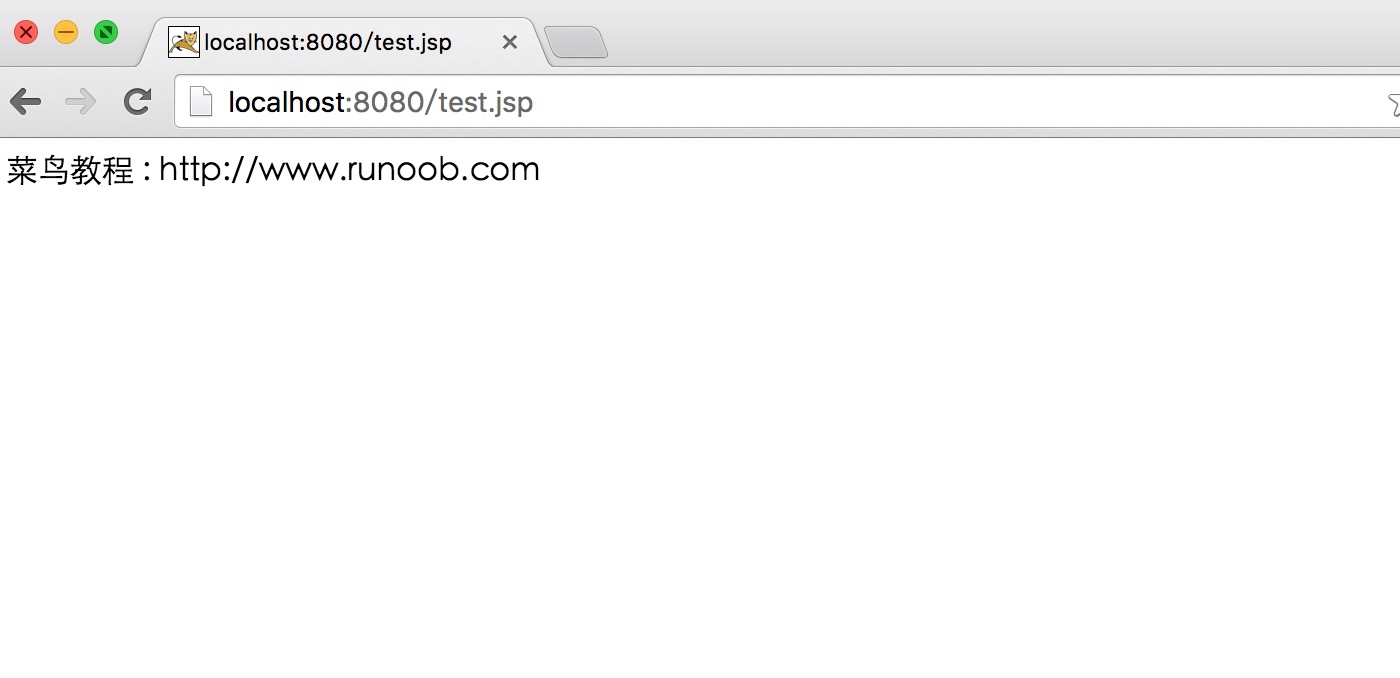
Then visit the address in the browserhttp://localhost:8080/test.jsp, the output result is as follows:
Associate Tomcat with Eclipse
After downloading Eclipse J2EE, extract it and it can be used. We open Java EE, select the menu bar Windows --> preferences (for Mac systems it is Eclipse --> Preferences), and the following interface pops up:
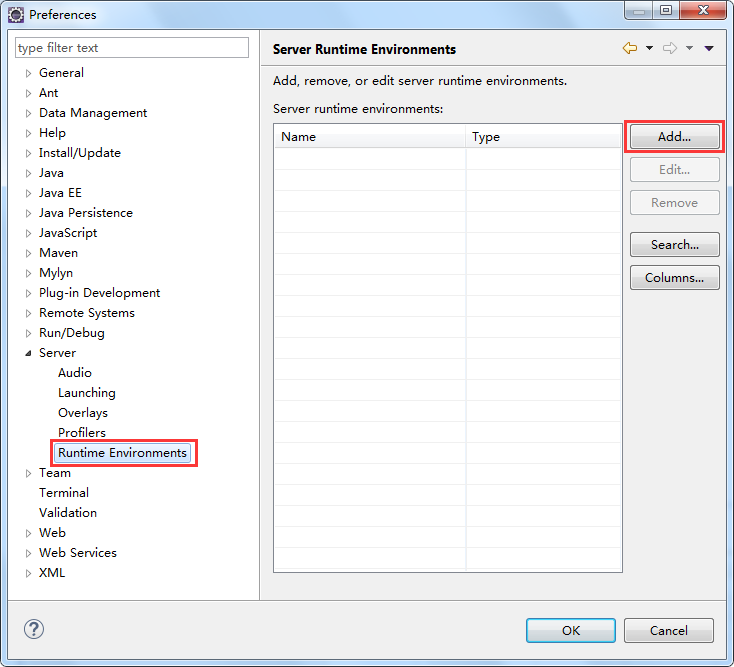
In the above figure, click the "add" button, and the following interface pops up:
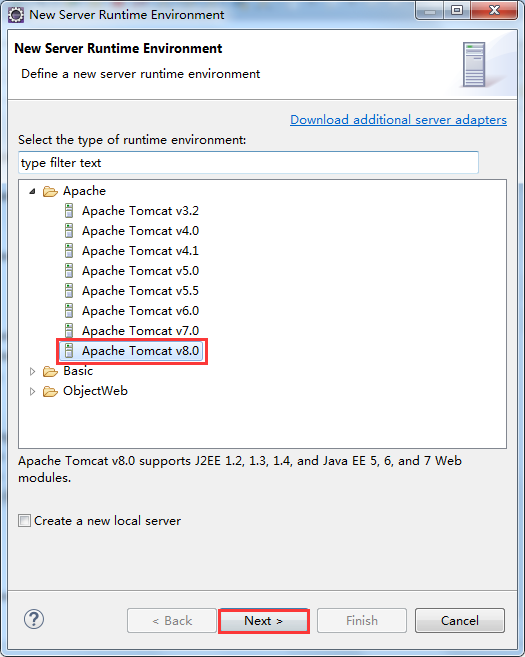
In the options, we select the corresponding Tomcat version, then click "Next", select Tomcat's installation directory, and select the Java environment we installed:
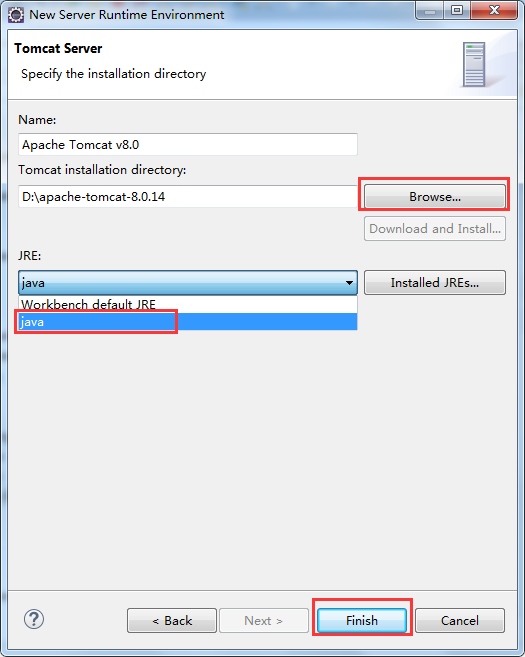
Click "Finish" to complete the configuration.
Create an Example
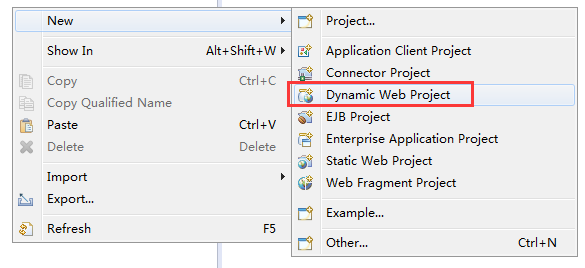
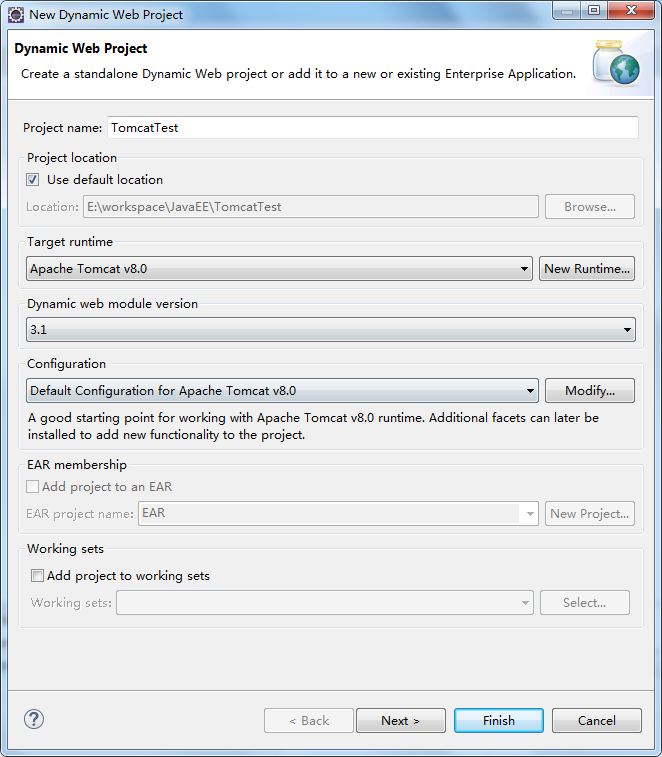
Select "File --> New --> Dynamic Web Project" to create the TomcatTest project:
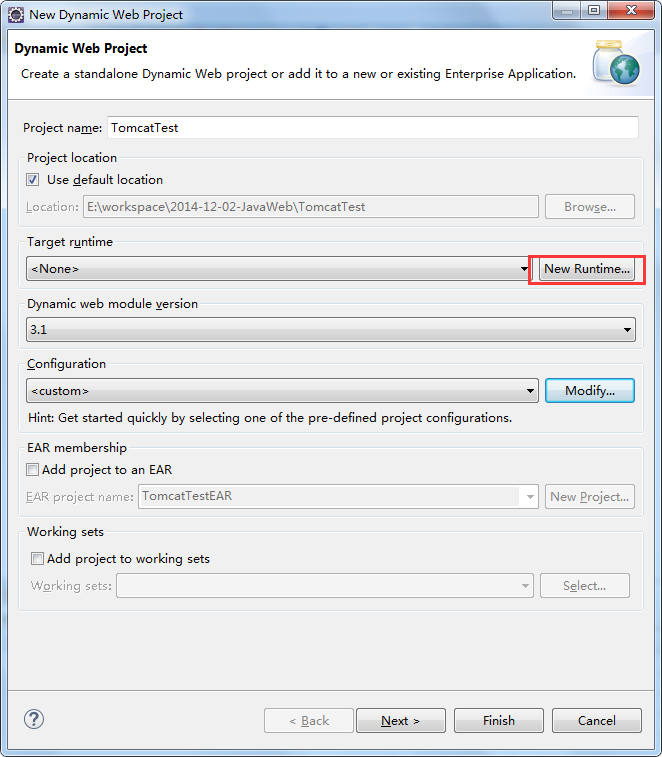
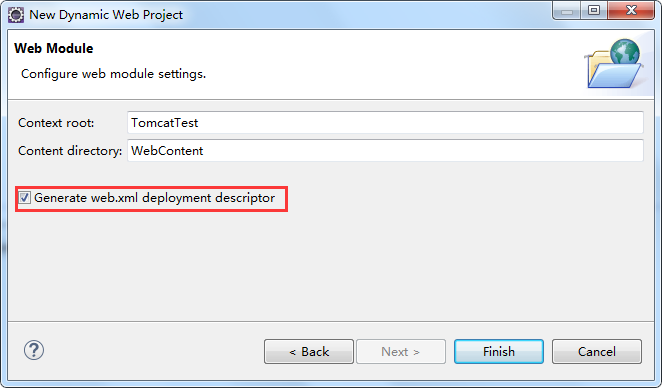
Click the red box part in the above figure, and the following interface pops up:
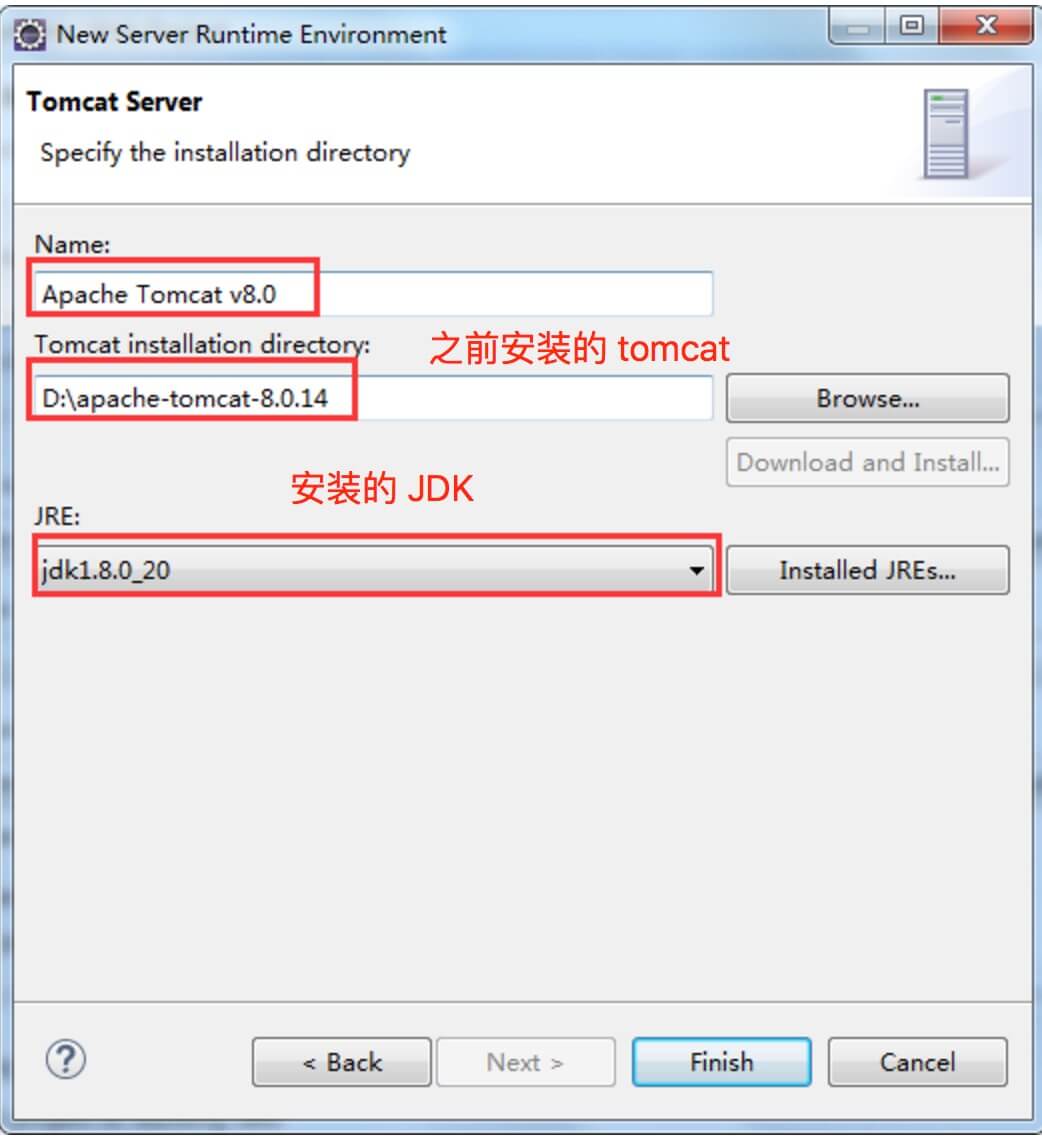
Note: If the Tomcat and JDK we installed earlier are already selected by default, you can skip this step.
Then, click Finish and continue:
Project file structure:
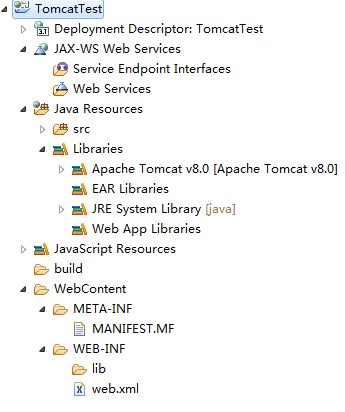
Explanation of each directory in the above figure:
- deployment descriptor: Description of deployment.
- Web App Libraries: The packages you add yourself can be placed here.
- build: Put the compiled files here.
- WebContent: Put the written pages in it.
Create a new test.jsp file under the WebContent folder. You can see its default code in the figure below:
<%@ page language="java" contentType="text/html; charset=UTF-8"
    pageEncoding="UTF-8"%>
<!DOCTYPE html PUBLIC "-//W3C//DTD HTML 4.01 Transitional//EN" "http://www.w3.org/TR/html4/loose.dtd">
<html>
<head>
<meta http-equiv="Content-Type" content="text/html; charset=UTF-8">
<title>Insert title here</title>
</head>
<body>

</body>
</html>
Next, we modify the code of the test.jsp file as shown below:
<%@ page language="java" contentType="text/html; charset=UTF-8"
    pageEncoding="UTF-8"%>
<!DOCTYPE html PUBLIC "-//W3C//DTD HTML 4.01 Transitional//EN" "http://www.w3.org/TR/html4/loose.dtd">
<html>
<head>
<meta http-equiv="Content-Type" content="text/html; charset=UTF-8">
<title>Example</title>
</head>
<body>
<%
    out.println("Hello World!");
%>
</body>
</html>
Before running the program, let's first modify the browser options:
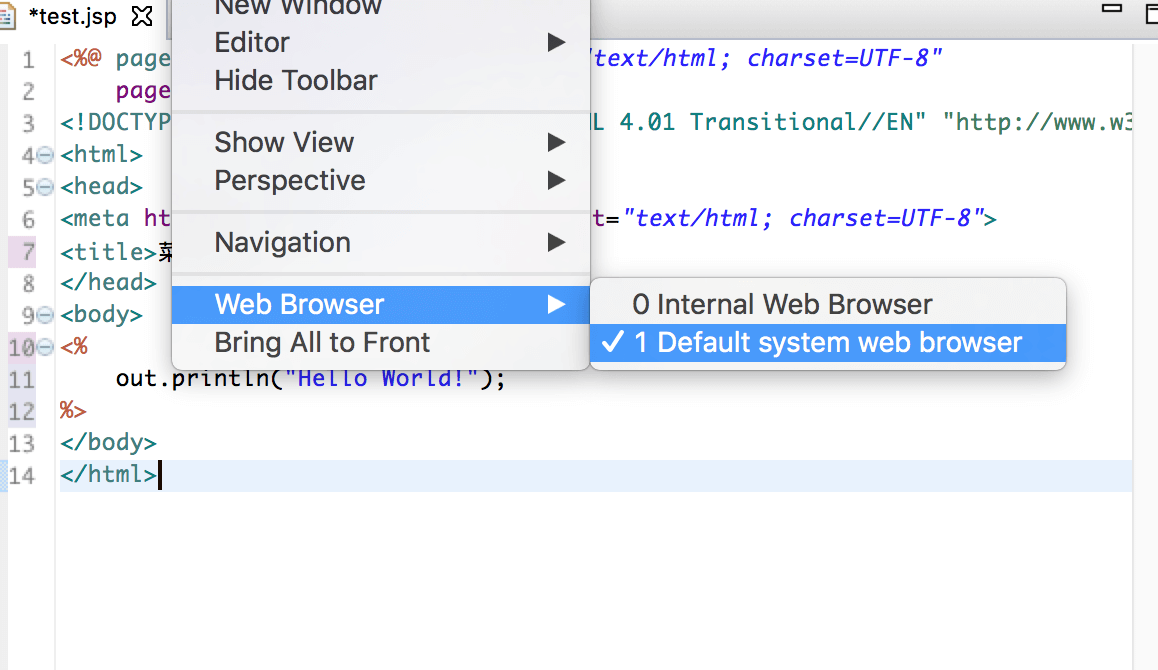
Then we run the project:
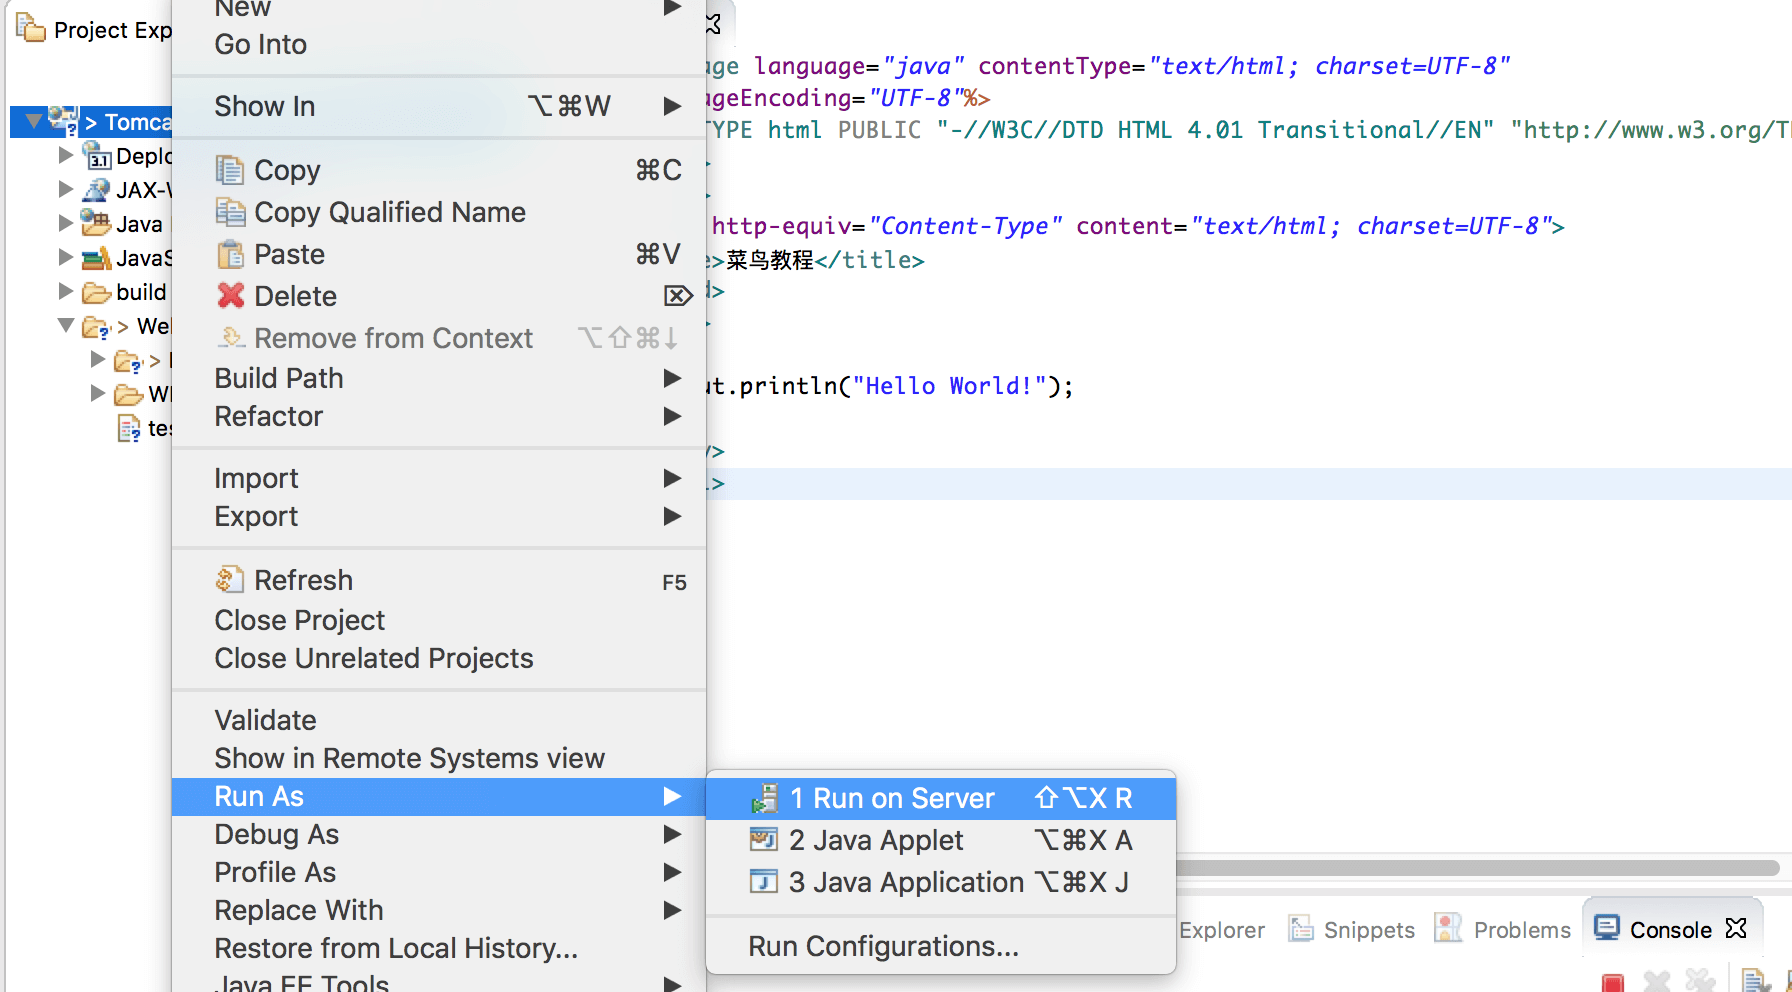
When running, the following error pops up: (If you don't have this error, please ignore it)
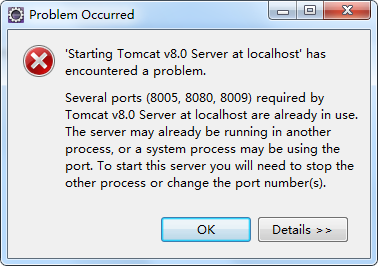
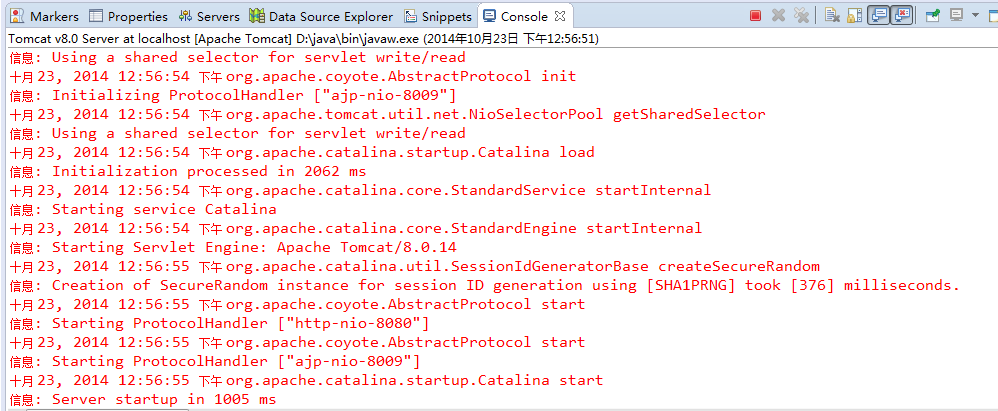
The reason is that we previously clicked startup.bat in the Tomcat installation package, which manually opened the Tomcat server. This is obviously redundant, because when the program runs, Eclipse will automatically start the Tomcat server. So we first manually shut down the Tomcat software, then run the program again, and that's it. The console information is as follows:
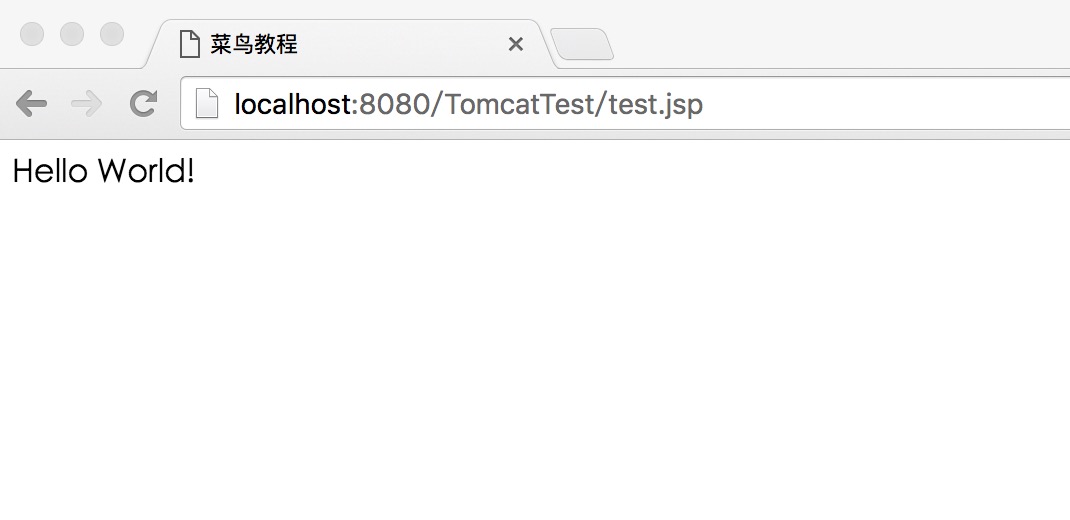
Browser accesshttp://localhost:8080/TomcatTest/test.jsp, then the normal result will be output:
Creating a Servlet Example
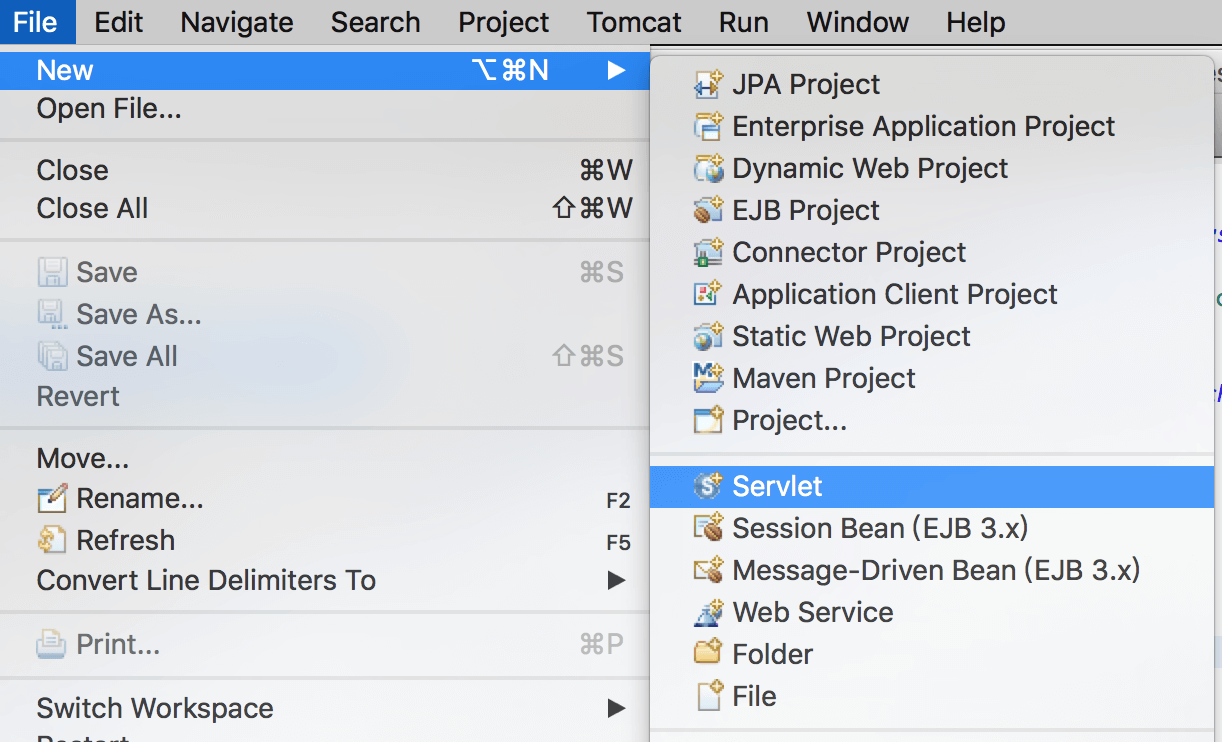
We can also use the above environment to create a Servlet file. Select "File --> New --> Servlet":
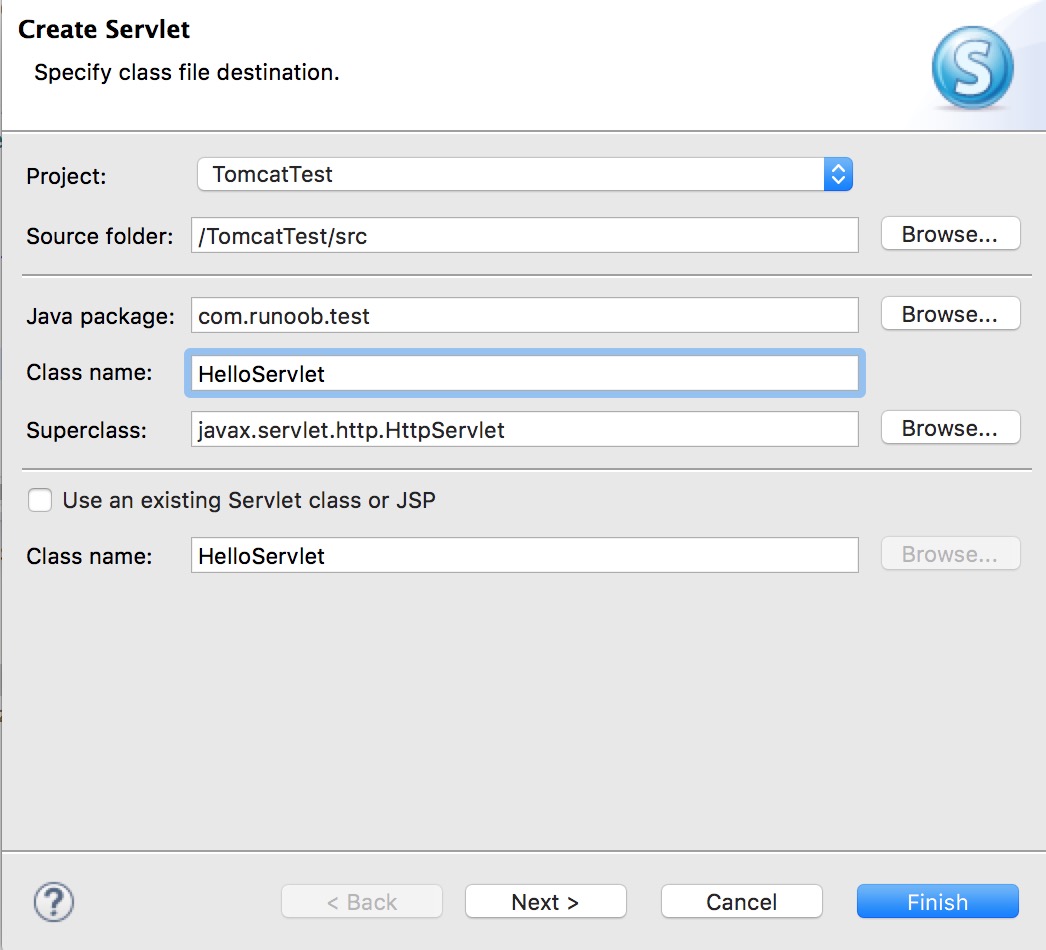
Create the "HelloServlet" class in the /TomcatTest/src directory of the TomcatTest project, with the package "com.example.test":
HelloServlet.java The code is as follows:
package com.example.test;

import java.io.IOException;
import javax.servlet.ServletException;
import javax.servlet.annotation.WebServlet;
import javax.servlet.http.HttpServlet;
import javax.servlet.http.HttpServletRequest;
import javax.servlet.http.HttpServletResponse;

/**
 * Servlet implementation class HelloServlet
 */
@WebServlet("/HelloServlet")
public class HelloServlet extends HttpServlet {
    private static final long serialVersionUID = 1L;

    /**
     * @see HttpServlet#HttpServlet()
     */
    public HelloServlet() {
        super();
        // TODO Auto-generated constructor stub
    }

    /**
     * @see HttpServlet#doGet(HttpServletRequest request, HttpServletResponse response)
     */
    protected void doGet(HttpServletRequest request, HttpServletResponse response) throws ServletException, IOException {
        // 使用 GBK 设置中文正常显示
        response.setCharacterEncoding("GBK");
        response.getWriter().write("Example:http://www.example.com");
    }

    /**
     * @see HttpServlet#doPost(HttpServletRequest request, HttpServletResponse response)
     */
    protected void doPost(HttpServletRequest request, HttpServletResponse response) throws ServletException, IOException {
        // TODO Auto-generated method stub
        doGet(request, response);
    }

}
Create the /TomcatTest/WebContent/WEB-INF/web.xml file (if not present), the code is as follows:
<?xml version="1.0" encoding="UTF-8"?>
<web-app version="2.5"
    xmlns="http://java.sun.com/xml/ns/javaee"
    xmlns:xsi="http://www.w3.org/2001/XMLSchema-instance"
    xsi:schemaLocation="http://java.sun.com/xml/ns/javaee
    http://java.sun.com/xml/ns/javaee/web-app_2_5.xsd">
  <servlet>
     <!-- 类名 -->
    <servlet-name>HelloServlet</servlet-name>
    <!-- 所在的包 -->
    <servlet-class>com.example.test.HelloServlet</servlet-class>
  </servlet>
  <servlet-mapping>
    <servlet-name>HelloServlet</servlet-name>
    <!-- 访问的网址 -->
    <url-pattern>/TomcatTest/HelloServlet</url-pattern>
    </servlet-mapping>
</web-app>
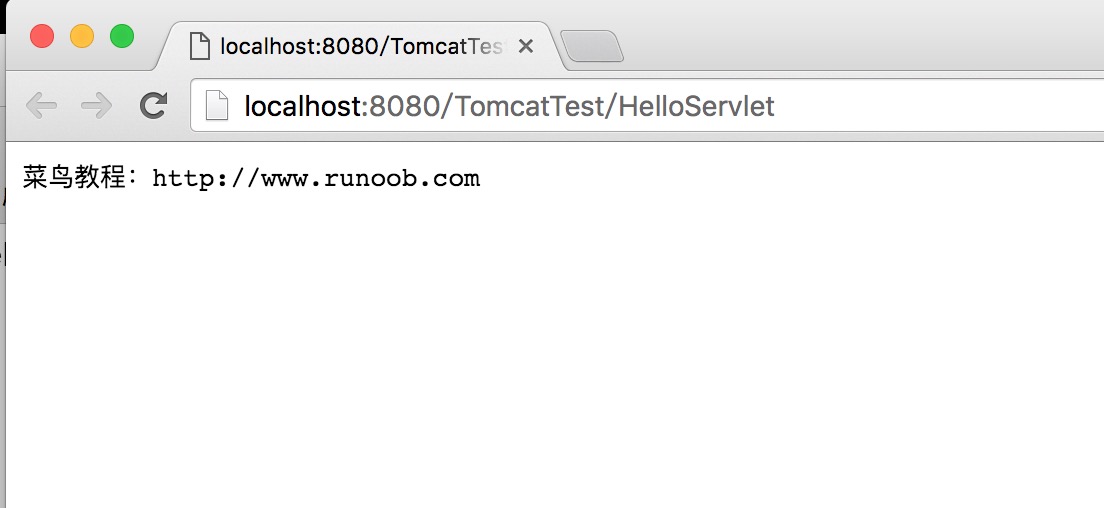
Then restart Tomcat and access in the browserhttp://localhost:8080/TomcatTest/HelloServlet:
Reference article: http://www.cnblogs.com/smyhvae/p/4046862.html
Other Extensions