Android Hello World Example
Let's start real programming based on the Android framework. Before you start writing your first example using the Android SDK, make sure you have followed the instructions in theAndroid - Environment Setuptutorial to complete your Android development environment setup. Also, I assume you have some knowledge of the Eclipse IDE.
Now let's start writing a simple Android application that can print out "Hello World".
Creating an Android Application
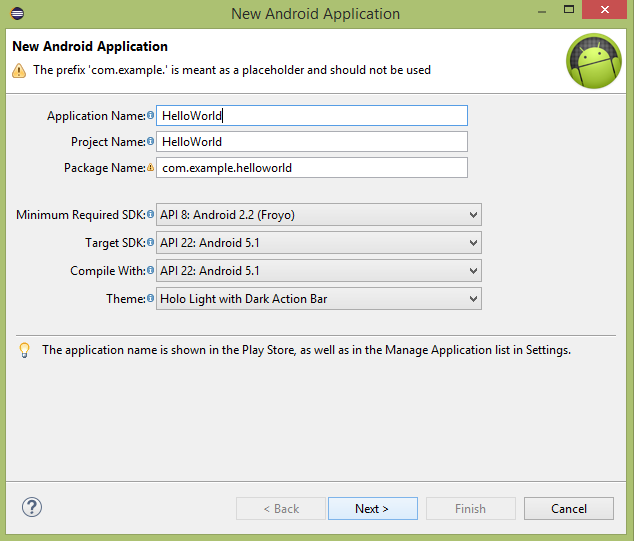
The first step is to create a simple Android application using the Eclipse IDE. Follow the options File -> New -> Project, and finally select Android New Application from the wizard list. Now, use the following window wizard to name the application HelloWorld:
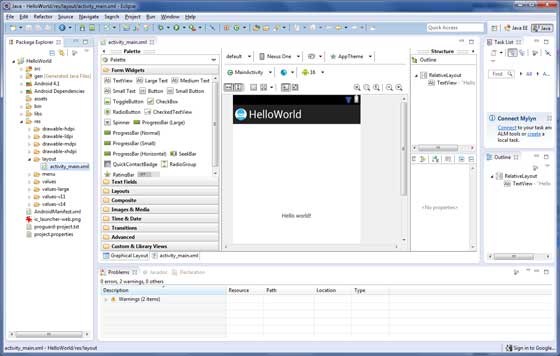
Next, follow the instructions provided, keeping all default inputs, until the final step. Once the project is created successfully, you will see the following project interface -
Anatomy of an Android Application
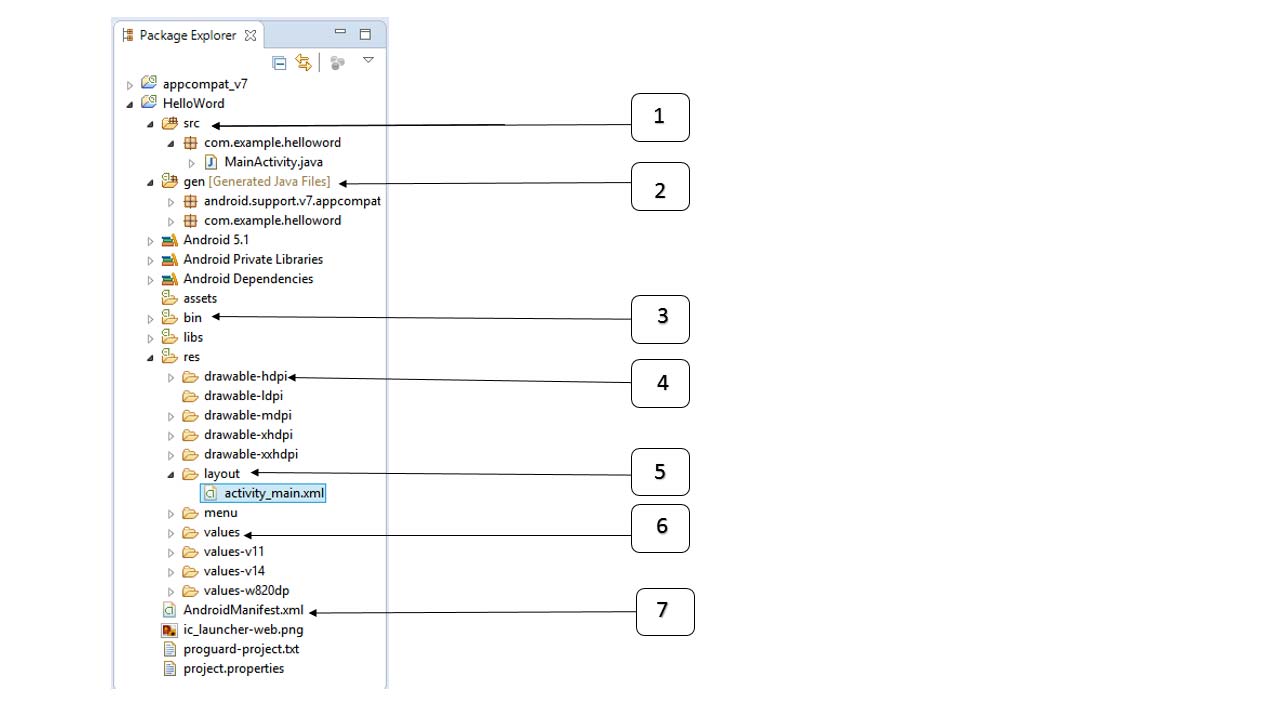
Before running the application, you need to be familiar with some file directories and files in the Android project -
| Serial No. | Folder, File, and Description |
|---|---|
| 1 | src: Contains all the .java source files in the project. By default, it includes a MainActivity.java source file corresponding to the activity class that will be run when the application is launched via the application icon. |
| 2 | gen: This contains the .R file generated by the compiler, which references all the resources in the project. This file cannot be modified. |
| 3 | bin: This folder contains the .apk package file built by Android via APT, as well as everything else needed to run the Android application. |
| 4 | res/drawable-hdpi: This directory contains all the drawable objects designed for high-density screens. |
| 5 | res/layout: This directory stores files used to define the user interface. |
| 6 | res/values: This directory stores various XML files containing a collection of resources, such as string and color definitions. |
| 7 | AndroidManifest.xml: This is the manifest file for the application, which describes the fundamental characteristics of the application and defines its various components. |
The following sections provide an overview of some important application files.
Main Activity File
The main activity code is in the Java file MainActivity.java. This is the actual application file that will be converted to a Dalvik executable and run. Below is the default code generated by the application wizard for the Hello World application -
package com.example.helloworld;

import android.os.Bundle;
import android.app.Activity;
import android.view.Menu;
import android.view.MenuItem;
import android.support.v4.app.NavUtils;

public class MainActivity extends Activity {

   @Override
   public void onCreate(Bundle savedInstanceState) {
      super.onCreate(savedInstanceState);
      setContentView(R.layout.activity_main);
   }

   @Override
   public boolean onCreateOptionsMenu(Menu menu) {
      getMenuInflater().inflate(R.menu.activity_main, menu);
      return true;
   }
}
Here, R.layout.activity_main refers to the activity_main.xml file in the res/layout directory. onCreate() is one of the many methods called after the activity is loaded.
Manifest File
No matter what component you develop as part of your application, you need to declare all components in the manifest.xml file located in the root directory of the application project. This file is the interface between the Android operating system and your application; therefore, if you do not declare your components in this file, they will not be recognized by the operating system. For example, a default manifest file looks like the following:
<manifest xmlns:android="http://schemas.android.com/apk/res/android"
   package="com.example.helloworld"
   android:versionCode="1"
   android:versionName="1.0" >

   <uses-sdk
      android:minSdkVersion="8"
      android:targetSdkVersion="22" />

   <application
       android:icon="@drawable/ic_launcher"
       android:label="@string/app_name"
       android:theme="@style/AppTheme" >

       <activity
          android:name=".MainActivity"
          android:label="@string/title_activity_main" >

          <intent-filter>
             <action android:name="android.intent.action.MAIN" />
             <category android:name="android.intent.category.LAUNCHER"/>
          </intent-filter>

       </activity>

   </application>
</manifest>
Here,
The action of the intent filter is named android.intent.action.MAIN, indicating that this activity is used as the entry point of the application. The category of the intent filter is named android.intent.category.LAUNCHER, indicating that the application can be launched through the device launcher icon.
@string refers to strings.xml (which will be introduced later). Therefore, @string/app_name refers to the app_name defined in strings.xml, which is actually "Hello World". Similarly, other strings in the application are also commonly used.
Below are the tags you will use in your manifest file to specify different Android application components:
Activity Element Service Element Broadcast Receiver Element Content Provider Element
Strings File
The strings.xml file is located in the res/values folder and contains all the text used by the application. For example, the names of buttons, labels, default text, and other similar strings. This file is responsible for their text content. A default strings file looks like this:
<resources>
   <string name="app_name">HelloWorld</string>
   <string name="hello_world">Hello world!</string>
   <string name="menu_settings">Settings</string>
   <string name="title_activity_main">MainActivity</string>
</resources>
R File
The gen/com.example.helloworld/R.java file is the glue between activity Java files, such as MainActivity.java, and resources such as strings.xml. This is an automatically generated file; do not modify the contents of R.java. Below is an example of an R.java file:
/* AUTO-GENERATED FILE.  DO NOT MODIFY.
 *
 * This class was automatically generated by the
 * aapt tool from the resource data it found.  It
 * should not be modified by hand.
 */

package com.example.helloworld;

public final class R {
   public static final class attr {
   }

   public static final class dimen {
      public static final int padding_large=0x7f040002;
      public static final int padding_medium=0x7f040001;
      public static final int padding_small=0x7f040000;
   }

   public static final class drawable {
      public static final int ic_action_search=0x7f020000;
      public static final int ic_launcher=0x7f020001;
   }

   public static final class id {
      public static final int menu_settings=0x7f080000;
   }

   public static final class layout {
      public static final int activity_main=0x7f030000;
   }

   public static final class menu {
      public static final int activity_main=0x7f070000;
   }

   public static final class string {
      public static final int app_name=0x7f050000;
      public static final int hello_world=0x7f050001;
      public static final int menu_settings=0x7f050002;
      public static final int title_activity_main=0x7f050003;
   }

   public static final class style {
      public static final int AppTheme=0x7f060000;
   }
}
Layout File
activity_main.xml is a layout file located in the res/layout directory. It is referenced when the application builds its user interface. You will modify this file very frequently to change the application's layout. In the "Hello World" application, this file has the default layout with the following content:
<RelativeLayout xmlns:android="http://schemas.android.com/apk/res/android"
   xmlns:tools="http://schemas.android.com/tools"
   android:layout_width="match_parent"
   android:layout_height="match_parent" >

   <TextView
      android:layout_width="wrap_content"
      android:layout_height="wrap_content"
      android:layout_centerHorizontal="true"
      android:layout_centerVertical="true"
      android:padding="@dimen/padding_medium"
      android:text="@string/hello_world"
      tools:context=".MainActivity" />

</RelativeLayout>
This is an example of a simple RelativeLayout; more content will be explained in a separate chapter. TextView is an Android widget used to build user graphical interfaces. It contains many different attributes, such as android:layout_width, android:layout_height, etc., used to set its width and height, among others. @string refers to the strings.xml file in the res/values folder. Therefore, @string/hello_world refers to the string named hello defined in strings.xml: "Hello World!".
Running the Application
Let's try to run the Hello World! application we just created. Assuming you have already created an AVD while setting up the environment. To run the application from Eclipse, open an activity file in your project and click the icon. Eclipse installs the application on the AVD and launches it. If everything goes smoothly, the emulator window will be displayed as follows -
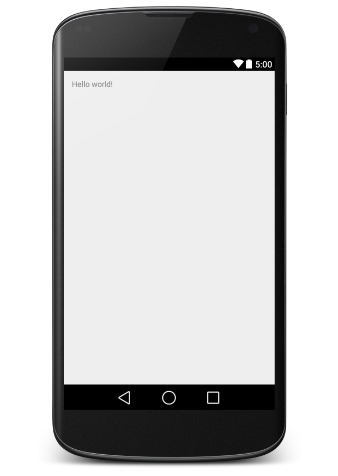
Congratulations, you have developed your first Android application. Follow the remaining tutorials step by step, and you will become a badass Android developer.
Other Extensions