Android Broadcast Receivers
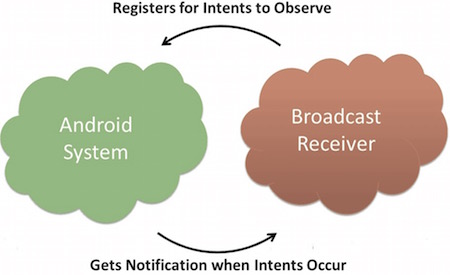
Broadcast receivers are used to respond to broadcast messages sent by other applications or by the system. These messages are sometimes called events or intents. For example, an application can initiate a broadcast to let other applications know that some data has been downloaded to the device and is available for them. In this way, broadcast receivers can define appropriate actions to intercept these communications.
The following are two important steps to make the system's broadcast intents work with broadcast receivers.
- Creating a Broadcast Receiver
- Registering a Broadcast Receiver
There is one additional step. To implement custom intents, you must create and broadcast those intents.
Creating a Broadcast Receiver
A broadcast receiver needs to be implemented as a subclass of the BroadcastReceiver class and override the onReceive() method to receive messages that take an Intent object as a parameter.
public class MyReceiver extends BroadcastReceiver {
   @Override
   public void onReceive(Context context, Intent intent) {
      Toast.makeText(context, "Intent Detected.", Toast.LENGTH_LONG).show();
   }
}
Registering a Broadcast Receiver
An application registers a broadcast receiver in AndroidManifest.xml to listen for specific broadcast intents. Suppose we are going to register MyReceiver to listen for the ACTION_BOOT_COMPLETED event generated by the system. This event is sent when the Android system's boot process completes.
<application
   android:icon="@drawable/ic_launcher"
   android:label="@string/app_name"
   android:theme="@style/AppTheme" >
   <receiver android:name="MyReceiver">

      <intent-filter>
         <action android:name="android.intent.action.BOOT_COMPLETED">
         </action>
      </intent-filter>

   </receiver>
</application>
Now, whenever the Android device is booted, it will be intercepted by the broadcast receiver MyReceiver, and the logic implemented in onReceive() will be executed.
There are many system-generated events defined as static constant values in the Intent class. The following table lists the important system events.
| Event Constant | Description |
|---|---|
| android.intent.action.BATTERY_CHANGED | A sticky broadcast containing the battery's charging status, level, and other information. |
| android.intent.action.BATTERY_LOW | Indicates a low battery condition on the device. |
| android.intent.action.BATTERY_OKAY | Indicates that the battery, after being low, is now okay. |
| android.intent.action.BOOT_COMPLETED | Broadcast once after the system has finished booting. |
| android.intent.action.BUG_REPORT | Displays an activity for reporting a bug. |
| android.intent.action.CALL | Calls the person specified by the call data. |
| android.intent.action.CALL_BUTTON | The user clicks the "Call" button to open the dialer or another appropriate interface for dialing. |
| android.intent.action.DATE_CHANGED | The date has changed. |
| android.intent.action.REBOOT | The device has been restarted. |
Broadcasting Custom Intents
If you want to generate and send custom intents within your application, you need to create and send these intents through sendBroadcast() in your activity class. If you use the sendStickyBroadcast(Intent) method, the intent is sticky, which means the intent you send remains after the broadcast has completed.
public void broadcastIntent(View view)
{
   Intent intent = new Intent();
   intent.setAction("com.example.CUSTOM_INTENT");
   sendBroadcast(intent);
}
An intent with com.example.CUSTOM_INTENT can be registered in the same way we registered system-generated intents earlier.
<application
   android:icon="@drawable/ic_launcher"
   android:label="@string/app_name"
   android:theme="@style/AppTheme" >
   <receiver android:name="MyReceiver">

      <intent-filter>
         <action android:name="com.example.CUSTOM_INTENT">
         </action>
      </intent-filter>

   </receiver>
</application>
Example
This example will explain how to create a broadcast receiver to intercept a custom intent. Once you become familiar with custom intents, you can program your application to intercept system-generated intents. Let us follow the steps below to modify the Android application we created in the Hello World example chapter.
| Step | Description |
|---|---|
| 1 | Use Android Studio to create an Android application, name it broadcastreceiver, and place it under the package com.example.broadcastreceiver in the Hello World example chapter. |
| 2 | Modify the main activity file MainActivity.java to add the broadcastIntent() method. |
| 3 | Create a new Java file named MyReceiver.java under the package com.example.broadcastreceiver to define the broadcast receiver. |
| 4 | An application can handle one or more custom or system intents without any restrictions. Every intent you want to intercept needs to be registered in AndroidManifest.xml using the <receiver.../> tag. |
| 5 | Modify the default content of the res/layout/activity_main.xml file to include a button for broadcasting an intent. |
| 6 | There is no need to modify the string resource file; Android Studio will take care of the string.xml file. |
| 7 | Launch the Android emulator to run the application and verify the results of the changes made to the application. |
Below is the content of the modified main activity file src/com.example.broadcastreceiver/MainActivity.java. This file contains each of the basic lifecycle methods. We have added the broadcastIntent() method to broadcast custom events.
package com.example.broadcastreceiver;

import android.os.Bundle;
import android.app.Activity;
import android.view.Menu;
import android.content.Intent;
import android.view.View;

public class MainActivity extends Activity {

    @Override
    public void onCreate(Bundle savedInstanceState) {
        super.onCreate(savedInstanceState);
        setContentView(R.layout.activity_main);
    }

    @Override
    public boolean onCreateOptionsMenu(Menu menu) {
        getMenuInflater().inflate(R.menu.menu_main, menu);
        return true;
    }

    // 广播自定义意图
    public void broadcastIntent(View view){
        Intent intent = new Intent();
        intent.setAction("cn.programmer.CUSTOM_INTENT");
        sendBroadcast(intent);
    }
}
Below is the content of src/com.example.broadcastreceiver/MyReceiver.java:
package com.example.broadcastreceiver;

import android.content.BroadcastReceiver;
import android.content.Context;
import android.content.Intent;
import android.widget.Toast;

public class MyReceiver extends BroadcastReceiver {
    @Override
    public void onReceive(Context context, Intent intent) {
        Toast.makeText(context, "检测到意图。", Toast.LENGTH_LONG).show();
    }
}
Next, modify the AndroidManifest.xml file. Here, we include our broadcast receiver by adding the <receiver.../> tag:
<?xml version="1.0" encoding="utf-8"?>
<manifest xmlns:android="http://schemas.android.com/apk/res/android"
    package="com.example.broadcastreceiver"
    android:versionCode="1"
    android:versionName="1.0" >

    <uses-sdk
        android:minSdkVersion="8"
        android:targetSdkVersion="22" />

    <application
        android:icon="@drawable/ic_launcher"
        android:label="@string/app_name"
        android:theme="@style/AppTheme" >

        <activity
            android:name=".MainActivity"
            android:label="@string/title_activity_main" >

            <intent-filter>
                <action android:name="android.intent.action.MAIN" />
                <category android:name="android.intent.category.LAUNCHER"/>
            </intent-filter>

        </activity>

        <receiver android:name="MyReceiver">

            <intent-filter>
                <action android:name="cn.programmer.CUSTOM_INTENT">
                </action>
            </intent-filter>

        </receiver>

    </application>

</manifest>
Below is the content of the res/layout/activity_main.xml file, containing a button for broadcasting a custom intent.
<RelativeLayout xmlns:android="http://schemas.android.com/apk/res/android"
    xmlns:tools="http://schemas.android.com/tools" android:layout_width="match_parent"
    android:layout_height="match_parent" android:paddingLeft="@dimen/activity_horizontal_margin"
    android:paddingRight="@dimen/activity_horizontal_margin"
    android:paddingTop="@dimen/activity_vertical_margin"
    android:paddingBottom="@dimen/activity_vertical_margin" tools:context=".MainActivity">

    <TextView
        android:id="@+id/textView1"
        android:layout_width="wrap_content"
        android:layout_height="wrap_content"
        android:text="广播实例"
        android:layout_alignParentTop="true"
        android:layout_centerHorizontal="true"
        android:textSize="30dp" />

    <TextView
        android:id="@+id/textView2"
        android:layout_width="wrap_content"
        android:layout_height="wrap_content"
        android:text="www.example.com"
        android:textColor="#ff87ff09"
        android:textSize="30dp"
        android:layout_above="@+id/imageButton"
        android:layout_centerHorizontal="true"
        android:layout_marginBottom="40dp" />

    <ImageButton
        android:layout_width="wrap_content"
        android:layout_height="wrap_content"
        android:id="@+id/imageButton"
        android:src="@drawable/ic_launcher.html"
        android:layout_centerVertical="true"
        android:layout_centerHorizontal="true" />

    <Button
        android:layout_width="wrap_content"
        android:layout_height="wrap_content"
        android:id="@+id/button2"
        android:text="广播意图"
        android:onClick="broadcastIntent"
        android:layout_below="@+id/imageButton"
        android:layout_centerHorizontal="true" />

</RelativeLayout>
Below is the content of the res/values/strings.xml file, which defines two new constants.
<?xml version="1.0" encoding="utf-8"?>
<resources>

    <string name="app_name">Android Broadcast Receiver</string>
    <string name="action_settings">Settings</string>
    <string name="menu_settings">Settings</string>
    <string name="title_activity_main">Main Activity</string>

</resources>
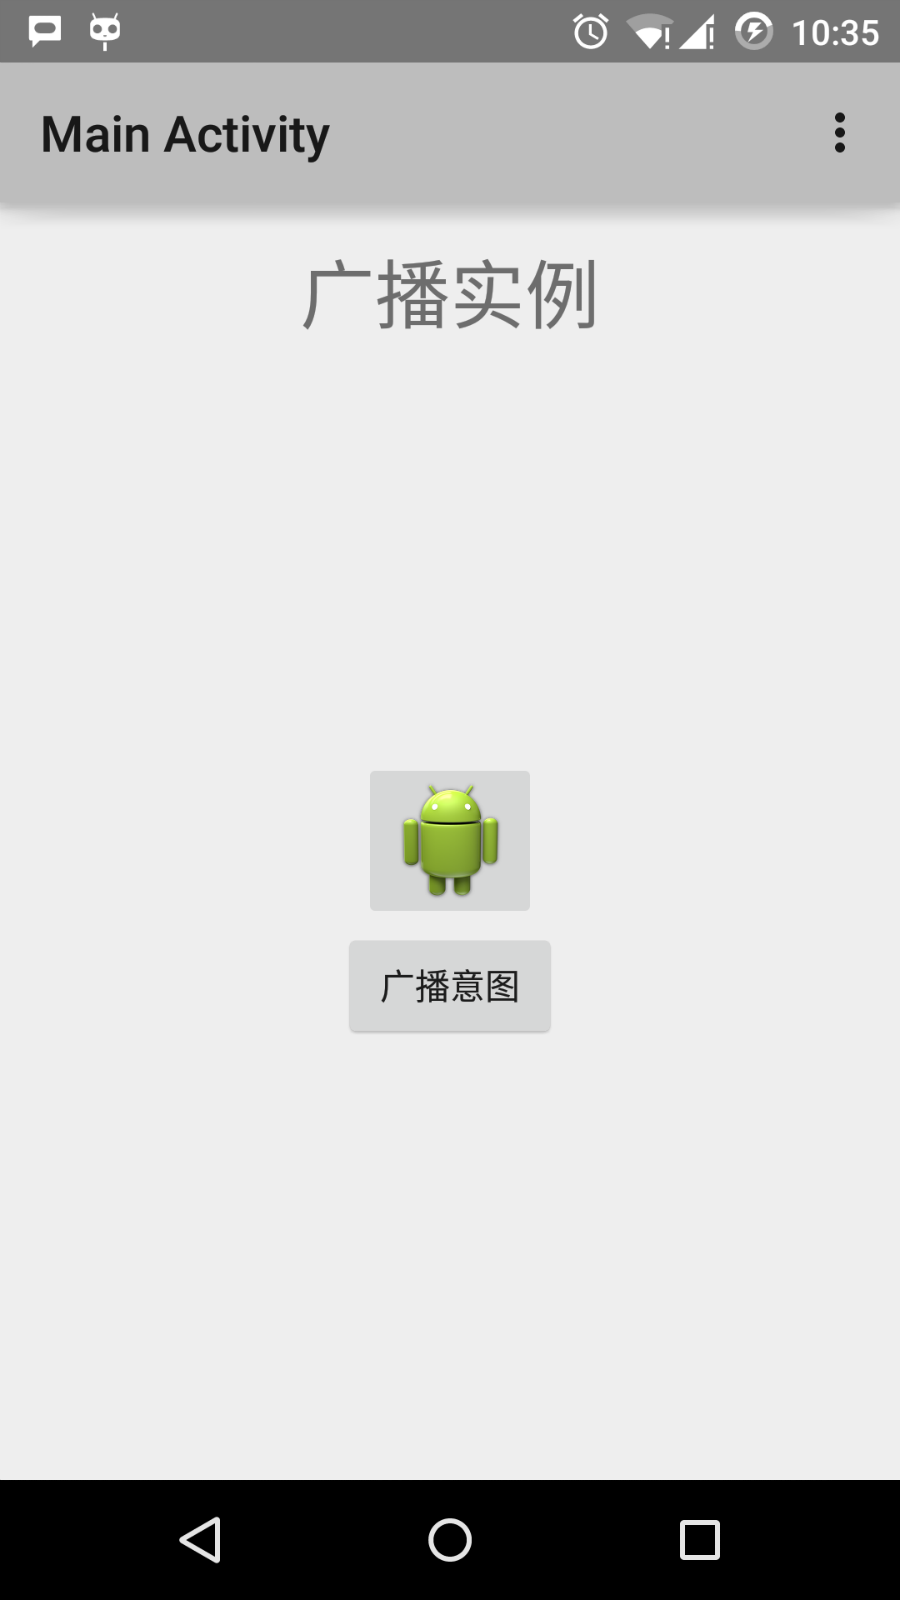
Let's run the Hello World! application we just modified. I assume you have already created an AVD when setting up the environment. Open the activity file in your project, and click the icon in the toolbar to run the application in Android Studio. Android Studio installs the application on the AVD and starts it. If everything goes smoothly, the following will be displayed on the emulator window:
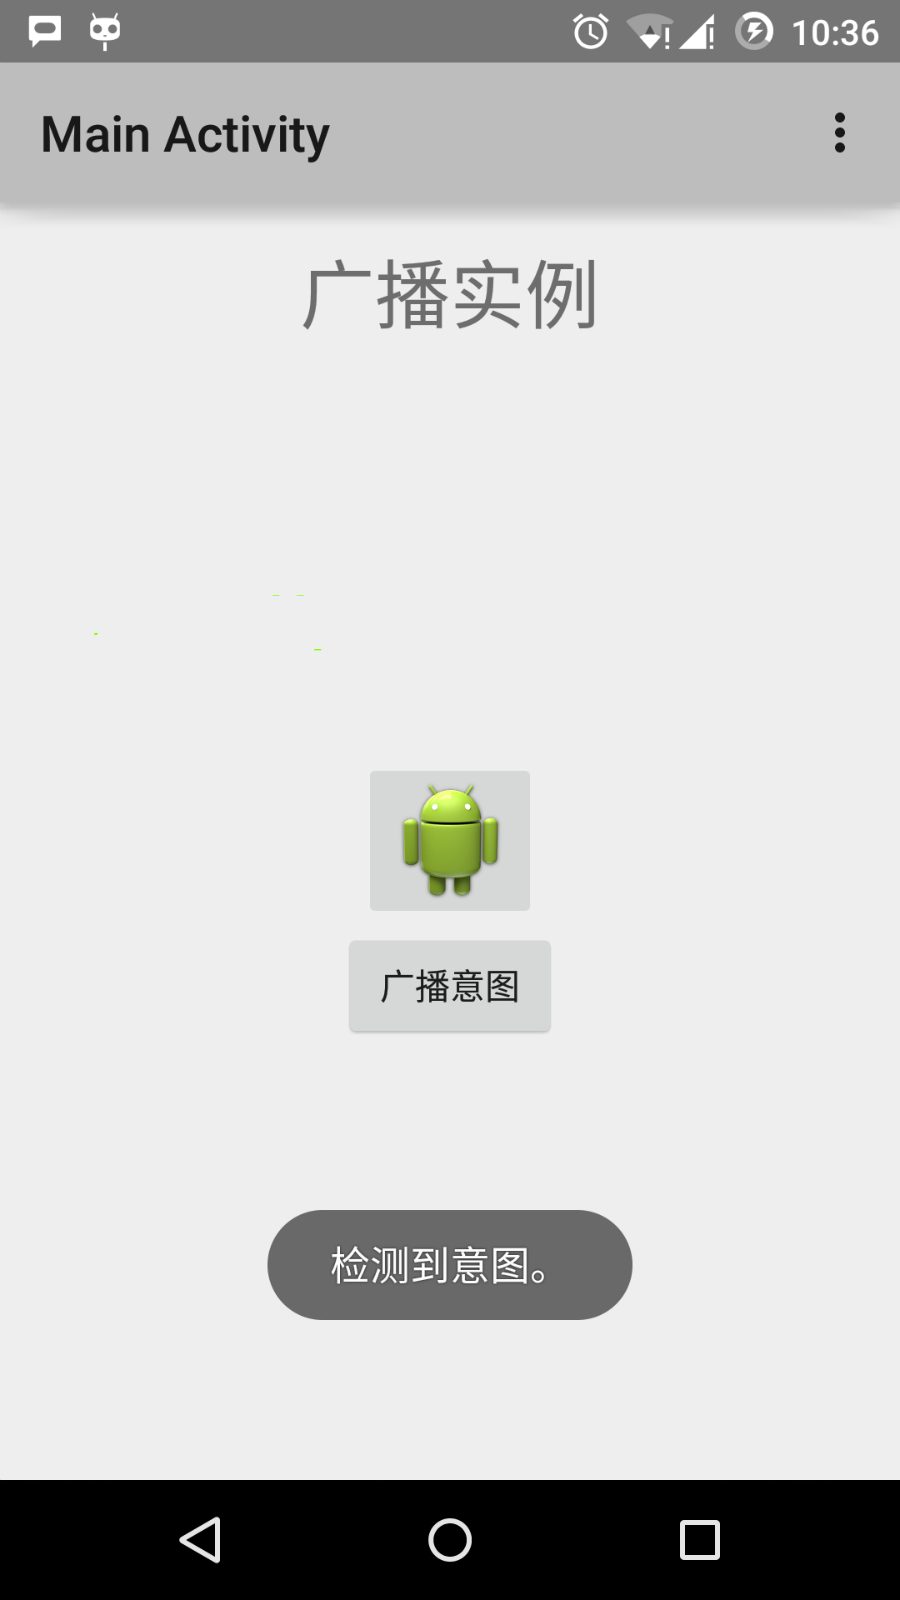
Now click the "Broadcast Intent" button to broadcast our custom intent. This will broadcast our custom intent "cn.programmer.CUSTOM_INTENT", which will be intercepted by our registered broadcast receiver MyReceiver and execute the logic we implemented. A toast will appear at the bottom of the emulator, as follows:
You can try to implement other broadcast receivers to intercept intents generated by the system, such as system boot, date change, low battery, and so on.
Other Extensions