Angular 2 JavaScript Environment Setup
In this chapter, we will show you how to configure the Angular 2 execution environment.
This chapter uses JavaScript to create Angular applications; of course, you can also use TypeScript and Dart to create Angular applications.
The file directory structure used in this chapter is as follows:
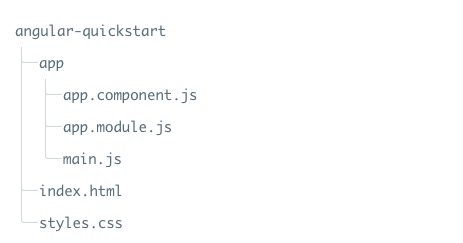
Create a configuration file
Create a directory
$ mkdir angular-quickstart
$ cd angular-quickstart
Load the required libraries
Here we recommend using npm as the package management tool. If you haven't installed npm yet or are unfamiliar with npm, you can check our tutorial:NPM Usage Introduction。
Create the package.json file, the code is as follows:
package.json file:
Because accessing the npm official mirror is too slow in China, I used Taobao's npm mirror here. The installation method is as follows:
$ npm install -g cnpm --registry=https://registry.npmmirror.com
After execution, we can use the cnpm command to install modules:
$ cnpm install
After successful execution, a node_modules directory will be generated in the angular-quickstart directory, which contains the modules needed for this example.
Create Angular components
Components are the foundation and core of Angular applications. A component encapsulates a specific function, and components work together to assemble a complete application.
Generally speaking, a component is a JavaScript class used to control the view template.
Next, we create an app directory in angular-quickstart:
$ mkdir app
$ cd app
And add the component file app.component.js with the following content:
app.component.js file:
Next, let's analyze the above code:
We created a visual component named AppComponent by chain-calling the Component and Class methods in the global Angular core namespace ng.core.
The Component method accepts a configuration object containing two properties. The Class method is where we implement the component itself. In the Class method, we add properties and methods to the component, which are bound to the corresponding views and behaviors.
Modules
Angular applications are modular. ES5 does not have a built-in module system, so a third-party module system can be used. Then we create an independent namespace app for the application, and the file code can be wrapped in an IIFE (Immediately Invoked Function Expression):
(function(app) {
})(window.app || (window.app = {}));
We pass the global app namespace object into the IIFE, and if it does not exist, we initialize it with an empty object.
Most application files export code by adding things to the app namespace. We exported AppComponent in the app.component.js file.
app.AppComponent =
Class definition object
In this example, the AppComponent class has only an empty constructor:
.Class({
    constructor: function() {}
});
When we want to create a meaningful application, we can extend this object with properties and application logic.
Component definition object
ng.core.Component() tells Angular that the class definition object is an Angular component. The configuration object passed to ng.core.Component() has two fields: selector and template.
selector defines a simple CSS selector my-app for a host HTML element. When Angular encounters a my-app element in the host HTML, it creates and displays an AppComponent instance.
The template property holds the component's template.
Add NgModule
Angular applications consist of Angular modules, which contain the components and everything else needed by the Angular application.
Next, create the app/app.module.js file with the following content:
app.module.js file:
Start the application
Add the app/main.js file:
app/main.js file:
We need two things to start the application:
- Angular's platformBrowserDynamic().bootstrapModule function.
- The application root module AppModule mentioned above.
Next, create index.html with the following code:
index.html file:
index.html analysis
- 1. Load the JavaScript libraries we need;
- 2. Load our own JavaScript files, pay attention to the order;
- 3. We add the <my-app> tag inside the <body> tag.
The execution process is: when Angular calls the bootstrapModule function in main.js, it reads the metadata of AppModule, finds AppComponent in the bootstrap components, finds the my-app selector, locates an element named my-app, and then loads the content between these tags.
Add some styles
The styles.css file code is:
styles.css file:
Open a terminal and enter the following command:
$ npm start
Visit http://localhost:3000/, the browser displays:
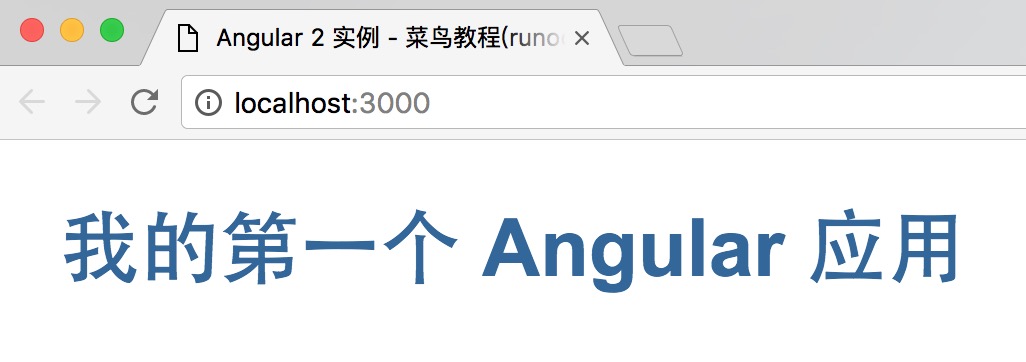
In this way, our first Angular 2 application is complete. The source code used in this article can be downloaded via the following method, excluding node_modules.
Source code download
<div style="display:none;"> <hr><h2 id="cs-ag2"> Using AngularJS2 in Cloud Studio </h2> <ul> <li><p>step1: Visit <a target="_blank" href='https://studio.dev.tencent.com/' rel="noopener noreferrer">Tencent Cloud Developer Platform</a> and register/log in to your account.</p></li> <li><p>step2: In the runtime environment menu on the right, select: <code>"Node.js"</code></p></li> <li><p>step3: Then install <a target="_blank" href='https://github.com/angular/angular-cli' rel="noopener noreferrer">Angular CLI</a> globally:</p> <pre>npm install -g @angular/cli</pre> </li> <li><p>step4: Create a new project. Run the following command to generate a new project and the default application code:</p> <pre>ng new my-app</pre> </li> <p>Angular CLI will install the necessary NPM packages, create project files, and generate a simple default application in the project. This may take a while.</p> <li><p>step5: Enter the project directory and start the server:</p> <pre>cd my-app ng serve --open</pre> <p>The <code>ng serve</code> command starts the development server, watches for file changes, and rebuilds the application when these files are modified.</p><p><img src='../wp-content/uploads/2018/08/1534843140-2272-app-works.png' alt='' /></p> </li></ul> <p>CODING is currently holding a [My Favorite Cloud Studio Plugin Contest] based on Cloud Studio workspaces. Visit the event official website: <a href="https://studio.qcloud.coding.net/campaign/favorite-plugins/index" rel="noopener noreferrer" target="_blank">https://studio.qcloud.coding.net/campaign/favorite-plugins/index</a> to learn more about the event.</p> </div> Other extensions