PyTorch Model Deployment
Model deployment is the process of putting trained machine learning models into practical applications. PyTorch provides various tools and methods to achieve this goal.
Why Model Deployment is Needed
- Application Integration: Integrate AI capabilities into Web, mobile, or embedded systems
- Performance Optimization: Optimize model inference speed for production environments
- Resource Management: Effectively utilize computing resources to achieve high-concurrency services
Deployment Process Overview
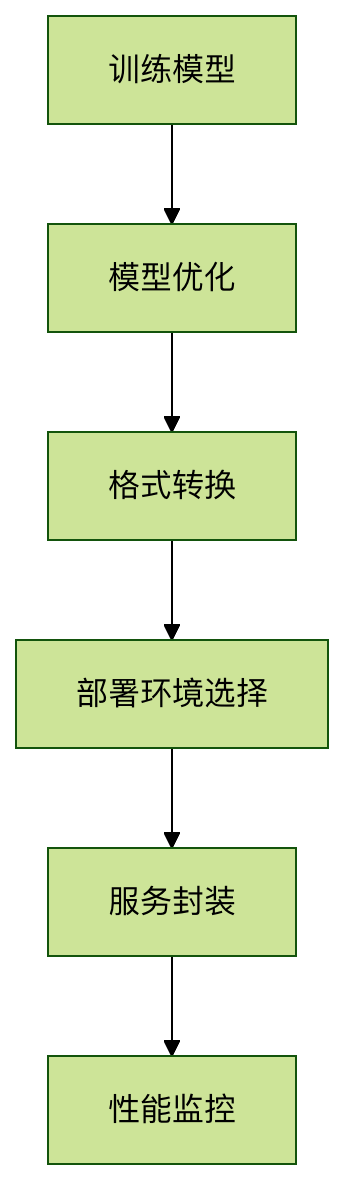
Model Preparation and Optimization
Model Export Formats
PyTorch mainly supports the following export formats:
| Format | Features | Applicable Scenarios |
|---|---|---|
| TorchScript | PyTorch native format, preserves dynamic graph features | Used within the PyTorch ecosystem |
| ONNX | Open standard, cross-framework compatible | Multi-framework collaboration environment |
| Torch-TensorRT | NVIDIA optimized format | GPU inference acceleration |
Exporting as TorchScript
Example
import torchvision
# Load pre-trained model
model = torchvision.models.resnet18(pretrained=True)
model.eval()
# Example input
example_input = torch.rand(1, 3, 224, 224)
# Method 1: Export via tracing
traced_script = torch.jit.trace(model, example_input)
traced_script.save("resnet18_traced.pt")
# Method 2: Export via scripting
scripted_model = torch.jit.script(model)
scripted_model.save("resnet18_scripted.pt")
Notes:
torch.jit.traceMore suitable for models without control flowtorch.jit.scriptCan handle models with complex logic such as conditional statements- Be sure to call before export
model.eval()
Choosing a Deployment Solution
Local Deployment Solutions
LibTorch (C++ API)
Example
int main() {
// Load model
torch::jit::script::Module module;
module = torch::jit::load("resnet18.pt");
// Prepare input
std::vector<torch::jit::IValue> inputs;
inputs.push_back(torch::ones({1, 3, 224, 224}));
// Execute inference
auto output = module.forward(inputs).toTensor();
std::cout << output.slice(/*dim=*/1, /*start=*/0, /*end=*/5) << '\n';
}
ONNX Runtime
Example
# Create inference session
sess = ort.InferenceSession("model.onnx")
# Prepare input
input_name = sess.get_inputs()[0].name
input_data = np.random.rand(1, 3, 224, 224).astype(np.float32)
# Execute inference
outputs = sess.run(None, {input_name: input_data})
Cloud Deployment Solutions
TorchServe (Official serving framework)
Example
pip install torchserve torch-model-archiver
# Package model
torch-model-archiver --model-name resnet18 \
--version 1.0 \
--serialized-file model.pth \
--extra-files index_to_name.json \
--handler image_classifier \
--export-path model_store
# Start service
torchserve --start --model-store model_store --models resnet18=resnet18.mar
Building REST API with FastAPI
Example
from PIL import Image
import io
import torch
app = FastAPI()
model = torch.jit.load("model.pt")
@app.post("/predict")
async def predict(image: UploadFile = File(...)):
img_data = await image.read()
img = Image.open(io.BytesIO(img_data))
# Preprocessing...
with torch.no_grad():
output = model(img_tensor)
return {"prediction": output.argmax().item()}
Performance Optimization Tips
Quantization Acceleration
Example
quantized_model = torch.quantization.quantize_dynamic(
model, {torch.nn.Linear}, dtype=torch.qint8)
# Static quantization
model.qconfig = torch.quantization.get_default_qconfig('fbgemm')
torch.quantization.prepare(model, inplace=True)
# Calibration...
torch.quantization.convert(model, inplace=True)
Using TensorRT for Acceleration
Example
# Compile optimization
trt_model = torch_tensorrt.compile(model,
inputs=[torch_tensorrt.Input((1, 3, 224, 224))],
enabled_precisions={torch.float32} # Or {torch.float16}
)
# Save optimized model
torch.jit.save(trt_model, "model_trt.pt")
FAQ
Q1: What should I do if version compatibility issues occur during deployment?A: It is recommended to use Docker containers to pin environment versions, or throughcondaCreate a dedicated environment.
Q2: How do I monitor the performance of deployed models?A: You can integrate monitoring tools such as Prometheus to track latency, throughput, and resource usage.
Q3: How do I achieve hot updates after model deployment?A: TorchServe supports model version management and A/B testing, allowing dynamic switching of model versions via API.
Other Extensions