PyTorch Installation
PyTorch is a popular deep learning framework that supports CPU and GPU computing.
Supported Operating Systems
- Windows: Windows 10 or later (64-bit)
- macOS: macOS 10.15 (Catalina) or later
- Linux: Mainstream distributions (Ubuntu 18.04+, CentOS 7+, RHEL 7+, etc.)
Python Version Requirements
- Recommended Version:Python 3.8 - 3.11
- Minimum Requirement:Python 3.7
- Note: Python 3.12+ support may be limited; it is recommended to use a stable version.
Hardware Requirements
- CPU: x86_64 processor with SSE4.2 instruction set support
- Memory: At least 4GB RAM (8GB+ recommended)
- Storage: At least 3GB of free space
- GPU(Optional): NVIDIA GPU with CUDA Compute Capability 3.5+
CUDA Compatibility (GPU Version)
| PyTorch Version | Supported CUDA Versions | Recommended CUDA Version |
|---|---|---|
| 2.1.x | 11.8, 12.1 | 12.1 |
| 2.0.x | 11.7, 11.8 | 11.8 |
| 1.13.x | 11.6, 11.7 | 11.7 |
Pre-installation Preparations
Check System Information
Windows:
# 检查 Windows 版本
winver

# 检查 Python 版本
python --version

# 检查是否有 NVIDIA GPU
nvidia-smi
macOS
# 检查 macOS 版本
sw_vers

# 检查 Python 版本
python3 --version

# 检查是否有兼容的 GPU(Apple Silicon)
system_profiler SPDisplaysDataType
Linux
# 检查发行版信息
cat /etc/os-release

# 检查 Python 版本
python3 --version

# 检查 NVIDIA GPU
nvidia-smi

# 检查 CUDA 版本(如果已安装)
nvcc --version
Python Environment Management
Using Anaconda/Miniconda:
# 下载并安装 Miniconda
# Windows: https://repo.anaconda.com/miniconda/Miniconda3-latest-Windows-x86_64.exe
# macOS: https://repo.anaconda.com/miniconda/Miniconda3-latest-MacOSX-x86_64.sh
# Linux: https://repo.anaconda.com/miniconda/Miniconda3-latest-Linux-x86_64.sh

# 创建专用环境
conda create -n pytorch_env python=3.10
conda activate pytorch_env
Using venv (Python Built-in)
# 创建虚拟环境
python -m venv pytorch_env

# 激活环境
# Windows
pytorch_env\Scripts\activate
# macOS/Linux
source pytorch_env/bin/activate
Install PyTorch
PyTorch officially provides several installation methods, which can be installed via pip or conda.
CPU Version Installation
Install PyTorch using pip:
# 最新稳定版本
pip install torch torchvision torchaudio

# 指定版本
pip install torch==2.1.0 torchvision==0.16.0 torchaudio==2.1.0

# 仅 CPU 版本(更小的安装包)
pip install torch torchvision torchaudio --index-url https://download.pytorch.org/whl/cpu
Install using conda:
If you use Anaconda or Miniconda to manage Python environments, installing PyTorch with conda may be simpler and more efficient.
# 从 conda-forge 安装
conda install pytorch torchvision torchaudio cpuonly -c pytorch

# 或从 conda-forge 渠道
conda install pytorch torchvision torchaudio -c conda-forge
If you are not familiar with Anaconda, you can refer to:Anaconda Tutorial
Install via PyTorch Official Website
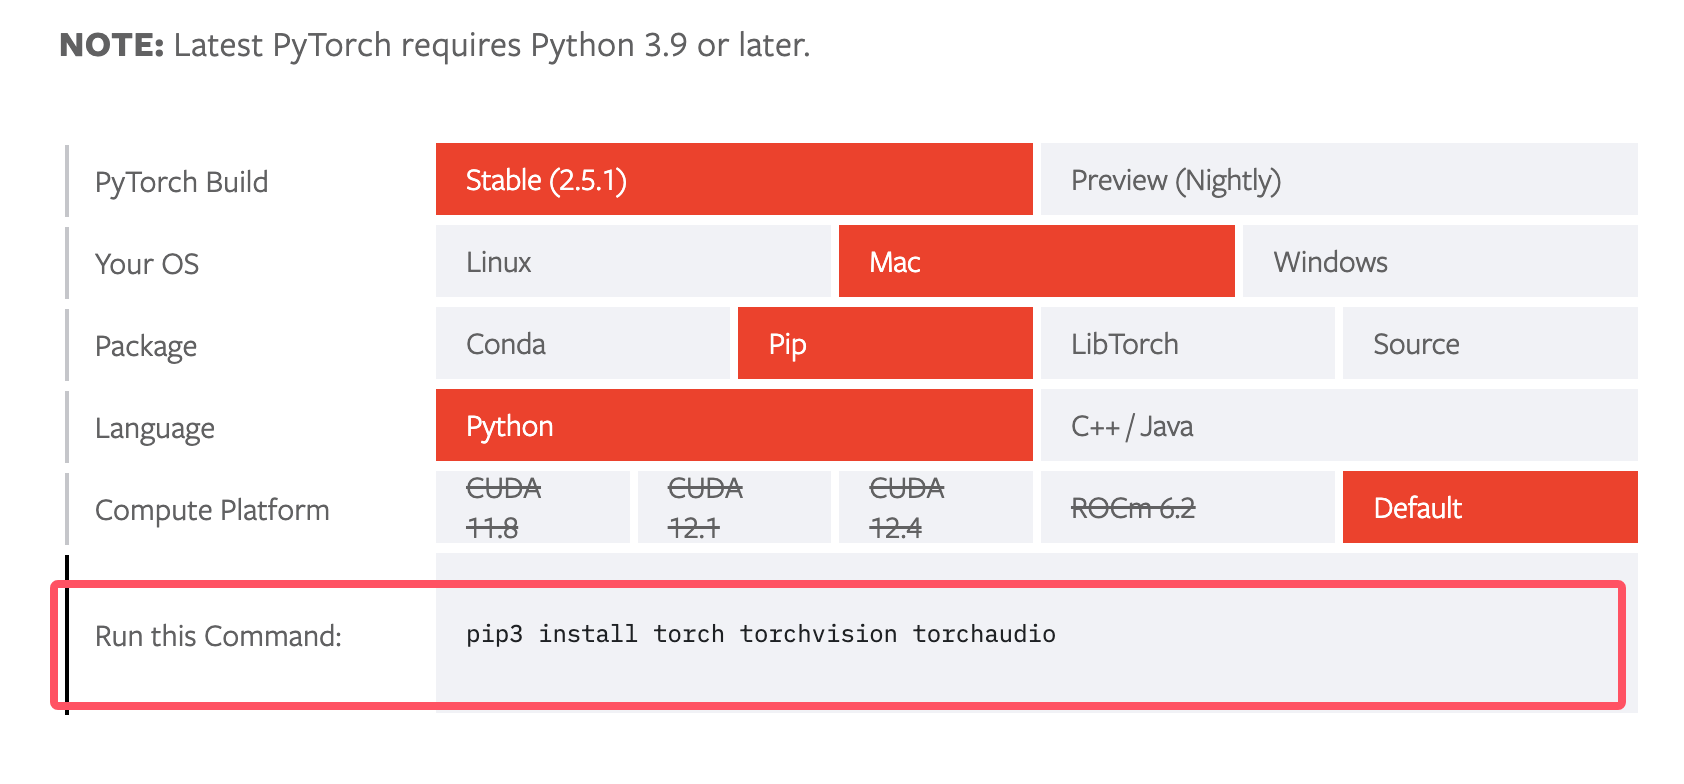
Visit the official PyTorch websitehttps://pytorch.org/get-started/locally/, the website provides a convenient tool that can recommend installation commands based on your system configuration (operating system, package manager, Python version, and CUDA version).
Install from Source
If you need to install PyTorch from source, or want to try the latest development version, you can use the following command:
git clone --recursive https://github.com/pytorch/pytorch
cd pytorch
python setup.py install
This will clone the PyTorch source code from GitHub and install it using setup.py.
GPU Version Installation (CUDA)
Install CUDA (if needed):
# Ubuntu/Debian
wget https://developer.download.nvidia.com/compute/cuda/repos/ubuntu2004/x86_64/cuda-ubuntu2004.pin
sudo mv cuda-ubuntu2004.pin /etc/apt/preferences.d/cuda-repository-pin-600
wget https://developer.download.nvidia.com/compute/cuda/12.1.0/local_installers/cuda-repo-ubuntu2004-12-1-local_12.1.0-530.30.02-1_amd64.deb
sudo dpkg -i cuda-repo-ubuntu2004-12-1-local_12.1.0-530.30.02-1_amd64.deb
sudo cp /var/cuda-repo-ubuntu2004-12-1-local/cuda-*-keyring.gpg /usr/share/keyrings/
sudo apt-get update
sudo apt-get -y install cuda

# CentOS/RHEL
sudo yum install -y https://developer.download.nvidia.com/compute/cuda/repos/rhel8/x86_64/cuda-repo-rhel8-12.1.0-1.x86_64.rpm
sudo yum clean all
sudo yum -y install cuda
Install PyTorch GPU version:
# CUDA 12.1 版本
pip install torch torchvision torchaudio

# CUDA 11.8 版本
pip install torch torchvision torchaudio --index-url https://download.pytorch.org/whl/cu118

# 使用 conda
conda install pytorch torchvision torchaudio pytorch-cuda=12.1 -c pytorch -c nvidia
macOS Specific Notes
Apple Silicon (M1/M2) Mac:
# 使用 Metal Performance Shaders (MPS) 后端
pip install torch torchvision torchaudio

# 验证 MPS 可用性
python -c "import torch; print(torch.backends.mps.is_available())"
Intel Mac:
# 标准安装
pip install torch torchvision torchaudio
Verify Installation
To ensure PyTorch is correctly installed, we can verify whether the installation was successful by running the following PyTorch code:
Example
# Version of the currently installed PyTorch library
print(torch.__version__)
# Check whether CUDA is available, i.e., whether your system has an NVIDIA GPU
print(torch.cuda.is_available())
Iftorch.cuda.is_available()outputs True, it means PyTorch has successfully detected your GPU.
A simple example: constructing a randomly initialized tensor:
Example
x = torch.rand(5, 3)
print(x)
If the installation is successful, the output will be similar to the following:
tensor([[0.3380, 0.3845, 0.3217],
        [0.8337, 0.9050, 0.2650],
        [0.2979, 0.7141, 0.9069],
        [0.1449, 0.1132, 0.1375],
        [0.4675, 0.3947, 0.1426]])
Other Extensions