1. Win7 configuration
First, download the JDK that matches your operating system version, for example, the latest JDK 8:
Download link:http://www.oracle.com/technetwork/java/javase/downloads/jdk8-downloads-2133151.html;
Of course, most developers do not use the latest JDK. The current mainstream choices are JDK 6 and JDK 7, and of course more and more developers are switching to the JDK 8 platform.
After downloading, install it all the way through. The local JDK installation path isC:\Program Files\Java\jdk1.7.0_79
Then follow these steps: Computer --> Properties --> Advanced System Settings --> Environment Variables
In the environment variables for xxx (xxx represents your computer name), create a new JAVA_HOME (this name can be customized, but this is the common one), and enter the value
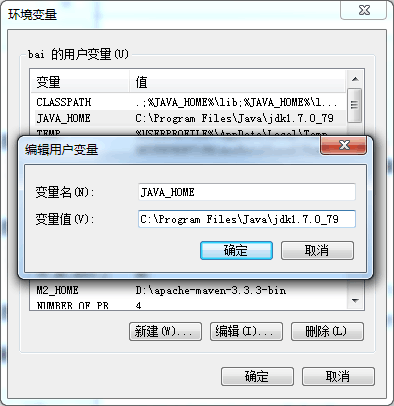
As shown in the figure.
Step 2: In the system variables below, find Path, edit it, and add at the very end:
%JAVA_HOME%\bin;%JAVA_HOME%\jre\bin
As shown: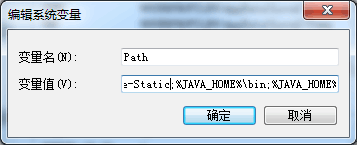
Then create a new variable named CLASSPATH, and enter the value .;%JAVA_HOME%\lib;%JAVA_HOME%\lib\dt.jar;%JAVA_HOME%\lib\tools.jar, note the dot!!!
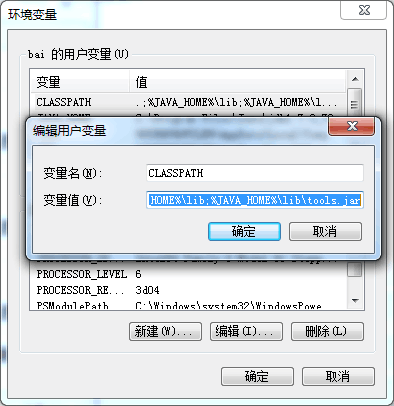
Click OK.Windows key + R, enter cmd
Then enter the commandjava -versionIf you can see the Java version information, it means the Java environment variable configuration was successful.
2. Linux environment variable configuration
Both Linux and Win7 are multi-user operating systems, so the location where environment variables are configured determines the scope within which the environment variables take effect.
As above, under Win7 I configured it under the user "bai", so only when the user "bai" logs in can the Java environment be used. Other users cannot use it. Of course, if your configuration is in the system variables, then all users on this computer can use this environment. Once you are familiar with this concept, configuring environment variables on Linux becomes simple.
Step 1: Download
Download the JDK version corresponding to Linux to /usr/local, then extract it:
$ wget http://download.oracle.com/otn-pub/java/jdk/7u79-b15/jdk-7u79-linux-x64.tar.gz
$ tar -zxvf jdk-8u66-linux-x64.tar.gz
$ mv jdk1.7.0_79 jdk1.7          # 重命名
Get the JDK directory path /usr/local/jdk1.7
Step 2: Configure the Java environment for all users
Log in as the root user and run vim /etc/profile
Press the Insert key, then move to the last line and add
#configuration java development enviroument
export JAVA_HOME=/usr/local/jdk1.7
export PATH=$JAVA_HOME/bin:$PATH
export CLASSPATH=.:$JAVA_HOME/lib/dt.jar:$JAVA_HOME/lib/tools.jar
Then press the Esc key, enter wq, and after exiting, enterjava -versionIf you can see the corresponding version information, it means the Java environment variable configuration was successful.
Step 3: Configure the Java environment for the current user
vim ~/.bash_profile file
Similarly, add the following information:
#configuration java development enviroument
export JAVA_HOME=/usr/local/jdk1.7
export PATH=$JAVA_HOME/bin:$PATH
export CLASSPATH=.:$JAVA_HOME/lib/dt.jar:$JAVA_HOME/lib/tools.jar
Reload the system configuration file:
source /etc/profile
Check whether the JDK was installed successfully:
java -version