Docker Dockerfile
What is a Dockerfile?
A Dockerfile is a text file that contains all the instructions for building a Docker image.
A Dockerfile is a text file used to build an image. Its text content contains the instructions and explanations required to build the image.
By defining a series of commands and parameters, the Dockerfile guides Docker in building a custom image.
Using Dockerfile to customize images
Here we only explain how to run a Dockerfile file to customize an image. The detailed explanation of the instructions inside the Dockerfile will be introduced in the next section. Here you only need to understand the build process.
1. Below, we'll customize an nginx image (the built image will contain a /usr/share/nginx/html/index.html file)
In an empty directory, create a new file named Dockerfile and add the following content to the file:
FROM nginx
RUN echo '这是一个本地构建的nginx镜像' > /usr/share/nginx/html/index.html
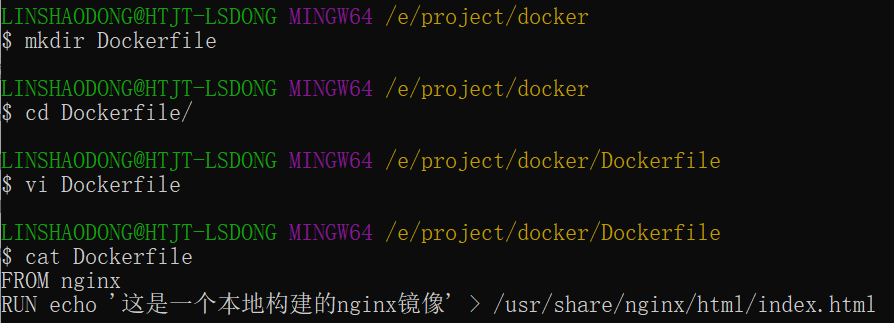
2. The role of the FROM and RUN instructions
FROM: Custom images are all based on the FROM image. Here, nginx is the base image required for customization. All subsequent operations are based on nginx.
RUN: Used to execute the command-line command that follows. It has the following two formats:
shell format:
RUN <命令行命令>
# <命令行命令> 等同于,在终端操作的 shell 命令。
exec format:
RUN ["可执行文件", "参数1", "参数2"]
# 例如:
# RUN ["./test.php", "dev", "offline"] 等价于 RUN ./test.php dev offline
Note: Each time an instruction in the Dockerfile is executed, a new layer is created on Docker. Therefore, too many meaningless layers will cause the image to become too large. For example:
RUN yum -y install wget
RUN wget -O redis.tar.gz "http://download.redis.io/releases/redis-5.0.3.tar.gz"
RUN tar -xvf redis.tar.gz
The above execution will create a 3-layer image. It can be simplified to the following format:
RUN yum -y install wget \
&& wget -O redis.tar.gz "http://download.redis.io/releases/redis-5.0.3.tar.gz" \
&& tar -xvf redis.tar.gz
As above, use&&Use "&&" to connect commands, so after execution, only one layer of image will be created.
Start building the image
In the directory where the Dockerfile file is located, execute the build action.
The following example builds an nginx:v3 (image name:image tag) through the Dockerfile in the directory.
Note: the last.Represents the context path for this execution, which will be introduced in the next section.
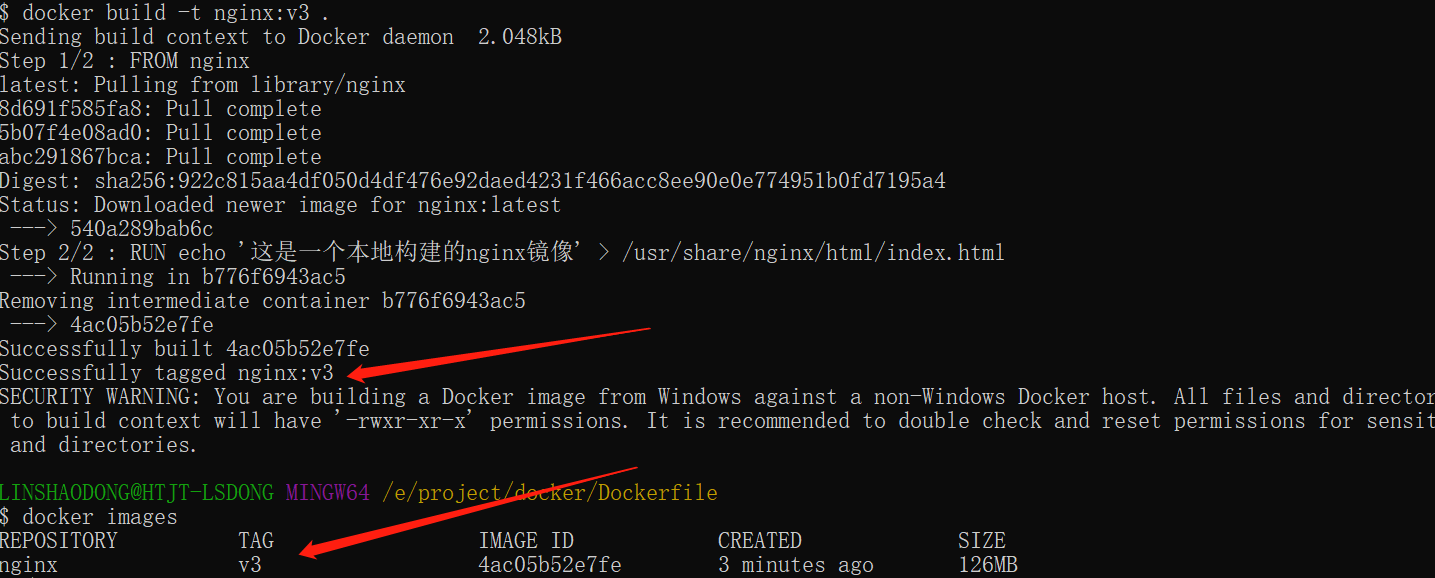
The above display indicates that the build has been successful.
context path
In the previous section, it was mentioned that the last part of the command.is the context path. So what is the context path?
The context path means that when docker builds an image, sometimes it wants to use files from the local machine (for example, copying). After the docker build command knows this path, it will package all the contents under that path.
Parsing:Because docker's running mode is C/S. Our local machine is C, and the docker engine is S. The actual build process is completed under the docker engine, so the files on our local machine cannot be used at this time. This requires packaging the files in the specified directory on our local machine and providing them to the docker engine for use.
If the last parameter is not specified, the default context path is the location where the Dockerfile resides.
Note: Do not place useless files in the context path, because they will be packaged and sent to the Docker engine together. If there are too many files, the process will be slow.
Instruction Details
| Dockerfile instructions | Description |
|---|---|
| FROM | Specify the base image for subsequent instruction building. |
| MAINTAINER | Specify the author/maintainer of the Dockerfile. (Deprecated, it is recommended to use the LABEL instruction) |
| LABEL | Add metadata to the image, using key-value pairs. |
| RUN | Execute commands in the image during the build process. |
| CMD | Specify the default command when the container is created. (Can be overridden) |
| ENTRYPOINT | Set the main command when the container is created. (Cannot be overridden) |
| EXPOSE | Declares the specific network ports that the container listens on at runtime. |
| ENV | Sets environment variables inside the container. |
| ADD | Copies files, directories, or remote URLs into the image. |
| COPY | Copy files or directories into the image. |
| VOLUME | Creates mount points for the container or declares volumes. |
| WORKDIR | Set the working directory for subsequent instructions. |
| USER | Specifies the user context for subsequent instructions. |
| ARG | Define variables passed to the builder during the build process, which can be set using the "docker build" command. |
| ONBUILD | Add triggers when this image is used as the base for another build process. |
| STOPSIGNAL | Set the system call signal sent to the container to exit. |
| HEALTHCHECK | Define a command to periodically check the health status of the container. |
| SHELL | Overrides the default shell in Docker, used for RUN, CMD, and ENTRYPOINT instructions. |
COPY
Copy instruction, copies files or directories from the context directory to the specified path in the container.
Format:
COPY [--chown=<user>:<group>] <源路径1>...  <目标路径>
COPY [--chown=<user>:<group>] ["<源路径1>",...  "<目标路径>"]
[--chown=<user>:<group>]:Optional parameter, changes the owner and group of the files copied into the container.
<source path>:Source file or source directory, which can be a wildcard expression here. Its wildcard rules must satisfy Go's filepath.Match rules. For example:
COPY hom* /mydir/
COPY hom?.txt /mydir/
<target path>: The specified path inside the container. This path does not need to be created in advance; if it does not exist, it will be created automatically.
ADD
The usage format of the ADD instruction is similar to that of COPY (under the same requirements, the official recommendation is to use COPY). The functions are also similar, with the differences as follows:
- ADD advantages: When the <source file> is a tar compressed file, and the compression format is gzip, bzip2, or xz, it will automatically copy and decompress it to the <destination path>.
- ADD disadvantages: It cannot copy tar compressed files without decompressing them. It will invalidate the image build cache, which may make the image build relatively slow. Whether to use it can be determined based on whether automatic decompression is needed.
CMD
Similar to the RUN instruction, it is used to run programs, but the two run at different points in time:
- CMD runs during docker run.
- RUN is during docker build.
Function:Specifies the default program to run for the started container. When the program finishes running, the container also ends. The program specified by the CMD instruction can be overridden by the program specified in the docker run command-line parameters.
Note: If there are multiple CMD instructions in the Dockerfile, only the last one takes effect.
Format:
CMD <shell 命令>
CMD ["<可执行文件或命令>","<param1>","<param2>",...]
CMD ["<param1>","<param2>",...]  # 该写法是为 ENTRYPOINT 指令指定的程序提供默认参数
The second format is recommended because the execution process is relatively clear. In actual operation, the first format will also be automatically converted to the second format, and the default executable file is sh.
ENTRYPOINT
Similar to the CMD instruction, but it will not be overridden by the command specified by the docker run command-line arguments. Moreover, these command-line arguments will be passed as parameters to the program specified by the ENTRYPOINT instruction.
However, if the --entrypoint option is used when running docker run, it will override the program specified by the ENTRYPOINT instruction.
Advantages:When executing docker run, you can specify the parameters required for ENTRYPOINT to run.
Note: If there are multiple ENTRYPOINT instructions in the Dockerfile, only the last one takes effect.
Format:
ENTRYPOINT ["<executeable>","<param1>","<param2>",...]
It can be used together with the CMD command: Generally, CMD is used for variable parameters. Here, CMD is equivalent to passing parameters to ENTRYPOINT, which will be mentioned in the example below.
Example:
Assume the nginx:test image has been built from the Dockerfile:
FROM nginx

ENTRYPOINT ["nginx", "-c"] # 定参
CMD ["/etc/nginx/nginx.conf"] # 变参
1. Run without passing parameters
$ docker run nginx:test
The container will run the following command by default to start the main process.
nginx -c /etc/nginx/nginx.conf
2. Run with parameters
$ docker run nginx:test -c /etc/nginx/new.conf
The container will run the following command by default to start the main process (/etc/nginx/new.conf: assuming this file already exists in the container).
nginx -c /etc/nginx/new.conf
ENV
Set environment variables. Once an environment variable is defined, it can be used in subsequent instructions.
Format:
ENV <key> <value>
ENV <key1>=<value1> <key2>=<value2>...
The following example sets NODE_VERSION = 7.2.0, which can be referenced via $NODE_VERSION in subsequent instructions:
ENV NODE_VERSION 7.2.0

RUN curl -SLO "https://nodejs.org/dist/v$NODE_VERSION/node-v$NODE_VERSION-linux-x64.tar.xz" \
  && curl -SLO "https://nodejs.org/dist/v$NODE_VERSION/SHASUMS256.txt.asc"
ARG
Build parameters, with the same effect as ENV. However, the scope is different. The environment variables set by ARG are only valid within the Dockerfile, that is, only during the docker build process. This environment variable does not exist in the built image.
In the build command `docker build`, it can be overridden with `--build-arg <parameter-name>=<value>`.
Format:
ARG <参数名>[=<默认值>]
VOLUME
Define an anonymous data volume. If you forget to mount a data volume when starting the container, it will be automatically mounted to the anonymous volume.
Function:
- Prevent important data from being lost due to container restarts, which is very critical.
- Avoid the container becoming continuously larger.
Format:
VOLUME ["<路径1>", "<路径2>"...]
VOLUME <路径>
When starting the container with docker run, we can modify the mount point using the -v parameter.
EXPOSE
Only declares ports.
Function:
- Helps image users understand the daemon port of this image service, making it convenient to configure mapping.
- When using random port mapping at runtime, that is, docker run -P, it will automatically randomly map the ports exposed by EXPOSE.
Format:
EXPOSE <端口1> [<端口2>...]
WORKDIR
Specifies the working directory. The working directory specified with WORKDIR will exist in every layer of the image build. The current directory for subsequent layers will be changed to the specified directory. If the directory does not exist, WORKDIR will create it for you.
During the docker build process, every RUN command creates a new layer. Only directories created through WORKDIR will always exist.
Format:
WORKDIR <工作目录路径>
USER
Used to specify the user and user group for executing subsequent commands. Here it only switches the user for executing subsequent commands (the user and user group must already exist in advance).
Format:
USER <用户名>[:<用户组>]
HEALTHCHECK
Used to specify a program or instruction to monitor the running status of the docker container service.
Format:
HEALTHCHECK [选项] CMD <命令>:设置检查容器健康状况的命令
HEALTHCHECK NONE:如果基础镜像有健康检查指令,使用这行可以屏蔽掉其健康检查指令

HEALTHCHECK [选项] CMD <命令> : 这边 CMD 后面跟随的命令使用,可以参考 CMD 的用法。
ONBUILD
Used to delay the execution of build commands. Simply put, commands specified with ONBUILD in the Dockerfile will not be executed during the current image build process (assuming the image is test-build). When a new Dockerfile uses the previously built image FROM test-build, then when building the new image's Dockerfile, the commands specified by ONBUILD in test-build's Dockerfile will be executed.
Format:
ONBUILD <其它指令>
LABEL
The LABEL instruction is used to add some metadata to the image, in the form of key-value pairs. The syntax is as follows:
LABEL <key>=<value> <key>=<value> <key>=<value> ...
For example, we can add the author of the image:
LABEL org.opencontainers.image.authors="example"other extensions