For source code to run, it must first be converted into binary machine code. This is the compiler's task.
For example, consider the following source code (assume the file name is test.c).
#include <stdio.h>

int main(void)
{
  fputs("Hello, world!\n", stdout);
  return 0;
}
It must first be processed by a compiler before it can run.
$ gcc test.c
$ ./a.out
Hello, world!
For complex projects, the compilation process must be divided into three steps.
$ ./configure
$ make
$ make install
What exactly do these commands do? Most books and materials are vague on this point, simply saying "this is how you compile," without further explanation.
This article will introduce how the compiler works, that is, the respective tasks of the three commands above. I mainly refer to Alex Smith's article "Building C Projects." It should be noted that this article mainly targets the gcc compiler, i.e., C and C++, and may not apply to the compilation of other languages.
Step 1: Configure
Before the compiler starts working, it needs to know the current system environment, such as where the standard library is, where the software installation location is, which components need to be installed, and so on. This is because different computers have different system environments. By specifying compilation parameters, the compiler can flexibly adapt to the environment and produce machine code that can run in various environments. This step of determining compilation parameters is called "configure."
This configuration information is stored in a configuration file, conventionally a script file named configure. It is usually generated by the autoconf tool. The compiler obtains the compilation parameters by running this script.
The configure script already tries to account for differences between systems and provides default values for various compilation parameters. If the user's system environment is unusual, or there are specific requirements, the user needs to manually supply compilation parameters to the configure script.
$ ./configure --prefix=/www --with-mysql
The above code is a compilation configuration for PHP source code. The user specifies that the installed files are saved in the www directory, and that the mysql module support is included during compilation.
Step 2: Determine the Location of the Standard Library and Header Files
Source code will inevitably use standard library functions and header files. They can be stored in any directory on the system. The compiler cannot automatically detect their location; it can only know it through the configuration file.
The second step of compilation is to learn the location of the standard library and header files from the configuration file. Generally, the configuration file provides a list of several specific directories. During compilation, the compiler searches these directories in order to find the targets.
Step 3: Determine Dependencies
For large projects, there are often dependencies between source files. The compiler needs to determine the order of compilation. Suppose file A depends on file B; the compiler should ensure the following two points:
(1) Only after file B is compiled can file A be compiled.
(2) When file B changes, file A will be recompiled.
The compilation order is stored in a file called makefile, which lists which files are compiled first and which are compiled later. The makefile file is generated by running the configure script, which is why configure must be run first during compilation.
While determining dependencies, the compiler also determines which header files will be used during compilation.
Step 4: Precompilation of Header Files
Different source files may reference the same header file (e.g., stdio.h). During compilation, header files must also be compiled. To save time, the compiler compiles header files before compiling source code. This ensures that each header file is compiled only once, rather than being recompiled every time it is used.
However, not all contents of header files are precompiled. The #define command, used to declare macros, is not precompiled.
Step 5: Preprocessing
After precompilation, the compiler begins replacing the header files and macros in the source code. Taking the source code at the beginning of this article as an example, it contains the header file stdio.h, and after replacement it looks like this:
extern int fputs(const char *, FILE *);
extern FILE *stdout;

int main(void)
{
    fputs("Hello, world!\n", stdout);
    return 0;
}
For readability, the above code only shows the parts of the header file related to the source code, i.e., the declarations of fputs and FILE, omitting the rest of stdio.h (because it is very long). In addition, the header file in the above code has not been precompiled; in fact, what is inserted into the source code is the precompiled result. The compiler also removes comments in this step.
This step is called "Preprocessing," because after it is complete, the real processing is about to begin.
Step 6: Compilation
After preprocessing, the compiler begins generating machine code. For some compilers, there is an intermediate step: first converting the source code into assembly code, and then converting the assembly code into machine code.
Below is the assembly code generated from the source code at the beginning of this article.
    .file   "test.c"
    .section    .rodata
.LC0:
    .string "Hello, world!\n"
    .text
    .globl  main
    .type   main, @function
main:
.LFB0:
    .cfi_startproc
    pushq   %rbp
    .cfi_def_cfa_offset 16
    .cfi_offset 6, -16
    movq    %rsp, %rbp
    .cfi_def_cfa_register 6
    movq    stdout(%rip), %rax
    movq    %rax, %rcx
    movl    $14, %edx
    movl    $1, %esi
    movl    $.LC0, %edi
    call    fwrite
    movl    $0, %eax
    popq    %rbp
    .cfi_def_cfa 7, 8
    ret
    .cfi_endproc
.LFE0:
    .size   main, .-main
    .ident  "GCC: (Debian 4.9.1-19) 4.9.1"
    .section    .note.GNU-stack,"",@progbits
This transcoded file is called an object file.
Step 7: Linking
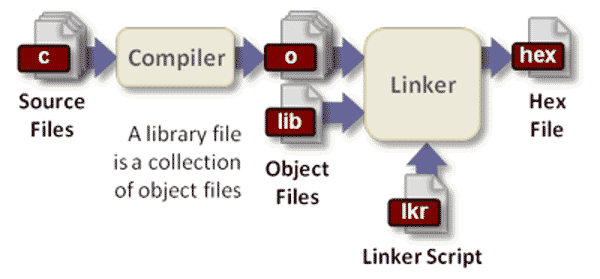
The object file cannot run yet; it must be further converted into an executable file. If you look carefully at the result of the previous step, you will notice that it references the stdout function and the fwrite function. That is, for the program to run normally, in addition to the above code, it must also have the code for the stdout and fwrite functions, which are provided by the C standard library.
The compiler's next task is to add the code of external functions (usually files with suffixes .lib and .a) to the executable file. This is called linking. This method of adding external function libraries to the executable file by copying is called static linking. Dynamic linking will be mentioned later.
The role of the make command is to start from Step 4, precompilation of header files, and continue until this step is completed.
Step 8: Installation
The linking in the previous step is performed in memory, meaning the compiler generates the executable file in memory. Next, the executable file must be saved to the installation directory specified in advance by the user.
On the surface, this step is simple: just copy the executable file (along with related data files) there. However, in practice, this step also involves creating directories, saving files, setting permissions, and so on. This entire saving process is called "Installation."
Step 9: Operating System Integration
After the executable file is installed, the operating system must be notified in some way that the program is available. For example, if we install a text reader program, we often want the program to run automatically when double-clicking a txt file.
This requires registering the program's metadata in the operating system: file name, file description, associated file extensions, and so on. In Linux systems, this information is usually stored in .desktop files under the /usr/share/applications directory. In addition, on Windows operating systems, a shortcut must be created in the Start menu.
These tasks are called "Operating System Integration." The make install command is used to complete the "Installation" and "Operating System Integration" steps.
Step 10: Generate Installation Package
At this point, the overall process of compiling source code is basically complete. But only a very small number of users are willing to patiently go through this entire process from start to finish. In fact, if you only give users the source code, they will consider you unfriendly. Most users want a binary executable program that can run immediately. This requires developers to turn the executable file generated in the previous step into a distributable installation package.
Therefore, the compiler must also have the ability to generate installation packages. Usually, the executable file (along with related data files) is saved as a compressed archive in a certain directory structure and handed over to the user.
Step 11: Dynamic Linking
Normally, by this step, the program is already able to run. As for what happens during runtime, it is unrelated to the compiler. However, the developer can choose, during the compilation phase, how the executable file links to external function libraries: either static linking (linking at compile time) or dynamic linking (linking at runtime). So, finally, we should also mention what dynamic linking means.
As mentioned earlier, static linking means copying external function libraries into the executable file. The advantage is broad applicability: no need to worry about the user's machine missing a library file. The disadvantage is that the installation package is relatively large, and multiple applications cannot share library files. Dynamic linking is the opposite: external function libraries are not included in the installation package and are only referenced dynamically at runtime. The advantage is that the installation package is smaller, and multiple applications can share library files. The disadvantage is that users must have the library files pre-installed, and both the version and installation location must meet requirements; otherwise, the program will not run properly.
In practice, most software uses dynamic linking and shared library files. These dynamically shared library files have the suffix .so on Linux platforms, .dll on Windows platforms, and .dylib on Mac platforms.
Original source: http://www.ruanyifeng.com/blog/2014/11/compiler.html