phpMailer is a very powerful PHP email-sending class that can set the sender address, reply-to address, email subject, HTML web pages, upload attachments, and is very easy to use.
Features of phpMailer:
- 1. Supports multiple TO, CC, BCC, and REPLY-TO in emails.
- 2. Widely used across platforms; supported SMTP servers include Sendmail, qmail, Postfix, Gmail, Imail, Exchange, etc.
- 3. Supports embedded images, attachments, and HTML emails.
- 4. Reliable and powerful debugging features.
- 5. Supports SMTP authentication.
- 6. Custom email headers.
- 7. Supports 8bit, base64, binary, and quoted-printable encoding.
phpmailer installation or download methods:
1. Download from GitHub:https://github.com/PHPMailer/PHPMailer/
2. Install using Composer:
composer require phpmailer/phpmailer
Before sending, you need to have your own mail server. For testing, it is actually most convenient to use a free email account you have applied for, as you don't need to set up your own server. You may need to configure the SMTP service of the email account; most public mailboxes (163, QQ, etc.) have it disabled by default for security.
NetEase mailbox configuration is as shown below:
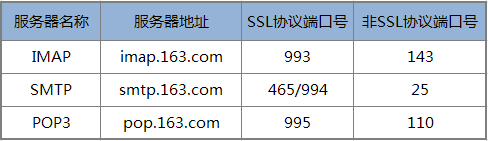
QQ mailbox related configuration is as shown below:
| POP3 server (port 995) | SMTP server (port 465 or 587) | |
|---|---|---|
| qq.com | pop.qq.com | smtp.qq.com |
Of course, other email services besides NetEase and QQ are also possible. The PHP code example is given below:
Example
use PHPMailer\PHPMailer\PHPMailer;
use PHPMailer\PHPMailer\Exception;
require './src/Exception.php';
require './src/PHPMailer.php';
require './src/SMTP.php';
$mail = new PHPMailer(true); // Passing `true` enables exceptions
try {
// Server configuration
$mail->CharSet ="UTF-8"; // Set email encoding
$mail->SMTPDebug = 0; // Debug mode output
$mail->isSMTP(); // Use SMTP
$mail->Host = 'smtp.163.com'; // SMTP server
$mail->SMTPAuth = true; // Allow SMTP authentication
$mail->Username = 'Email username'; // SMTP username, i.e., the email username
$mail->Password = 'Password or authorization code'; // SMTP password - some mailboxes use an authorization code (e.g., 163 mailbox)
$mail->SMTPSecure = 'ssl'; // Allow TLS or SSL protocol
$mail->Port = 465; // Server port 25 or 465, depending on the mail server support
$mail->setFrom('xxxx@163.com', 'Mailer'); // Sender
$mail->addAddress('aaaa@126.com', 'Joe'); // Recipient
//$mail->addAddress('ellen@example.com'); // Multiple recipients can be added
$mail->addReplyTo('xxxx@163.com', 'info'); // Which email to reply to; it is recommended to be the same as the sender
//$mail->addCC('cc@example.com'); // CC
//$mail->addBCC('bcc@example.com'); // BCC
// Send attachment
// $mail->addAttachment('../xy.zip'); // Add attachment
// $mail->addAttachment('../thumb-1.jpg', 'new.jpg'); // Send attachment and rename
//Content
$mail->isHTML(true); // Whether to send in HTML document format; after sending, the client can directly display the corresponding HTML content
$mail->Subject = 'Here is the email subject'. time();
$mail->Body = '<h1>Here is the email content</h1>'. date('Y-m-d H:i:s');
$mail->AltBody = 'If the email client does not support HTML, this content is displayed';
$mail->send();
echo 'Email sent successfully';
} catch (Exception $e) {
echo 'Email sending failed: ', $mail->ErrorInfo;
}
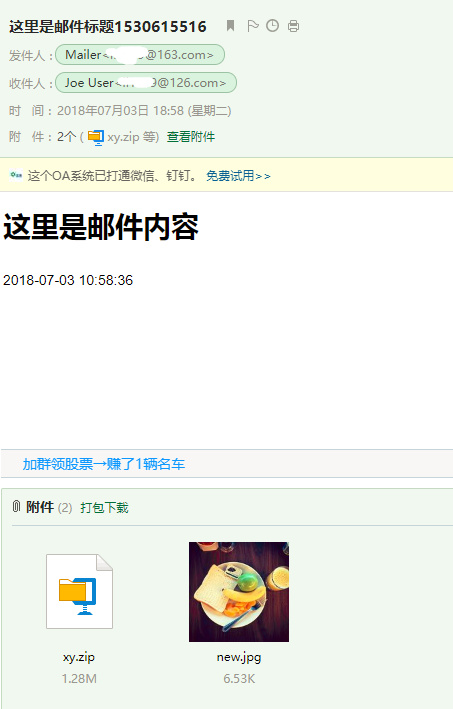
The interface after sending an email with attachments is as follows:
Article source: https://www.liminghulian.com/article/98