Electron Getting Started Example
In the previous chapter, we learned how to install Electron.
In this section, we will introduce step by step how to create a simple Electron instance.
1. Create project directory
Open the terminal and run the following commands in sequence:
mkdir my-electron-app
cd my-electron-app
npm init -y
npm install electron --save-dev
The generated structure is as follows:
my-electron-demo/
├─ package.json
├─ main.js
└─ index.html
2. Configure package.json
Open package.json and modify it to the following content:
{
  "name": "my-electron-app",
  "version": "1.0.0",
  "description": "EXAMPLE Electron 测试",
  "main": "main.js",
  "scripts": {
    "start": "electron ."
  },
  "devDependencies": {
    "electron": "latest"
  }
}
Description:
| Fields | Function |
|---|---|
"main" |
Specify the main process file to be executed when Electron starts. |
"scripts.start" |
definitionnpm startCommand execution content |
"electron ." |
Indicates letting Electron run the application in the current directory |
"devDependencies" |
Development dependencies, which will not be packaged into the final app. |
3. Write the main process file main.js.
This is Electron's core control center, responsible for creating app windows and loading pages.
Create the file main.js and enter the following complete code (with detailed comments):
Example
// main.js — Electron main process file
// Import app (controls application lifecycle) and BrowserWindow (creates windows) from the electron module.
const { app, BrowserWindow } = require('electron');
// Node.js built-in module for joining file paths
const path = require('path');
// Create a function to generate the main window
function createWindow() {
// Create a new window instance
const win = new BrowserWindow({
width: 800, // Window width (pixels)
height: 600, // Window height (pixels)
resizable: true, // Whether to allow users to drag and resize the window (default true)
title: "EXAMPLE Electron Test", // Window title, shown in the title bar
webPreferences: {
// Web page runtime configuration
contextIsolation: true, // Enable context isolation (recommended for security)
nodeIntegration: false, // Do not use Node.js directly in web pages
}
});
// Load the local index.html file into the window
// path.join(__dirname, 'index.html') returns the path to index.html in the current directory
win.loadFile(path.join(__dirname, 'index.html'));
// Open developer tools (optional, convenient for debugging)
// win.webContents.openDevTools();
}
// When Electron initialization is complete, the app's ready event is triggered.
// app.whenReady() returns a Promise; after it resolves, call createWindow()
app.whenReady().then(createWindow);
// Triggered when all windows are closed (only applies outside macOS)
app.on('window-all-closed', () => {
// process.platform returns the operating system platform
// The platform value for macOS is 'darwin'; on macOS, the program is generally kept resident.
if (process.platform !== 'darwin') {
app.quit(); // exit application
}
});
// macOS special logic: recreate the window when clicking the Dock icon
app.on('activate', () => {
// If no window is currently open, create a new one
if (BrowserWindow.getAllWindows().length === 0) {
createWindow();
}
});
// Import app (controls application lifecycle) and BrowserWindow (creates windows) from the electron module.
const { app, BrowserWindow } = require('electron');
// Node.js built-in module for joining file paths
const path = require('path');
// Create a function to generate the main window
function createWindow() {
// Create a new window instance
const win = new BrowserWindow({
width: 800, // Window width (pixels)
height: 600, // Window height (pixels)
resizable: true, // Whether to allow users to drag and resize the window (default true)
title: "EXAMPLE Electron Test", // Window title, shown in the title bar
webPreferences: {
// Web page runtime configuration
contextIsolation: true, // Enable context isolation (recommended for security)
nodeIntegration: false, // Do not use Node.js directly in web pages
}
});
// Load the local index.html file into the window
// path.join(__dirname, 'index.html') returns the path to index.html in the current directory
win.loadFile(path.join(__dirname, 'index.html'));
// Open developer tools (optional, convenient for debugging)
// win.webContents.openDevTools();
}
// When Electron initialization is complete, the app's ready event is triggered.
// app.whenReady() returns a Promise; after it resolves, call createWindow()
app.whenReady().then(createWindow);
// Triggered when all windows are closed (only applies outside macOS)
app.on('window-all-closed', () => {
// process.platform returns the operating system platform
// The platform value for macOS is 'darwin'; on macOS, the program is generally kept resident.
if (process.platform !== 'darwin') {
app.quit(); // exit application
}
});
// macOS special logic: recreate the window when clicking the Dock icon
app.on('activate', () => {
// If no window is currently open, create a new one
if (BrowserWindow.getAllWindows().length === 0) {
createWindow();
}
});
Description:
| Concepts | Description |
|---|---|
| main process | The script that runs first after Electron starts, responsible for window creation, menu control, system APIs, etc. |
| BrowserWindow | Used to create a browser window that loads web content (HTML files or URLs). |
| app.whenReady() | Ensure the window is created only after Electron initialization is complete; otherwise, errors may occur. |
| win.loadFile() | Load a local HTML file. You can also usewin.loadURL('https://example.com')Load website. |
| contextIsolation | Isolates web page scripts from the Node environment to improve security (officially recommended). |
| nodeIntegration | if set totrue, allowing you to use Node.js directly in the page (but with security risks). |
| window-all-closed | Exit the app when all windows are closed (effective on Windows/Linux). |
4. Write the rendering page index.html
Create the index.html file and enter the following content:
Example
<!DOCTYPE html>
<html>
<head>
<meta charset="utf-8">
<title>Example (example.com)</title>
<style>
body {
margin: 0;
display: flex;
align-items: center;
justify-content: center;
height: 100vh;
font-family: "Segoe UI", Arial, sans-serif;
background: #f5f7fa;
}
.box {
text-align: center;
background: white;
padding: 40px 60px;
border-radius: 12px;
box-shadow: 0 6px 20px rgba(0, 0, 0, 0.08);
}
h1 {
margin: 0 0 10px;
color: #333;
}
p {
margin: 0;
color: #666;
}
</style>
</head>
<body>
<div class="box">
<h1>Hello, Electron!</h1>
<p>EXAMPLE Electron test. This is the first Electron desktop application you created.🎉</p>
</div>
</body>
</html>
<html>
<head>
<meta charset="utf-8">
<title>Example (example.com)</title>
<style>
body {
margin: 0;
display: flex;
align-items: center;
justify-content: center;
height: 100vh;
font-family: "Segoe UI", Arial, sans-serif;
background: #f5f7fa;
}
.box {
text-align: center;
background: white;
padding: 40px 60px;
border-radius: 12px;
box-shadow: 0 6px 20px rgba(0, 0, 0, 0.08);
}
h1 {
margin: 0 0 10px;
color: #333;
}
p {
margin: 0;
color: #666;
}
</style>
</head>
<body>
<div class="box">
<h1>Hello, Electron!</h1>
<p>EXAMPLE Electron test. This is the first Electron desktop application you created.🎉</p>
</div>
</body>
</html>
5. Run the project
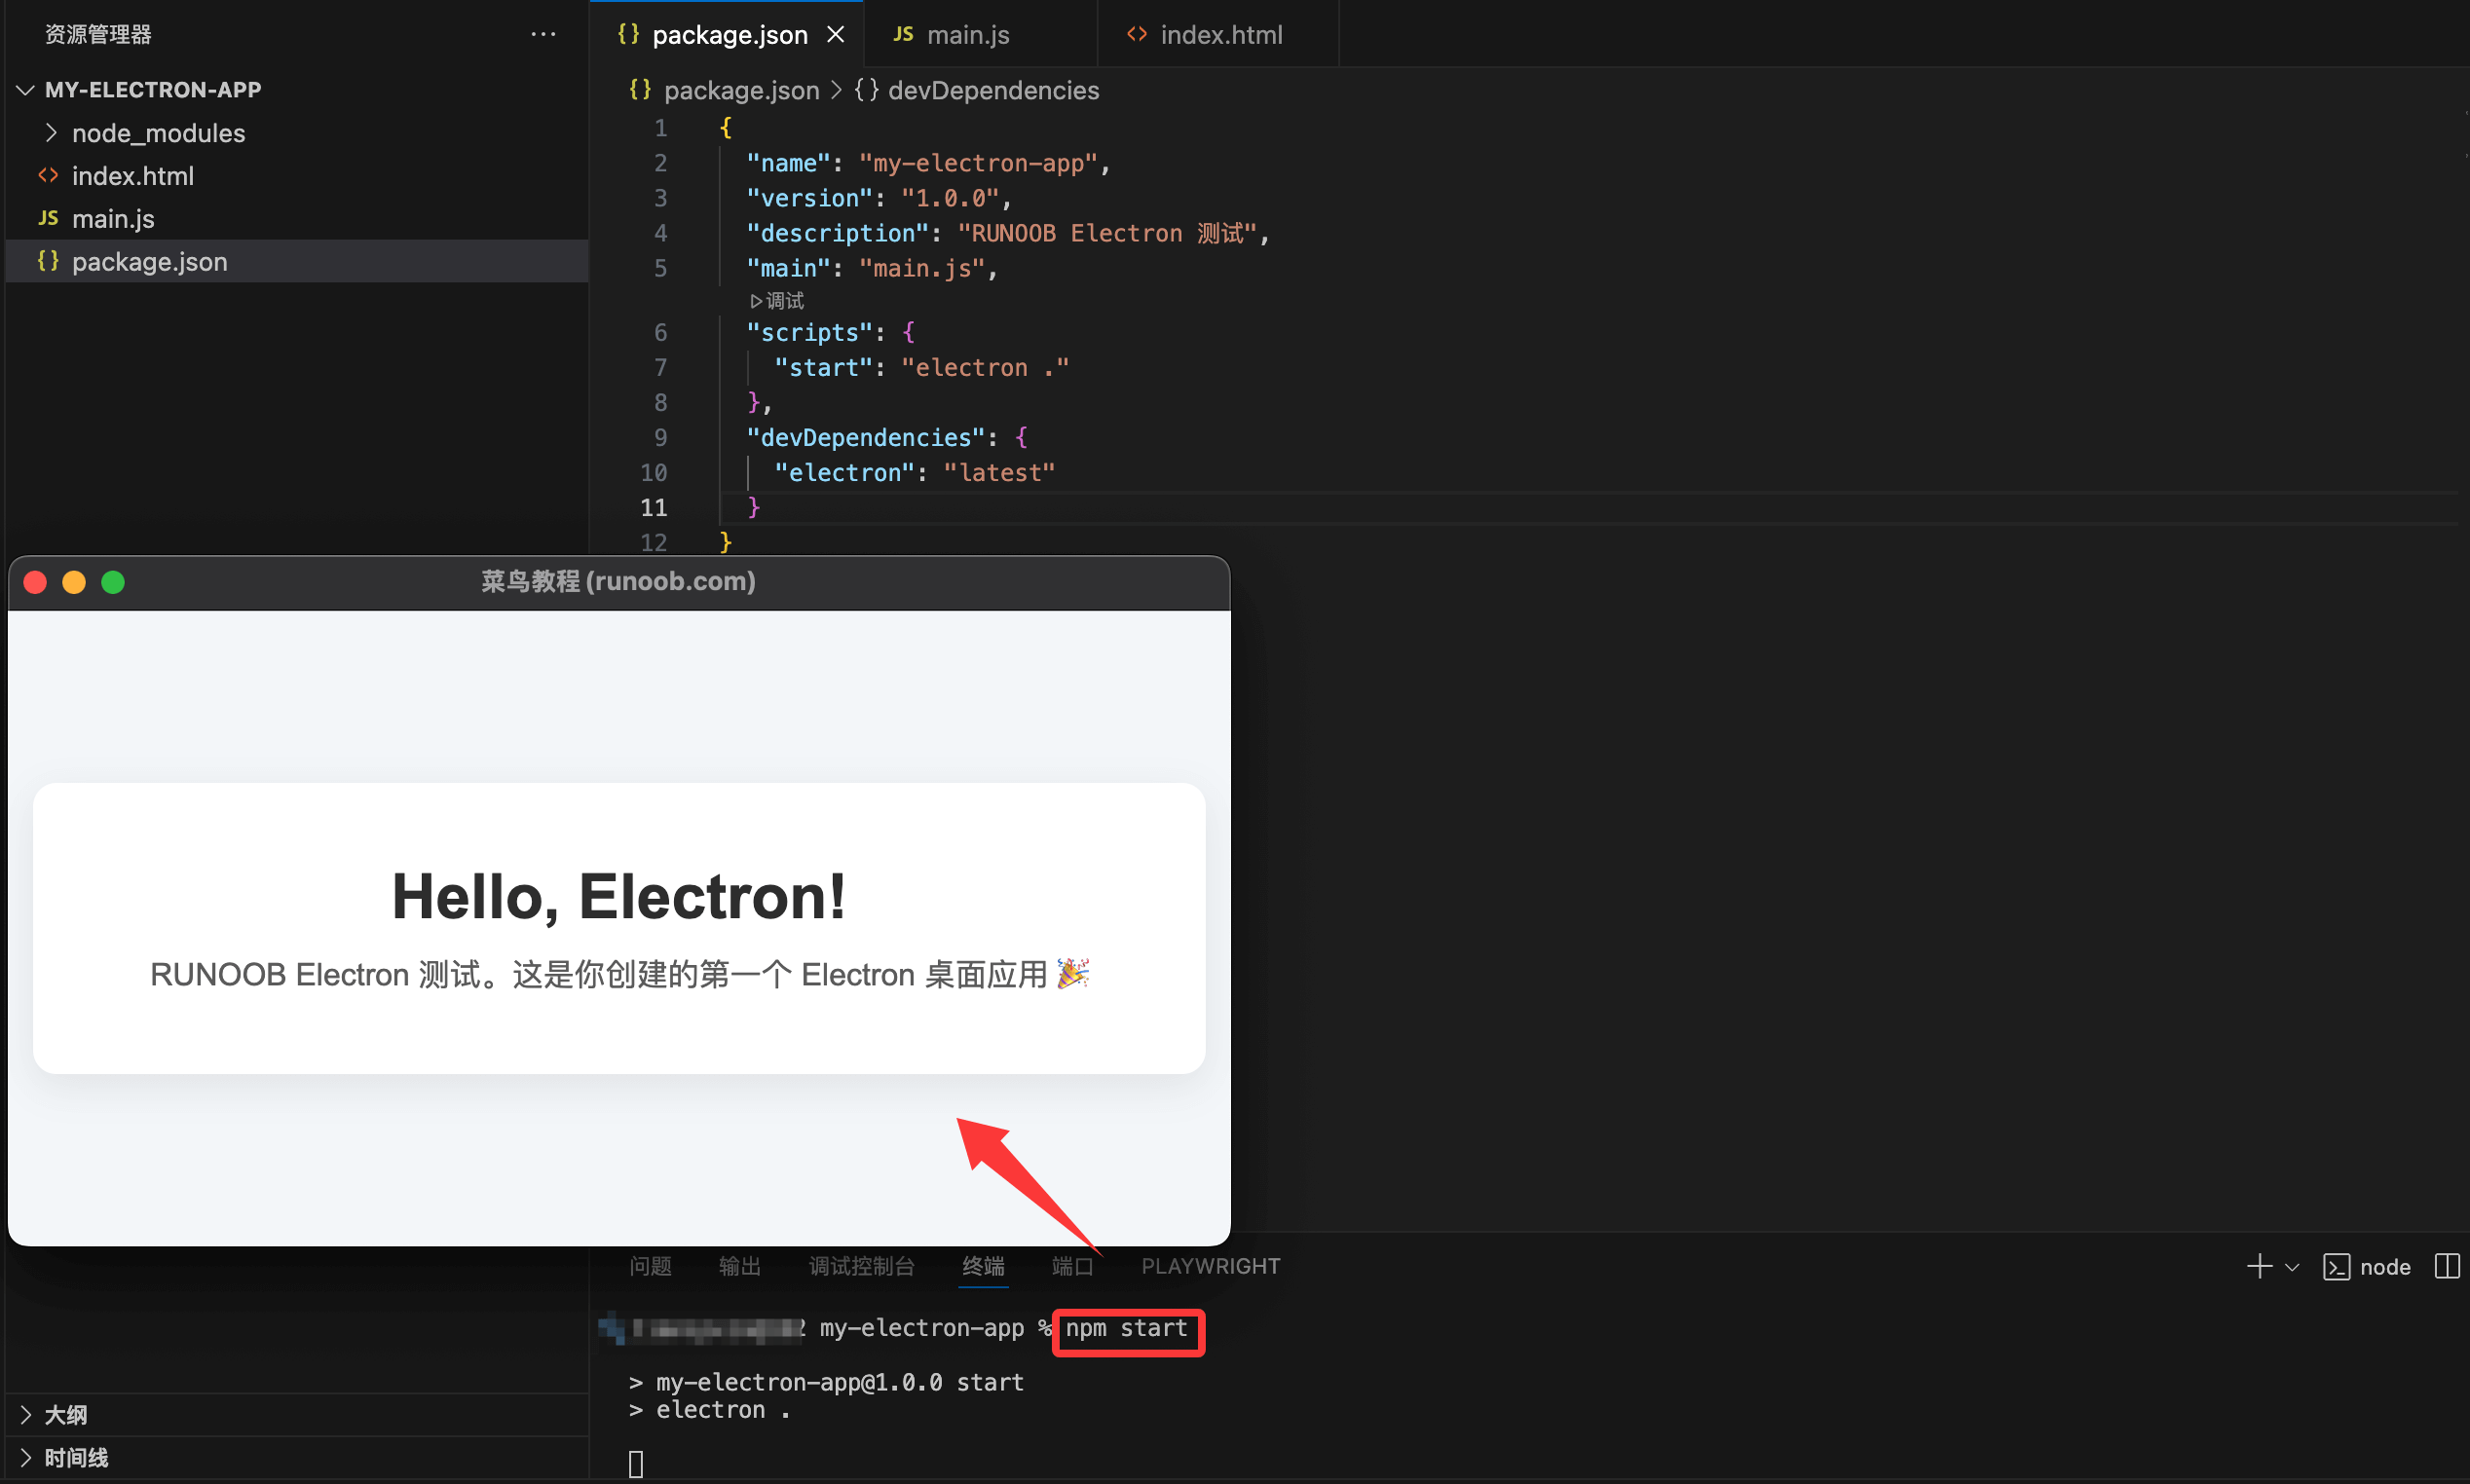
Return to the terminal and run:
npm start
After running, you will see a desktop window displaying:
Hello, Electron!
EXAMPLE Electron 测试。这是你创建的第一个 Electron 桌面应用 🎉