Dash Common HTML Components
One of the core components of Dash is the HTML components, which allow you to embed standard HTML elements in your application.
This article will provide a detailed introduction to the commonly used HTML components in Dash.
1. Importing HTML Components
In the latest version of Dash, the way HTML components are imported has changed. We can directly import fromdashImport in modulehtmlcomponents, instead of having to import from as beforedash_html_componentsImport from.
from dash import html
Common HTML Components
| Components | Description | Example code |
|---|---|---|
html.Div |
Create a container (<div>), used to wrap other components |
html.Div(children=[html.H1("标题"), html.P("这是一个段落。")]) |
html.H1 |
Create a level-1 heading (<h1>) |
html.H1("一级标题") |
html.H2 |
Create a level-2 heading (<h2>) |
html.H2("二级标题") |
html.H3 |
Create a level-3 heading (<h3>) |
html.H3("三级标题") |
html.P |
Create paragraph (<p>) |
html.P("这是一个段落。") |
html.Span |
Create an inline container (<span>), used to wrap inline text or elements |
html.Span("这是一段行内文本。") |
html.Br |
Create line break (<br>) |
html.Div(children=[html.P("第一行"), html.Br(), html.P("第二行")]) |
html.A |
Create a hyperlink (<a>) |
html.A("点击这里访问 Dash 官网", href="https://dash.plotly.com") |
html.Img |
Insert image (<img>) |
html.Img(src="https://plotly.com/assets/images/logo.png", height="50px") |
html.Ul |
Create an unordered list (<ul>) |
html.Ul(children=[html.Li("列表项1"), html.Li("列表项2")]) |
html.Ol |
Create an ordered list (<ol>) |
html.Ol(children=[html.Li("第一项"), html.Li("第二项")]) |
html.Li |
Create a list item (<li>) |
html.Li("列表项") |
html.Button |
Create button (<button>) |
html.Button("点击我", id='my-button') |
html.Label |
Create label (<label>), usually used together with input components |
html.Label("用户名:"), dcc.Input(id='username', type='text') |
html.Table |
Create table (<table>) |
html.Table(children=[html.Tr(children=[html.Th("姓名"), html.Th("年龄")])]) |
html.Tr |
Create a table row (<tr>) |
html.Tr(children=[html.Th("姓名"), html.Th("年龄")]) |
html.Th |
Create table header (<th>) |
html.Th("姓名") |
html.Td |
Create table cells (<td>) |
html.Td("张三") |
html.Header |
Create page header (<header>) |
html.Header(children=[html.H1("页眉标题")]) |
html.Footer |
Create footer (<footer>) |
html.Footer(children=[html.P("版权所有 © 2023")]) |
html.Section |
Create section (<section>) |
html.Section(children=[html.H2("章节标题"), html.P("章节内容")]) |
html.Nav |
Create a navigation bar (<nav>) |
html.Nav(children=[html.A("首页", href="../index.html"), html.A("关于", href="../about.html")]) |
html.Main |
Create the main content area (<main>) |
html.Main(children=[html.H1("主要内容")]) |
html.Article |
Create an article area (<article>) |
html.Article(children=[html.H2("文章标题"), html.P("文章内容")]) |
html.Aside |
Create a sidebar (<aside>) |
html.Aside(children=[html.H2("侧边栏"), html.P("侧边栏内容")]) |
html.Details |
Create collapsible content (<details>) |
html.Details(children=[html.Summary("点击展开"), html.P("隐藏内容")]) |
html.Summary |
Create the title of collapsible content (<summary>) |
html.Summary("点击展开") |
2. Common HTML Components
2.1 html.Div
html.Divis one of the most commonly used HTML components in Dash, and it is used to create adivElement.divThe element is typically used to group content and can be styled through CSS.
Example
html.H1('This is a title'),
html.P('This is a paragraph.')
])
In this example,html.DivContains a heading (html.H1) and a paragraph (html.P)。
2.2 html.H1tohtml.H6
html.H1tohtml.H6Used to create headings of different levels.H1is the highest-level heading,H6is the lowest-level heading.
Example
html.H2('This is the H2 heading'),
html.H3('This is the H3 heading'),
html.H4('This is the H4 heading'),
html.H5('This is the H5 heading'),
html.H6('This is the H6 heading')
2.3 html.P
html.PUsed to create a paragraph (<p>element).
Example
2.4 html.A
html.AUsed to create a hyperlink (<a>element). You can use thehrefattribute to specify the target URL of the link.
Example
2.5 html.Img
html.ImgUsed to insert an image into the page (<img>element). You need to use thesrcattribute to specify the URL of the image.
Example
2.6 html.Ulandhtml.Li
html.UlUsed to create an unordered list (<ul>element), andhtml.LiUsed to create list items (<li>element).
Example
html.Li('List item 1'),
html.Li('List item 2'),
html.Li('List item 3')
])
2.7 html.Ol
html.OlUsed to create an ordered list (<ol>element).
Example
html.Li('First item'),
html.Li('Second item'),
html.Li('Third item')
])
2.8 html.Br
html.BrUsed to insert a line break (<br>element).
Example
html.Br(),
html.P(This is the second line.)
2.9 html.Hr
html.HrUsed to insert a horizontal line (<hr>element).
Example
html.Hr(),
html.P('This is the content below.')
2.10 html.Span
html.SpanUsed to create an inline container (<span>element), typically used to style a portion of text.
Example
html.Span('highlight', style={'color': 'red'}),
' paragraph.')
3. Using styles
Dash's HTML components support throughstyleattribute to set CSS styles.styleattribute accepts a dictionary, where the keys are CSS properties and the values are the corresponding CSS values.
Example
children=This is a styled Div,
style={
'color': 'white',
'backgroundColor': 'blue',
'padding': '10px',
'borderRadius': '5px'
}
)
This code uses Dash's html.Div component to create a styled div element, resulting in a div with a blue background, white text, rounded corners, and padding.
html.Div: create a<div>Container.children: Settingsdivthe content is"这是一个带样式的 Div"。style: Set via CSS stylesdivthe appearance:color: white: Text color is white.backgroundColor: blue: Background color is blue.padding: 10px: Padding is 10 pixels.borderRadius: 5px: Border radius is 5 pixels.
Example
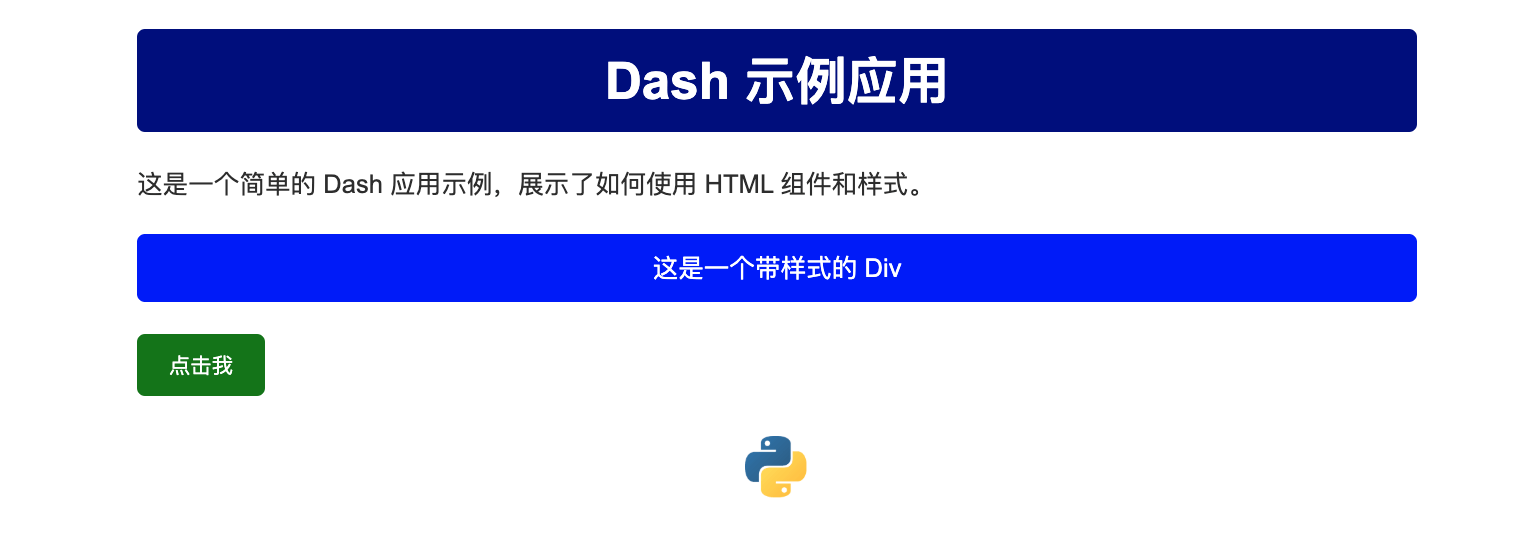
The following is a complete Dash application example that demonstrates how to use html.Div and other HTML components, and set styles through the style attribute.
Example
# Create Dash App
app = Dash(__name__)
# Define the application layout
app.layout = html.Div(
style={
'fontFamily': 'Arial, sans-serif', # Set global font
'padding': '20px', # Set global padding
'maxWidth': '800px', # Set maximum width
'margin': '0 auto' # Center Display
},
children=[
# Heading
html.H1(
"Dash Example Application",
style={
'color': 'white',
'backgroundColor': 'darkblue',
'padding': '10px',
'borderRadius': '5px',
'textAlign': 'center' # Center Text
}
),
# Paragraph
html.P(
This is a simple Dash application example that demonstrates how to use HTML components and styles.,
style={
'fontSize': '16px',
'color': '#333',
'marginTop': '20px'
}
),
# Styled Div
html.Div(
children=This is a styled Div,
style={
'color': 'white',
'backgroundColor': 'blue',
'padding': '10px',
'borderRadius': '5px',
'marginTop': '20px',
'textAlign': 'center'
}
),
# Button
html.Button(
"Click me",
style={
'backgroundColor': 'green',
'color': 'white',
'border': 'none',
'padding': '10px 20px',
'borderRadius': '5px',
'cursor': 'pointer',
'marginTop': '20px'
}
),
# Image
html.Img(
src="https://dash.plotly.com/assets/images/language_icons/python_50px.svg",
style={
'height': '50px',
'marginTop': '20px',
'display': 'block', # Center Image
'marginLeft': 'auto',
'marginRight': 'auto'
}
)
]
)
# Run the app
if __name__ == '__main__':
app.run_server(debug=True)
The effect is as follows: