GitCode Usage Tutorial
This course will introduce how to practice Git commands on GitCode.
Step 1: Register and Set Up SSH Keys
Before using GitCode for code management, you need to complete some basic setup. Here are the detailed steps:
1. Visit GitCode and register an account
- First, open your browser and visitGitCodewebsite.
- Click"Register"Button, and fill in the necessary information as prompted, such as username, password, phone number, etc.
2. Generate an SSH key pair
If you don't have an SSH key pair yet, you need to generate one.
An SSH key pair consists of a public key and a private key. The public key can be shared publicly, while the private key must be kept confidential.
In the terminal, you can use the following command to generate an SSH key pair:
ssh-keygen -t rsa -b 4096 -C "your_email@example.com"
hereyour_email@example.comReplace it with your email address; this helps identify the purpose of the key pair.
3. Add the public key to your GitCode account
- After generating the key pair, you will find two files in the ~/.ssh directory: id_rsa (private key) and id_rsa.pub (public key).
- You need to add the content of the public key to your GitCode account. Open the id_rsa.pub file and copy its contents.
- Log in to your GitCode account and go to"Personal Settings"On the page, find the "SSH Public Key" section.
- Click the "Add SSH Public Key" button, paste the copied public key content into the corresponding text box, fill in a description (such as "Personal Laptop" or "Work Computer"), and then click "Save".
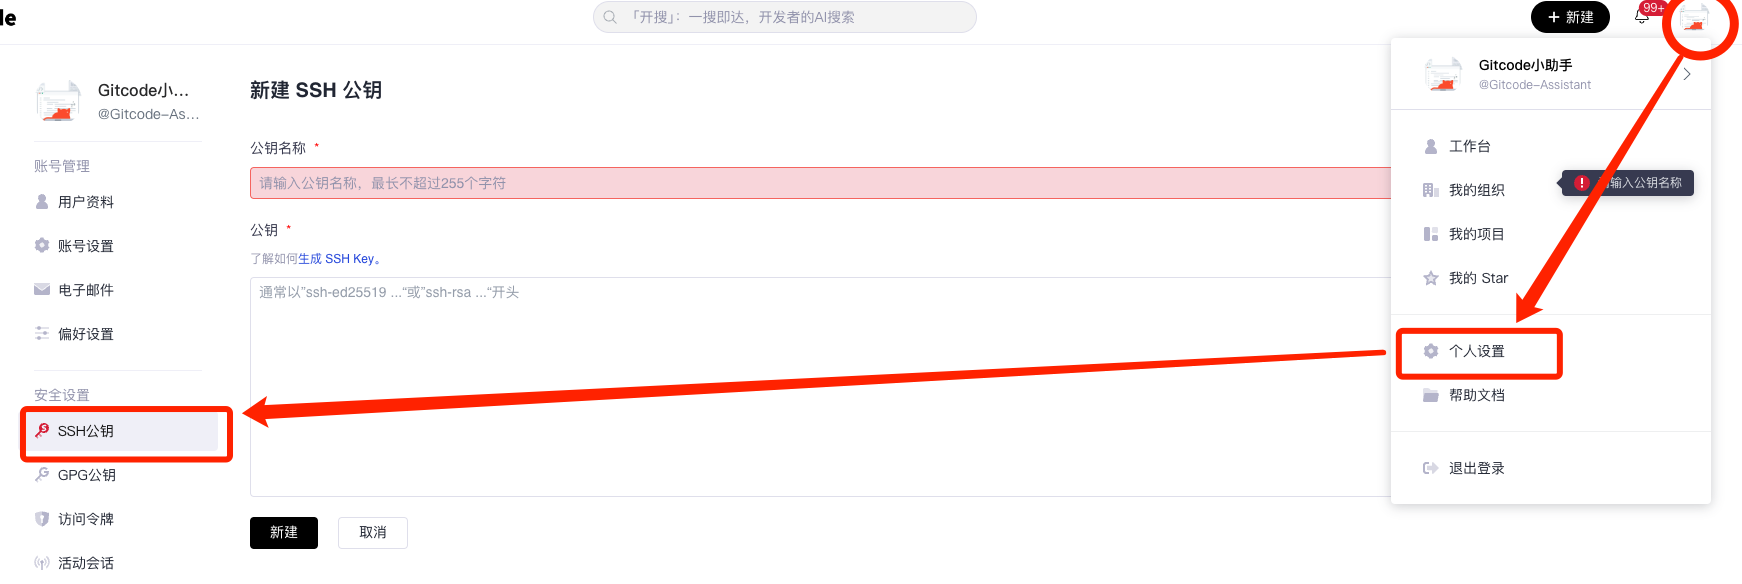
4. Verify whether the SSH key was set up successfully
After adding the SSH key, to ensure everything is set up correctly, you can run the following command in your terminal:
ssh -T git@gitcode.com
This command will attempt to connect to GitCode's SSH server and return some information. If you see a message like "Welcome to GitCode", it means the SSH key was set up successfully.
If you encounter any issues, such as "Permission denied (publickey)", you may need to check whether your SSH key was correctly added to your GitCode account, or regenerate and add a new SSH key.
Through the steps above, you can ensure that your GitCode account is securely connected to your local development environment via SSH keys, allowing you to safely commit and pull code. This not only improves security but also makes operations more convenient.
Step 2: Create a New Repository
After successfully registering and setting up your SSH keys, you can start creating a new project to host your code.
The detailed steps are as follows:
1. Log in to your GitCode account
- Open your browser and visitGitCode。
- Enter your username and password to log in to your GitCode account.
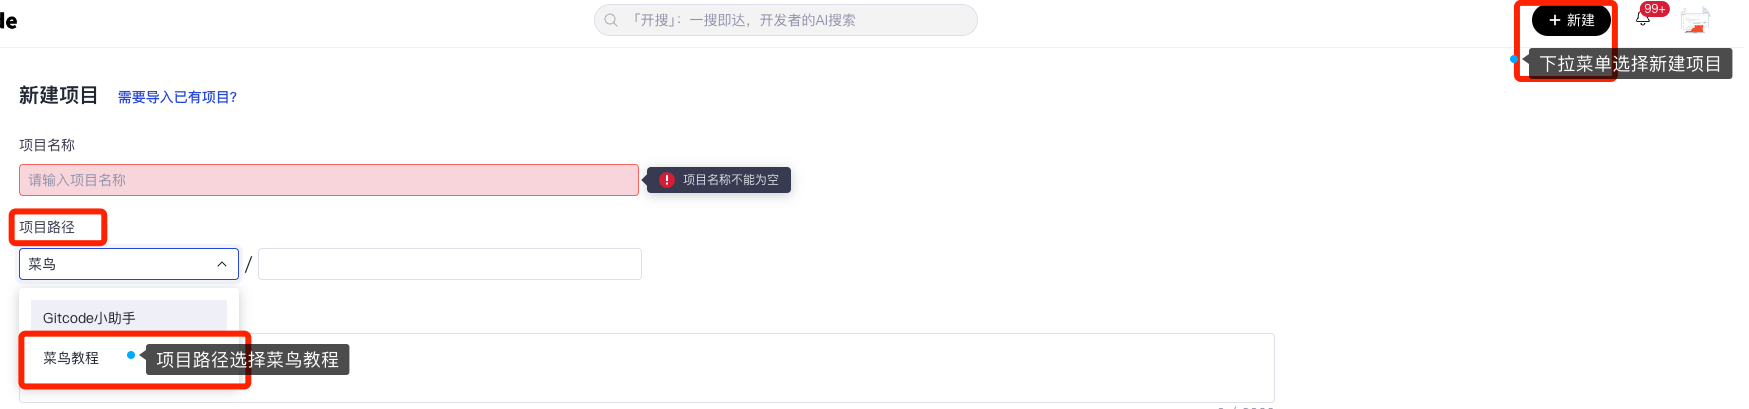
2. Select "New Project"
In the dropdown menu,Find and click the 'New Project' optionThis will guide you to the interface for creating a new project.
3. In the project path, choose the "Example Tutorial" organization
- When creating a new project, you need to select a project path. It is recommended that everyone create test projects under the "Example Tutorial" organization.
- Select"Example"Organization, so that the test projects you create will all belong to this organization.
4. Fill in the repository information
On the project creation interface, you need to fill in some basic information:
- Project name: Enter a concise and descriptive name, such as "My Project" or "Test Repository".
- Project path: The project path is the address of the project after it is created. Note that this address is unique for each project and cannot be duplicated.
- Repository description: Briefly describe the purpose or content of this repository, which helps others understand the purpose of the repository.
- Public or private: Choose the visibility of the repository. Public repositories can be accessed by anyone, while private repositories can only be accessed by authorized users.
After filling in all the necessary information, click the "Create Project" button at the bottom of the page.
The system will process your request and create a new repository for you within a few seconds.
5. Verify the repository was created successfully
- Navigate to the 'Projects' page under the Example organization, you will see your newly created repository.
- Click the repository name to enter the repository's homepage. Here, you can view the repository's files, commit history, issues, pull requests, etc.
- Click the "Clone" button on the right side of the project navigation bar. You will see the command prompt for cloning the project (since everyone has already set up an SSH key, it is recommended that everyone clone using SSH).
6. Initialize the local repository
- On your local computer, open a terminal or command prompt.
- Use the following command to clone your new repository locally:
git clone git@gitcode.com:test121/your-demo-repo.git
heregit@gitcode.com:test121/your-demo-repo.gitis the SSH address of your newly created repository; make sure to replace it with your actual repository address.
Through the steps above, you have not only successfully created a new repository, but you can also start writing and committing code in your local development environment. This lays a solid foundation for subsequent code management, version control, and collaborative development.
Step 3: Push and Pull Code
After creating a new project and initializing the local repository, you next need to learn how to push local code changes to GitCode, and how to pull the latest code from GitCode. The detailed steps and some related operations are as follows.
Push code to GitCode
1. Make code changes locally
- Open your code editor or IDE and start writing or modifying code.
- Save your changes.
2. Add the changes to Git
Open your terminal or command prompt and switch to your repository directory.
Use the following command to add the changed files to Git's staging area:
git add .
Here.This adds all changed files in the current directory. You can also specify a specific file name, such as:
git add filename.txt
3. Commit changes
Use the git commit command to commit your changes and add a descriptive commit message:
git commit -m "添加了新功能"
The commit message should be concise and clear, describing the changes you made.
4. Push changes to GitCode
Use the git push command to push your changes to GitCode:
git push origin main
Here, origin is the name of the remote repository, defaulting to origin, and main is the name of the branch you are pushing. If you are using another branch, such as develop or feature-branch, you need to replace it accordingly.
5. Handle push conflicts
If you encounter conflicts while pushing, you may need to first pull the latest code and resolve the conflicts:
git pull --rebase origin main
This will reapply the changes from the remote branch to your local branch, and you may need to manually resolve some conflicts.
Open立i.e.body验。
Pull code from GitCode
1. Pull the latest code
In your terminal or command prompt, switch to your repository directory.
Use the git pull command to pull the latest code from GitCode:
git pull origin main
This will merge the latest changes from the remote repository into your local repository.
2. Handle merge conflicts
If you encounter merge conflicts during the pull, Git will prompt you to resolve these conflicts.
Open the conflicted file, locate the conflict sections marked by Git, and decide which changes to keep and which to remove.
Save the file and close the editor.
3. Re-commit the changes
After resolving the conflicts, you need to re-commit these changes:
git add .
git commit -m "解决合并冲突"
4. Push the changes again
Push the conflict-resolved changes to GitCode:
git push origin main
5. Keep your code in sync
Regularly use the git pull command to keep your local repository in sync with the remote repository, avoiding too many conflicts when pushing.
Through these steps, you can effectively manage your code changes and ensure your repository always stays up to date. This is not only helpful for individual development, but also a very important part of team collaboration.
Open立i.e.body验。
Step 4: Explore Advanced Features
GitCode is not just a code hosting platform; it is also a community that promotes knowledge sharing, technical exchange, and collaborative development. We hope GitCode becomes an efficient, convenient, and friendly code home for domestic developers.
Publish and share code
Create a new code repository on the website, commit your code to that repository, and share the link so others can access your code.
Participate in discussions and exchanges
Provide feedback on code issues or ideas, and learn about the latest activities and content recommendations from open source organizations.
cooperatedoeditCourse
Participate in others' projects, solve problems together or develop new features, and submit your changes and suggestions to the project via Pull Request.
Read and learn from others' code
Use search to find projects or repositories you are interested in, and view the project's source code, documentation, and contributor information.
For more detailed introductions to features, feel free to check:https://docs.gitcode.com/docs/。
other extensions